EPiServer Commerce Product Link Plug-in - Installation and User Guide
|
Product version: |
EPiServer Commerce 1.0 and 1.0 SP1 |
|---|---|
|
Document last saved: |
30-03-2010 |
Introduction
This document describes how to install and use the EPiServer Commerce Product Link Plug-in, one of several plug-ins available for EPiServer Commerce. This plug-in makes it possible for editors to link to and display information for selected products in the product catalog in Commerce Manager.
Table of Contents
- Installing the Product Link Plug-in
- Build the Product Link Plug-in Project
- Copy the Files to the Editor Plug-ins folder in Program Files
- Deploying the Files to Your Site
- Adding the Product Link Button to the Editor Toolbar - Using the Product Link Plug-in eith the Editor
- Adding a Product Link to Text, Files or Images in the Editor
- Editing A Product Link
- Removing a Product Link - Integrating Multiple Plug-ins for EPiServer Commerce
Installing the Product Link Plug-in
Perform the steps below to install the Product Link plug-in for the EPiServer CMS 6 Editor (TinyMCE).
Build the Product Link Plug-in Project
- Download and open the "EPiServer.Business.Commerce.Plugins.csproj" using Visual Studio 2008 and build it.
- Copy the "EPiServer.Business.Commerce. Plugins.dll" file in the project bin folder to the bin folder of your site.
Copy the Files to the Editor Plug-ins Folder in Program Files
- Create a folder named "productlink" in the following editor plug-ins folder on your server:
"C:\Program Files (x86)\EPiServer\CMS\6.0.530.0\Application\Util\Editor\tinymce\plugins\"
- Copy the following files and folders in the ProductPicker\ProductLink\ folder to the "productlink" folder created above:
|
Name |
Note |
|
Images |
Copy folder and its content |
|
editor_plugin.js |
Copy file |
|
editor_plugin_src.js |
Copy file |
Deploying the Files to Your Site
- Copy the”ProductPicker” folder and its content to the root folder of your site (except the *.cs and *.js files).
- Copy the” ClientResources” folder and its content to the root folder of your site.
- Copy the "EPiServer.Business.Commerce.ProductPicker_EN.xml" file in the lang folder of the project to your site's lang folder.
Adding the Product Link Button to the Editor Toolbar
This is done in Admin mode of EPiServer CMS, and can be done globally or locally for every XHTML property as desired.
- To add it globally select “Edit Custom Property Types” and select the XHTML string. Create a new setting and drag the Product Link button to the toolbar and save and click “Use as default”.
- To add the button to a single editor, select the property from the page type. Go to the Custom Settings tab and drag the Product Link button into place and save.
Using the Product Link Plug-in with the Editor
This plug-in creates a tool button in the toolbar in the EPiServer CMS 6 (TinyMCE) Editor. This makes it possible for editors to link to selected products from the product catalog in Commerce Manager. When the link is clicked on, the visitor will be transferred to the product page "view mode" for that product.
Adding a Product Link to Text, Files or Images in the Editor
In Edit mode, select the text, files or images where you want to add a link to a product page in EPiServer Commerce.
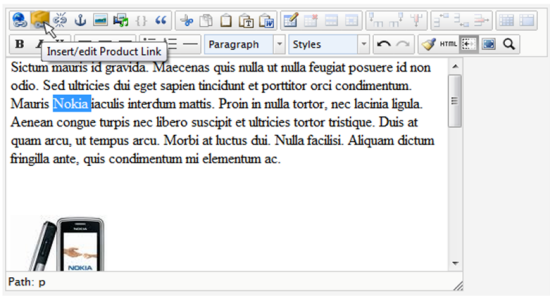
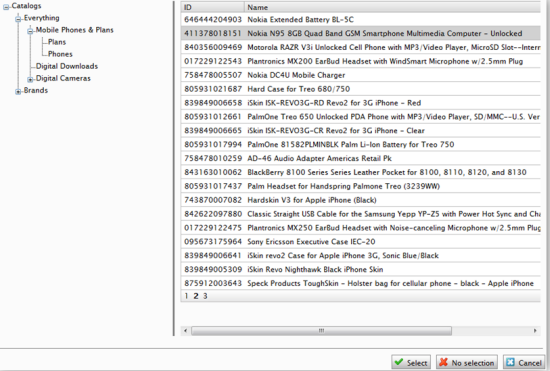
Select the Insert/edit Product Link tool in the toolbar of the Editor. You will then be able to access products in the product catalog of Commerce Manager. Select a product in the list and click Select.
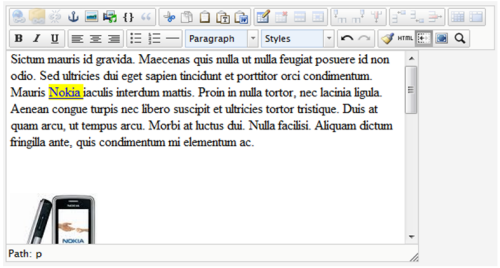
Enter the details for the link such as title and target fram, just as you would for any link in EPiServer CMS. Refer to the EPiServer CMS user documentation for detailed expalanation of the fields. Click OK.

The product link will be displayed in the Editor.
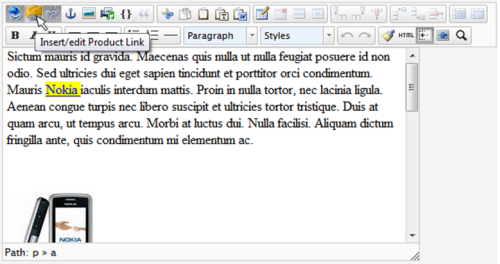
Editing a Product Link
Select the link or place the cursor in the link. Select the Insert/edit Product Link tool in the toolbar. This will open the product listing from Commerce Manager to change product.
Removing a Product Link
Select the link or place the cursor in the link. Select the Insert/edit Product Link tool in the toolbar. Select Delete to delete the link to the product.
Integrating Multiple Plug-ins for EPiServer Commerce
If you are integrating several plug-ins for EPiServer Commerce, it is necessary to merge your projects into one. This is described further in the tech note EPiServer Commerce - Integrating Multiple Plug-ins.