Don't miss out Virtual Happy Hour today (April 26).
Try our conversational search powered by Generative AI!
AI OnAI Off
Don't miss out Virtual Happy Hour today (April 26).
|
Product version: |
EPiServer CMS 4.62 |
|
Document version: |
1.0 |
|
Document creation date: |
05-06-2006 |
|
Document last saved: |
04-10-2007 |
A major part in the creation of an EPiServer CMS Web site consists of defining the graphical layout of the site and creating templates for the presentation of various types of content.
This document describes the workings and structure of the EPiServer CMS Content Framework, as well as briefly explaining some relevant ASP.NET terminology used throughout the rest of the document.
What is the EPiServer CMS Content Framework?
Content Framework Components
- Framework Definition File
- Page Template Files
- Web User Controls
Retrieving Page Properties
IntelliSenseFrom Concept to Completed Site
The majority of the pages on a Web site usually share a common design to facilitate navigation and provide a uniform user experience. Building a Web site using the Content Framework allows you to define the overall design in a single place, the framework definition file, which is the basis for the continued development of the Web site. You also specify which parts of the design have content that may need to vary in different types of pages on the site – customized in detail through the use of a number of page template files.
To make full use of the flexibility offered by ASP.NET and the EPiServer CMS Content Framework, the templates should make use of smaller, reusable Web user controls that can encapsulate individual parts of the user interface (both appearance and behavior).
The image below illustrates the relationships between the building blocks of a site designed according to these principles.
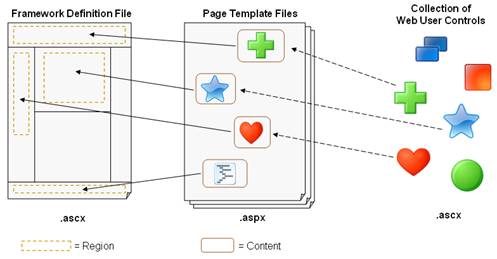
The framework definition file is mainly pure HTML and standard server controls that describe aspects like the background colors and icons or other images of the site. Apart from such static parts, the framework definition will contain a number of regions that will allow their content to be varied. Each page template can insert content into one or more of these regions in order to render the page accurately. Content can be defined either through regular HTML or the use of Web user controls – in the image above illustrated by colored symbols inserted into the template pages.
The image below outlines the site structure of the EPiServer CMS sample site.

As EPiServer CMS is based on the Microsoft .NET technology, familiarity with the concepts of Web development using ASP.NET is essential for creating solutions based on EPiServer CMS. In order to make this document readable by a larger audience, some key terms and their uses in the Content Framework model are described briefly here.
ASP.NET Web forms (with the file extension .aspx) can contain ordinary HTML markup as well as predefined server-side controls and script code. .NET Web development allows each page to be split into one design or presentation file and one file containing code written in one of the .NET languages, C# in the case of EPiServer CMS, known as the code-behind file. If your ASP.NET page is yourFileName.aspx and your chosen language is C#, the code-behind file will (by default) be yourFileName.aspx.cs.
Web user controls are contained in .ascx files (accompanied by a code-behind file) that are in many ways similar to .aspx files. A simplified view of a Web user control is to think of it as a reusable part that can be placed in multiple pages. These controls can be able to take parameters as input when instantiated from a page, in order to make them more flexible.
In the example below, a fictitious control called NewsMenu is invoked. The id attribute is optional, but needed if you want to access the control programmatically (for instance from the code-behind file). The runat="server" attribute is always needed for server-side controls, including the ones you define yourself. Finally, the PageLinkProperty attribute is available because your NewsMenu control has defined a publicly accessible property by that name. What the property is used for is up to the implementation of the control.
<site:NewsMenu id="newsMenu" runat="server" PageLinkProperty="ListingContainer"/>
In order to use Web user controls on a page, you need to register them first – this is also where the prefix (site in the example above) is set. Adding the following code to the top of your page’s .aspx file would register your NewsMenu Web user control for use in that page, provided the definition of the control is in the MyNewsMenu.ascx file (placed in a templates/units directory for this example):
<%@ Register TagPrefix="site" TagName="NewsMenu" Src="~/templates/units/MyNewsMenu.ascx"%>
ASP.NET code is compiled, which not only results in a major performance gain, but also requires code-behind pages to be compiled before any changes made to them are noticed in the pages. If you at some point do not have access to Visual Studio .NET, you can use the command-line tools csc to compile your C# files.
To bypass the need to compile the code manually, there is the option to include server-side script code directly in the .aspx file (as shown below) – letting the .NET runtime compile the code when it is called the first time.
<script language="C#" runat="server">
private string MyMethod()
{
return "Hello World!";
}
</script>
In general, developing solutions in Microsoft Visual Studio .NET will give a lot of assistance when it comes to creating the right files, providing help and class information as well as compiling and debugging a .NET project.
Postbacks and data binding are issues that are relevant to any Web development using ASP.NET and Web forms, but covering them in depth goes beyond the scope of this paper.
Postback is the mechanism that passes information in a form back to the same page via a roundtrip to the server, allowing for a more “application-like” experience for Web pages, by allowing them to retain their state. This preservation of state is achievable by maintaining the page properties in the ASP.NET view state, which is automatically saved as a hidden part of the page enabling the correct values and context to be rendered even after a roundtrip to the server. View state content is programmatically accessible through the ViewState property of a page or control.
Data binding is needed when parts of a page (typically server controls) depend on some data source to retrieve their content. A rule of thumb when developing according to the Content Framework is that data binding on the page level should be performed when a page template is loaded, unless it has just performed a postback. The following code, placed in the page’s Page_Load method, accomplishes this:
if(!IsPostBack)
DataBind();
Data binding expressions (using the <%#expression%> syntax) should only be used to assign values to control properties stored in view state. Controls whose properties are changed during a postback need to be data bound explicitly, since the entire page should only be data bound the first time it is loaded – not on postbacks. This could be performed in the event handler responding to the event that caused the postback, as in the following example:
public void ExpandClick(object sender, CommandEventArgs e)
{
myPageDataTree.Expand(EPiServer.Core.PageReference.Parse(e.CommandArgument as string));
myPageDataTree.DataBind();
}
In general, your controls should be designed in such a way that they can handle postbacks gracefully, for instance by making sure all publicly accessible properties are stored in view state. More details on state management in .NET using these concepts is available in the Microsoft documentation for the framework.
Working with the Content Framework you will create at least one framework definition file, several page template files and probably any number of Web user controls. These building blocks are described in more detail in the following chapters.
The framework definition file(s) will be the core of your site development. Large parts of the HTML markup that is ultimately sent to users browsing the completed site can be defined and maintained at this single point, along with standard and customized server-side controls.
Looking more closely, the framework definition is really just a Web user control inheriting from the EPiServer CMS Content Framework core EPiServer.WebControls.ContentFramework. Doing so will provide some wiring behind the scenes that is needed to make the model work.
Interspersed with the HTML code for the skeleton layout of your site are the regions that the page templates will later make use of to insert their content. All page templates created for EPiServer CMS require the context of a form in order to function (based on features in ASP.NET). This makes the framework definition file an ideal candidate to hold the <form> tag for the solution. A simplified portion of your framework definition file (myFramework.ascx) could look something like this:
<%@ Register TagPrefix="EPiServer" Namespace="EPiServer.WebControls" Assembly="EPiServer" %> …
<form id="myGlobalForm" runat="server">
…
<div>
<div>
<div>
<episerver:region id="leftRegion" runat="server">
<img src="/images/myLogo.gif">
</episerver:region>
</div>
<div>
<a href="http://www.episerver.com">EPiServer</a>
</div>
</div>
<episerver:region id="tableRowRegion" runat="server">
<div>
<div>
<img src="/images/biggerLogo.gif">
</div>
</div>
</episerver:region>
…
</form>
…
The code above results in the following:
Note that for simplicity, this example does not contain any server-side controls apart from the regions. However, both the image tags and the link above could easily be replaced by controls without changing any of the behavior or meaning of the region concept discussed here. Regions are not themselves rendered – only the content of a region is. That allows regions to be placed at each place in the framework definition where you anticipate a need for flexibility in content based on the type of a page. EPiServer CMS offers many ways to handle dynamic content in varying degrees, but this paper focuses on the Content Framework features.
To provide an even greater flexibility for designing page templates, the framework definition can contain nested regions – that is, one or more regions defined within another region. That gives each page template the option to either leave both regions untouched, override the inner region, but leave the rest of the contents of the outer region unchanged, or override the outer region and thus also effectively removing the inner one from the page template.
If so desired, more than one framework definition can be created for use within the same Web site. One reason for doing so would be that parts of the site differ enough in design to warrant separate files. That would mean that some page templates would be using the secondary framework and thus providing a different layout.
Once your framework definition has taken shape it is time to create template files for the different page types you can identify within the site. Pages with similar appearances may very well use the same page template, even though they logically may be separate types of pages. Developers have a lot of leeway in deciding to what extent the templates should be adaptable to different needs. Two page types that are almost identical, but differ on a few points can either be handled by completely separate templates or by a common template that can adjust to the slight differences and render both types appropriately. Extensive use of Web user controls can usually alleviate any potential problems of having duplicate code in several templates (which may be a problem when the design is upgraded).
The basic idea in each page template is that you define which regions in your framework should be replaced/overridden with content specific to the particular page type(s) that will be using the template. Whether this content is all or in part produced by placing HTML code directly in the page template or extracted into reusable Web user controls is a design choice left to the site developer.
Linking the page-specific content to a particular region of the framework is performed by using the EPiServer CMS Content control, providing the name of the desired region to replace in the region attribute.
The following example illustrates a page template providing new content for two regions defined in the framework. Note that the framework definition needs to be registered like any other Web user control.
<%@ Page language="c#" Codebehind="Page.aspx.cs" Inherits="development.StandardPage" %>
<%@ Register TagPrefix="EPiServer" Namespace="EPiServer.WebControls" Assembly="EPiServer" %>
<%@ Register TagPrefix="site" TagName="myFramework"
Src="~/templates/frameworks/myFramework.ascx" %>
<site:myFramework runat="server">
<episerver:content region="leftRegion" runat="server">
<b>Page name:</b> <episerver:property PropertyName="PageName" runat="server"/>
</episerver:content>
<episerver:content region="tableRowRegion" runat="server"></episerver:content>
</site:myFramework>
This template will cause the page name to be rendered in the region leftRegion—through the use of the very useful EPiServer CMS Property control, discussed in more detail below—as well as suppressing any content defined in the framework definition for the tableRowRegion region.
The concept of Web user controls is described briefly in the ASP.NET Terminology chapter. For a more in-depth description, refer to Microsoft documentation regarding Web development using .NET.
From an EPiServer CMS Content Framework perspective you would typically create Web user controls to get a reusable piece of your site, from the simplest containing only HTML layout to more complex components, such as a calendar control that retrieves and displays data and handles interactions with the user.
As stated earlier, a Web user control can also be created to handle input parameters that can vary the behavior or rendering of the control and its contents. For many controls that output HTML it is desirable to be able to change the style used to render the HTML This can be easily achieved by providing a CssClass attribute that is publicly available.
Below is the .ascx file of a simple HTML-only control that would likely be inserted in the <head> section of any pages that would like to use it, to get the right styles and scripts. Small changes to this Header.ascx file and the code-behind file would allow the title of the page to be able to be set by the caller of the control.
<%@ Control Language="c#" Codebehind="Header.ascx.cs" Inherits="site.Header"
TargetSchema="http://schemas.microsoft.com/intellisense/ie5" %>
<title>My Demo Site</title>
<link rel="stylesheet" type="text/css" href="/styles/myStyles.css">
<script language="JavaScript" src="/javascript/myScript.js"></script>
In the examples in this paper, much of the page content (images, links, etc.) has been entered into the framework definitions, page templates and Web user controls through HTML. Even though this is a perfectly valid option for static content, the majority of content on most sites needs to be editable by users.
Each page type defined in Admin mode has a number of properties that carry information about each instance (page) created of that page type. Such properties can range from the name of the author of the page to complex HTML blocks representing the main content of a page. A very useful tool for rendering the values of different properties is the EPiServer CMS Property control. It was used in an earlier example to display the name of a page through the following code:
<episerver:property PropertyName="PageName" runat="server"/>
The value of the PropertyName attribute can be the name of any property for the page type, as defined in Admin mode.
Another way to access properties on the current page is to get them directly from the page instance. Within any .aspx file you have access to the ASP.NET concept of a Page, which in your EPiServer CMS development will always be of the type EPiServer.PageBase (or a type inheriting from it). For more details on the classes and namespaces provided by EPiServer along with some examples on how to use them, please refer to the EPiServer CMS SDK documentation. The following line of code in your template .aspx file will render the page name similar to the previous example:
<%=(Page).CurrentPage.PageName%>
NOTE: Not all properties are available through the CurrentPage.PropertyName syntax, which is more of a convenience for the base built-in defined properties. The more general CurrentPage["PropertyName"] syntax will retrieve any property – built-in or user defined.
For situations where you need to calculate or modify the output (whether based on page properties or not) before rendering it, an option is to make calls into methods defined in the code-behind file from your .aspx or .ascx file. Provided you implement a DisplayDate() method in your code-behind (returning a formatted date string based on some business logic), you can call the method from your .aspx file using something like the following:
…
<b>The date is:</b> <%=DisplayDate()%>
…
In order to enable the IntelliSense feature of Visual Studio .NET for the EPiServer CMS-specific controls, you need to perform two steps:
<span Xmlns:EPiServer="http://schemas.episerver.com/WebControls />
The required file as well as further instructions is located in the EPiServer CMS SDK, available for download from www.episerver.com.
Start by creating the first version of the site’s framework definition file (or the primary definition, if you anticipate portions of the site will require a separate design). If you have access to an HTML design, regardless of whether it is from a current static version of the site or from an HTML prototype (so-called “mock-up”), that will provide a very good basis for your framework definition work. For the rest of this discussion, assume you have a mock-up of the desired site.
Paste the HTML in its entirety into your newly created framework definition .ascx file and make sure you change the code-behind to inherit from EPiServer.WebControls.ContentFramework. Identify the portions of the markup where typical content is located and place region tags around each such block of text or images. Name each region, preferably as descriptively as possible based on the typical role or type of content intended for the region. Now you have a framework definition file that can provide the exact same output as your original mock-up, but with regions that can be altered by the page templates you will be creating next.
Creating the required page templates starts with identifying the different types of pages the site will support. The pages that require a separate “type” in this context are based primarily on output and layout. If a news post is rendered in the same basic way as a notice on the Web site’s bulletin board, they could both use the same template. Not all differences in layout warrant a separate template – page types in EPiServer CMS can use properties and other means to provide page type specific information that the page template can interpret to render the page appropriately.
Start by creating the most regular page type, usually supporting pages that contain text and possibly images provided by the page authors. This template’s .aspx file should contain any formatting and layout that will be common to all pages created of this type. Including it in the template page lets future authors focus on content, not layout. All this code should be enclosed in a block indicating what region of the framework to render it in (as shown in an earlier example).
By linking one or more page types in Admin mode to your new template (by specifying your .aspx as the template page for the page type), you are set to go. As you work your way through the Web site, you may want to split recurring parts of layout or logic into self-contained Web user controls, as described above. Doing so minimizes the amount of HTML in the page template files and lets you keep the definitions of common building blocks in a single place for easy maintenance.