Don't miss out Virtual Happy Hour this Friday (April 26).
Try our conversational search powered by Generative AI!
AI OnAI Off
Don't miss out Virtual Happy Hour this Friday (April 26).
The Add-ons Store lets site administrators view and install add-ons to EPiServer websites. You can install and manage the add-ons from Visual Studio but let site administrators have read-only view to add-ons, see Installing Add-ons for details. EPiServer and third-parties can develop add-on modules.
An add-on extends the functionality of the EPiServer website, such as initializable modules, gadgets, visitor group criteria, virtual path providers, page and search providers.
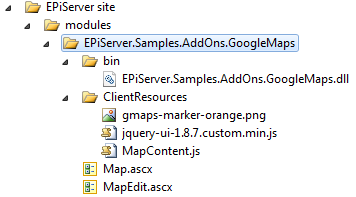
An add-on is packaged as a NuGet package and follows a defined set of guidelines. The module system (or Shell modules) defines the folder structure and configuration system used by add-ons, and is a built-in module system to extend the user interface but you can use it to build any module.
Add-on assemblies are loaded and processed during site start-up, so an add-on can contain components like InitializableModule and plug-ins that require assembly scanning. Consider the following guidelines when you develop add-ons.
User control example:
<%@ Control Language="C#" AutoEventWireup="false" CodeBehind="Map.ascx.cs" Inherits="EPiServer.Research.DynamicContent.Map, GoogleMapsDynamicContent" %>Strongly typed MVC view example:
<%@ Control Language="C#" Inherits="System.Web.Mvc.ViewUserControl<ColoredModel>" %>
<%@ Assembly Name="EPiServer.Samples.Module" %>
<%@ Import Namespace="EPiServer.Samples.Module.Models" %>Resolving a path to an add-on resource by type
// MapDynamicContent is type from add-on assembly:
string pathToControl = Paths.ToResource(typeof(MapDynamicContent), "Map.ascx");
// load control using resolved path:
page.LoadControl(pathToControl);
Resolving a path to a client resource
string pathToAddonScript = Paths.ToClientResource(typeof(MapDynamicContent), "ClientResources/MapContent.js");// register client script using resolved path:
Page.ClientScript.RegisterClientScriptInclude("MapContent.js", pathToAddonScript);You should define paths to plug-in resources as follows:
[GuiPlugIn(UrlFromModuleFolder="Control.ascx")]
[DynamicContentPlugIn(ViewUrlFromModuleFolder ="View.ascx")]
[RenderDescriptor(Path = "Blocks/SampleBlockControl.ascx")]The resolved virtual path to the block template in a public add-on is ~/modules/<package ID>/Blocks/SampleBlockControl.ascx.
The directory structure where template files reside, must follow the namespace convention if the Path property of RenderDescriptorAttribute of a page or a block template is not set.
An EPiServer add-on is delivered as a NuGet package, containing all add-on resources and assemblies. Create a package from an assembly, a project or a convention-based working directory. See the tools and documentation available from Nuget to create a NuGet package.
Run the following command to create a NuGet manifest (nuspec) file for your add-on package:
nuget specEdit the nuspec file and specify the information for your add-on package. If you are going to create your package from a project, use replacement tokens for the add-on package ID, version, author, and description. The following nuspec file example is for the Google Maps add-on:
XML
<?xml version="1.0"?>
<package xmlns="http://schemas.microsoft.com/packaging/2010/07/nuspec.xsd">
    <metadata>
    <id>$id$</id>
    <version>$version$</version>
    <title>Google Maps dynamic content</title>
    <authors>$author$</authors>
    <owners />
    <iconUrl>http://world.episerver.com/PageFiles/3/Icons/Nuget.png</iconUrl>
    <requireLicenseAcceptance>false</requireLicenseAcceptance>
    <description>Allows to add Google Maps as dynamic content on pages.</description>
    <tags>EPiServerPublicModulePackage Google Maps Dynamic</tags>
    <dependencies>
        <dependency id="EPiServer.Samples.SampleFoundation" version="1.2" />
        <dependency id="EPiServer.CMS.UI" version="7.5" />
    </dependencies>
    </metadata>
</package>
Public and protected add-ons differ in user access rights required to access the add-on files and routes.
Public and protected add-ons have the following file locations and virtual paths:
If your add-on requires other add-ons to be installed on the site, add these to the list of dependencies in the nuspec file. This ensures that if these other add-ons are not already installed when a user chooses to install yours, the other add-ons are also installed, if possible. If the other add-ons cannot install to the environment, the installation aborts.
Add-on packages must follow the Semantic Versioning (SemVer) scheme for versioning for the package itself to have a common understanding of which versions are compatible and which versions introduce breaking changes.
SemVer means having version numbers in the format Major.Minor.Patch, where the different segments correspond to:
For example, if you require the feature set from version 1.3 of a dependency, set [1.3,2) as the version range, which accepts versions that are known to be compatible. When version 2.0 is released, it may or may not turn out to be compatible. If it is compatible, the version range can be changed to [1.3,3) in the next update. Otherwise the version range, after your code base is changed to run with version 2.0 of this dependency, is changed to something like [2.0,3). See NuGet Docs for version ranges in NuGet.
Prerequisites are dependencies to installed products that are not installed as actual add-on packages. Dependencies ensure compatibility by requiring that specific products are installed for the package. Assemblies installed in the application and system packages (e.g. EPiServer.CMS.Core and EPiServer.CMS.UI) are represented in the NuGet environment as virtual packages to which you can add dependencies. The names and version numbers of these packages are based on the assembly names and assembly versions. Dependencies must be actual NuGet packages for Visual Studio-enabled add-ons.
The package directory structure should follow the conventions in NuGet Docs. If you are going to create the package from a Visual Studio project, run the following command:
nuget pack AddOnProject.csprojAlternatively, if you have prepared a NuGet manifest (nuspec) file and a convention-based directory structure for the actual package content, you can create the package with the following command:
nuget.exe pack addondirectory\addon.nuspecUse the NuGet Package Explorer GUI tool to view metadata and create new packages.
The following example shows the Google Maps add-on package opened in NuGet Package Explorer.

Dependencies should be attached to ordinary NuGet packages rather than just references to assemblies. In most scenarios, the primary assembly of the NuGet package matches the ID of the package.
Content files must have a path in the nuspec as they appear on site. This implies that paths for content files should include \modules\<packageid> for public add-ons, for example:
<file src="Settings.aspx" target="Content\modules\<packageId>\Settings.aspx" />...and modules\_protected\<packageid> for protected add-ons, for example:
<file src="Views\Setting\Index.aspx" target="Content\modules\_protected\<packageId>\Views\Setting\Index.aspx" />The NuGet package should contain a module.config file in the package root (e.g. <file src="module.config" target="Content\modules\<packageId>\module.config" />). The module.config must contain a tags attribute that contains either EPiServerModulePackage or EPiServerPublicModulePackage. This is required for the EPiServer add-on UI to distinguish the add-on from other shell modules. The module.config also can contain a description attribute that describes the module in the add-on UI. It also should list assemblies the package contains. The following code sample shows a minimal module.config.
<?xml version="1.0" encoding="utf-8"?>
<module loadFromBin="false" description="Allows to run various support tools on the site." tags=" EPiServerModulePackage ">
<assemblies>
<add assembly="DeveloperTools" />
</assemblies>
</module>
The EPiServer.Packaging.Converter converts old add-ons to a format that lets the add-on be installed from Visual Studio. A readme file describes how to use the converter.
Deliver content in your add-on as a compressed ZIP archive by compressing the whole content structure below the package folder to a zip file. Give it the same name as the package and place within the package directory, for example:
Content\modules\<packageId>\<packageId>.zipEPiServer scans module directories during startup and adds a virtual path provider for any archive that is found as long as it follows this convention.
Using this feature is NOT recommended if your module contains large files because the content is kept in a memory cache. It can however be useful if you are developing a Visual Studio add-on that contains many small files because it prevents the module from adding the files to the Visual Studio project of the developers installing your add-on. If you want to debug files in an add-on that uses this functionality, extract the archive into its current directory and delete or rename the archive.
Execute custom code at the following extension points, when certain actions are performed:
If your add-on requires executing custom code only on web application start-up and does not need to be notified about installations, updates or deletions, consider using IInitializableModule.
To execute custom code when the status of the add-on package changes, the custom code should include a class inherited from the abstract class EPiServer.Packaging.PackageInitializer in the EPiServer.Packaging assembly:
public abstract class PackageInitializer : IInitializableModule, IPackageNotification
{
        #region Implementation of IInitializableModule

        public virtual void ConfigureContainer(ServiceConfigurationContext context);
        public virtual void Initialize(InitializationEngine context);
        public virtual void Uninitialize(InitializationEngine context);
        public virtual void Preload(string[] parameters);

        #endregion

        #region Implementation of IPackageNotification

        public abstract void AfterInstall();
        public abstract void AfterUpdate();
        public abstract void BeforeUninstall();

        #endregion
        }
The PackageInitializer class combines the IInitializableModule and IPackageNotification interfaces. Inheritors of this class are instantiated and executed by the EPiServer Framework initialization system in the same manner as for the regular IInitializableModule.
The Initialize method in PackageInitializer checks if the add-on (package ID) containing the assembly with the inheriting class is newly installed, and calls the AfterInstall method if necessary, or if the add-on is newly updated calls AfterUpdate if necessary.
When overriding the Initialize method, you should call the base implementation before proceeding with the initialization to ensure that the AfterInstall and AfterUpdate methods are executed before the initialization.
The BeforeUninstall method is called before the package contents are removed, when the user clicks the Uninstall button in the add-on system.
This method is called after the add-on installation is complete and only the first time the application starts, (as opposed to the Initialize method which is called each time the application starts).
Do the following to get custom code executed after an add-on installation:
The add-on installation and the point where the AfterInstall method is called:
Method executes after the add-on update is complete and is called only the first time the application starts after updating an add-on.
Do the following to execute custom code after an add-on update:
The add-on installation and the point where the AfterUpdate method is called:
Method executes immediately after the user clicks Uninstall in the add-on management user interface, but before the actual uninstallation takes place. If an exception occurs in the BeforeUninstall method, the uninstallation is aborted. It does not trigger when uninstalling an add-on using Visual Studio.
Do the following to execute custom code before add-on unistallation:
The process of add-on uninstallation:
If an add-on is dependent on other systems or add-ons, it needs to indicate these dependencies using ModuleDependency attributes so that initialization methods are called after those of all of the listed dependencies.
Last updated: Feb 23, 2015