
TinyMCE Table Templates
Aim.
Lately we had a requirement from one of our clients to enable the WYSIWYG editor on a page (XHtmlString property (TinyMCE)) in the CMS to cater for a set of preformed table templates. The notion was to allow content editors to enter data into a simple table in the WYSIWYG editor but, to make the task easier, they should be able to select what sort of table they require, as opposed to having to create one themselves.
Situation.
By reducing the number of tools available in the WYSIWYG editor toolbar, to just bold, italic, undo, redo and a new template button (less is more), the content editor will be able to quickly complete the task without any unnecessary clutter on the WYSIWYG editor in question. The new template button will enable the content editor to select what preformed template they require for the specific task. This custom configuration of TinyMCE can then be applied to one or more page types.
Solution.
So that's enough of the 'what' and 'why', now for the 'how'.
Firstly, let's create a couple of (really simple) preformed template tables in HTML, thus:
<h5>Table title</h5>
<table cellpadding="10">
    <thead>
    <tr>
        <td>Document</td>
        <td>Part Number</td>
        <td>Type</td>
        <td>Size</td>
        <td>Date Added</td>
    </tr>
    </thead>
    <tbody>
    <tr>
        <td></td>
        <td></td>
        <td></td>
        <td></td>
        <td></td>
    </tr>
    </tbody>
</table>
and:
<table cellpadding="10">
    <thead>
    <tr>
        <td>Document</td>
        <td>Part Number</td>
        <td>Type</td>
    </tr>
    </thead>
    <tbody>
    <tr>
        <td></td>
        <td></td>
        <td></td>
    </tr>
    </tbody>
</table>
Note that the first template caters for a heading, outside of the main table, and five columns, whereas the second template caters for only three columns. Also note that we have added the 'cellpadding="10"' attribute to the table tag (I know 'cellpadding' is an obsolete attribute but trust me, it'll work just fine for what we want it for); these settings will prove to be useful for the content editors later on and, because of the CSS we use, this additional attribute will not affect the final rendering of the table(s). Save these templates (as .html) into a suitable location in your project.
Next we're going to create the configuration for TinyMCE to use these templates. Open up the configuration file for TinyMCE; ours looks like this:
    [InitializableModule]
    [ModuleDependency(typeof(TinyMceInitialization))]
    public class TinymceCustomInitialization : IConfigurableModule
    {
        public void Initialize(InitializationEngine context) { }

        public void Uninitialize(InitializationEngine context) { }

        public void ConfigureContainer(ServiceConfigurationContext context)
        {
            context.Services.Configure<TinyMceConfiguration>(config =>
            {
                // Default configuration settngs go here...
            });
        }
    }
Directly under the default configuration settings we're going to clone the default settings and apply a stylesheet that contains the relevant CSS for final rendering, thus:
        public void ConfigureContainer(ServiceConfigurationContext context)
        {
                // Default configuration settngs go here...

                // Create a simple version of tinyMce, with just the bare necessities and a template button.
                var simpleConfiguration = config.Default().Clone()
                    .ContentCss("/static/css/default.css")
            });
        }
Next, let's add the settings for the two templates and add these settings as a plugin, thus:
        public void ConfigureContainer(ServiceConfigurationContext context)
        {
            context.Services.Configure<TinyMceConfiguration>(config =>
            {
                // Default configuration settngs go here...

                // Create a simple version of tinyMce, with just the bare necessities and a template button.
                var simpleConfiguration = config.Default().Clone()
                    .ContentCss("/static/css/default.css")
                    .AddSetting("templates", new[]
                    {
                        new
                        {
                            title = "Downloads template 1",
                            url = "/static/html/templates/template1.html",
                            description = "Template 1 for a preformed table"
                        },
                        new
                        {
                            title = "Downloads template 2",
                            url = "/static/html/templates/template2.html",
                            description = "Template for a preformed table"
                        }
                    })
                    .AddPlugin("template")
            });
        }
Note that the settings name should be 'templates' and that the plugin name should be 'template', this is IMPORTANT.
Finally, let's setup the toolbar and apply our simple TinyMCE configuration to a page type that's going to use it, thus:
        public void ConfigureContainer(ServiceConfigurationContext context)
        {
            context.Services.Configure<TinyMceConfiguration>(config =>
            {
                // Default configuration settngs go here...

                // Create a simple version of tinyMce, with just the bare necessities and a template button.
                var simpleConfiguration = config.Default().Clone()
                    .ContentCss("/static/css/default.css")
                    .AddSetting("templates", new[]
                    {
                        new
                        {
                            title = "Template 1",
                            url = "/static/html/templates/template1.html",
                            description = "Template 1 for a preformed table"
                        },
                        new
                        {
                            title = "Template 2",
                            url = "/static/html/templates/template2.html",
                            description = "Template 2 for a preformed table"
                        }
                    })
                    .AddPlugin("template")
                    .Toolbar("bold italic | undo redo | template");

                // Assign this simple tinyMce configuration to the required XhtmlString property
                // on the required model.
                config.For<YourPageType>(x => x.YourPropertyName, simpleConfiguration);
            });
        }
And that's it folks! Let's compile our code and see how it renders in edit mode in the CMS:
fig.1
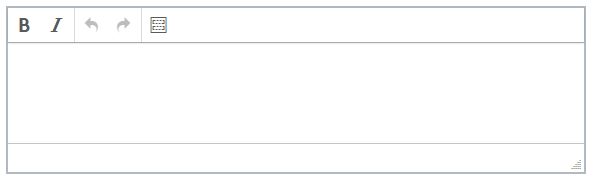
Note the simple toolbar configuration with the new template button.
fig.2
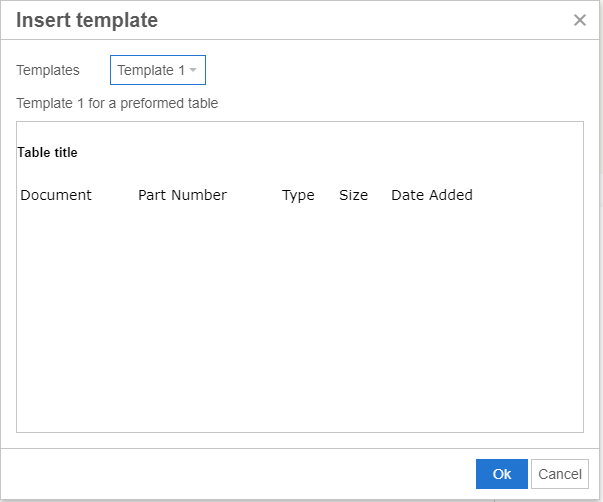
When the content editor clicks on the new template button they will be presented with a new modal window, which allows them to select a template to use.
fig.3
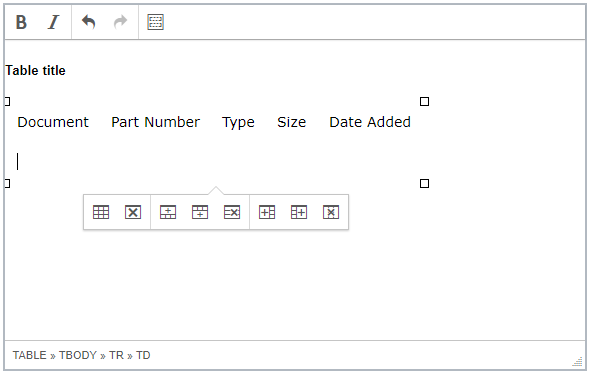
With the template selected the content editor is ready to enter their data. Hey, but what's with that extra toolbar and where did it come from? Well, because the template HTML contains a table, TinyMCE has detected this and has provided us with tools to be able to set the table properties, delete the table, add a new row above the current row in scope, add a new row beneath the current row in scope, delete the current row in scope, add a new column to the right of the current column in scope, add a new column to the left of the current column in scope and delete the current in scope, respectively.
Needless to say, the content editors can edit the table title and column headings to their own requirements and can enter multiple table templates should they desire.
Note that because we used the old 'cellpadding="10"' attribute on the table tag in our template HTML, the cells are 'padded' so the content editor has a clearer, less cluttered view of where their data is to go. This setting is NOT carried over to the final rendering of the table, if your CSS file has correctly defined the table rendering of course. As an extra aid a content editor may (temporarily) set the border attribute for the table to "1"; this can be set in the 'border' attribute of the table properties toolbar item but it will need to be deleted/set to "0", when they've finished editiing the table data, as this setting WILL carry over to final rendering.
fig.4

Final rendering.
Conclusion
This solution provides a really lightweight, simple-to-use alternative to having to use a block to acheive the same result. I'd like to pay tribute to the article I found at https://davidboland.site/blog/create-episerver-tinymce-default-templates for giving me the inspiration for this solution.
Feedback to this post will be welcomed and appreciated.
Thanks for this Jon, i think this will be really useful. In the past i have had to make compromises with designers and front-end developers because i couldn't find an easy and user-friendly way to get wysiwyg content to include anything other than really basic elements (headings and paragraphs mostly). Now i know that we can use templates to output more complicated html with class names pre-applied i think we can really improve the editor experience.
Really nice to be able to use templates like this! 👍
On important thing to note though is that the template markup is copied when the editor uses it to insert html in TinyMCE.
That means that if you change the template sometime down the road those changes won't affect the XHTML-properties where the template has been used.
Worth considering when deciding whether to use this template approach or a block.
Thanks for this Jon, this will be really useful.