")
A Quick Guide to Using the Content Management API and OpenID Connect Authentication
Introduction
Content management in Optimizely CMS becomes more efficient and streamlined with the power of the Content Management API.
The Optimizely Content Management API adds REST endpoints for basic content management operations such as:
- Create content objects
- Modify existing content objects
- Delete content objects
- Get draft content objects
- Move content objects
The REST API is useful for pushing external content to Optimizely without having to deploy custom integration code to the Optimizely Content Management System (CMS).
In this quick guide, I'll walk through the steps to set up a solution for content creation using the API.
Prerequisites
Before diving into the process, ensure you have the following:
- An active Optimizely CMS instance (For Alloy site setup, refer to my guide here).
- Familiarity with an API request tool like Postman.
- A good understanding of your CMS's content structure and types.
Step 1: Install and Configure the Content Management API
First, let's set up the Content Management API. If you're using Visual Studio, you can install it via the Package Manager or via the CLI using this command:
dotnet add package EPiServer.ContentManagementApiOnce installed, modify the Startup Class to include the basic configuration. In the ConfigureServices method, add the following line:
services.AddContentManagementApi(o => o.DisableScopeValidation = true);Then, build and run your solution with:
dotnet runStep 2: Test the Endpoint
After installing the Content Management API, you can test the endpoint using Postman. Send a simple POST request to /api/episerver/v3.0/contentmanagement. As we haven't added any parameters, expect a 400 Bad Request status code with a specific JSON response.
{
    "errors": {
        "filename": [
            "The filename field is required."
        ],
        "content-Type": [
            "The contentType field is required."
        ]
    },
    "type": "https://tools.ietf.org/html/rfc7231#section-6.5.1",
    "title": "One or more validation errors occurred.",
    "status": 400,
    "traceId": "00-b2f4877cb70b04fc20ea6fc0dfe1d2fe-d37b0cf2e4dc9458-00",
    "code": "InvalidModel"
}
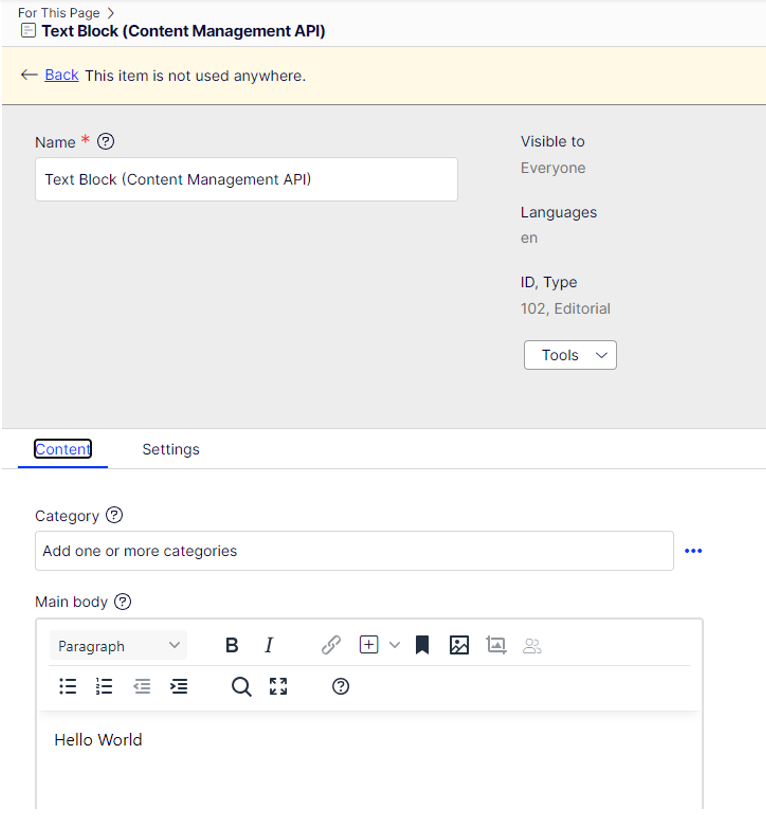
This response tells us the endpoint is operational. Alternatively, it would have resulted in a 404 status code. At this stage, we can try adding content to Optimizely CMS via Postman. Use the provided JSON body, but you'll likely encounter a 401 status due to permissions.
{
  "name": "Text Block (Content Management API)",
  "language": {
      "name": "en"
  },
  "contentType": [
      "Block",
      "EditorialBlock"
  ],
  "parentLink": {
      "id": "33"
  },
  "mainBody": {
      "value": "<p>Hello World</p>"
  },
  "status": "Published"
}
Response Example
{
    "type": "https://tools.ietf.org/html/rfc7235#section-3.1",
    "title": "Unauthorized",
    "status": 401,
    "detail": "Access was denied to content 33. The required access level was \"Create, Publish\".",
    "instance": "/api/episerver/v3.0/contentmanagement",
    "traceId": "00-c91883ef32f39b8dda0571df62c44b7b-d48fe0471f6254da-00"
}
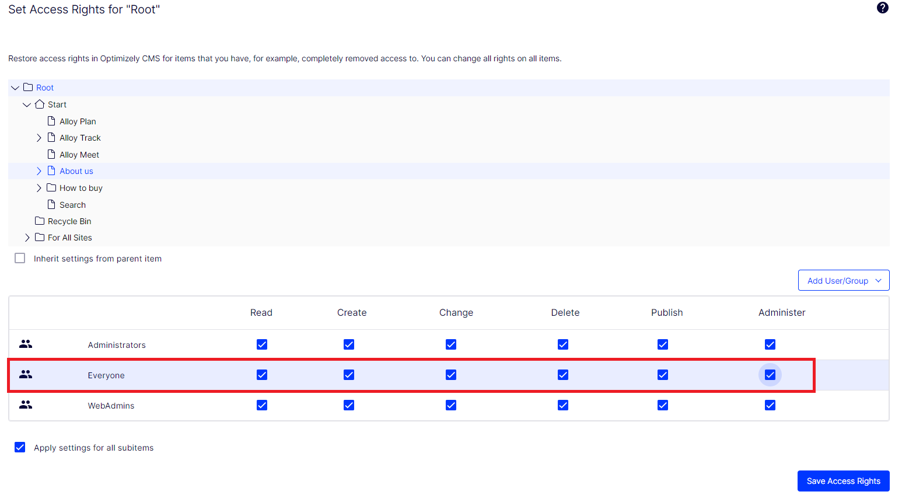
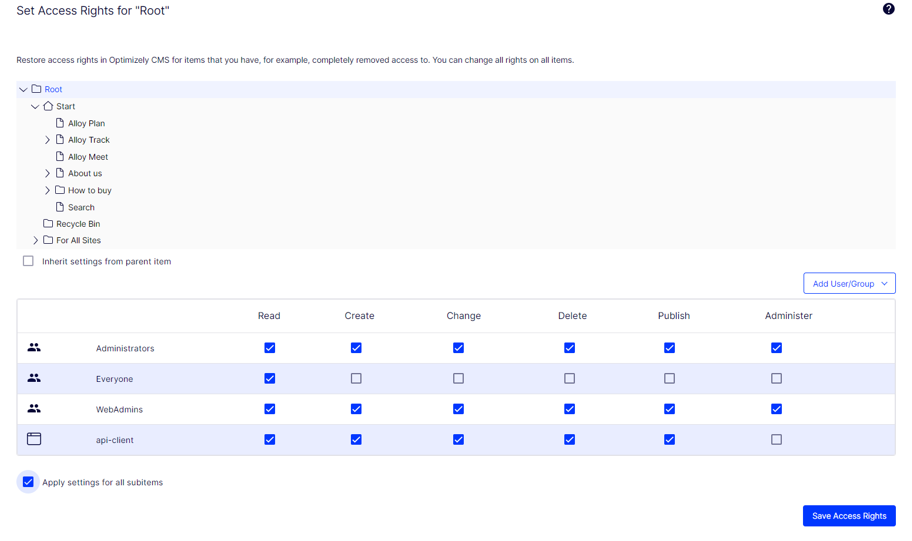
For testing purposes, you can temporarily grant access rights to "Everyone" for creating and publishing pages. After making this change, re-run the request. You should now receive a 201 (Success) status code with the content successfully created in CMS.
Step 3: API Authentication via OpenID Connect
In the real world, giving "Everyone" access to publish content is not acceptable. To ensure authorized individuals/services create and publish content, we need to authenticate Content Management API requests using OpenID Connect and Bearer Tokens (JWT). Here's how:
- Install the OpenIDConnect NuGet package with this command:
dotnet add package EPiServer.OpenIDConnect.UI - Amend the Startup class to configure this package and make Content Management API support it. Update the code as follows:
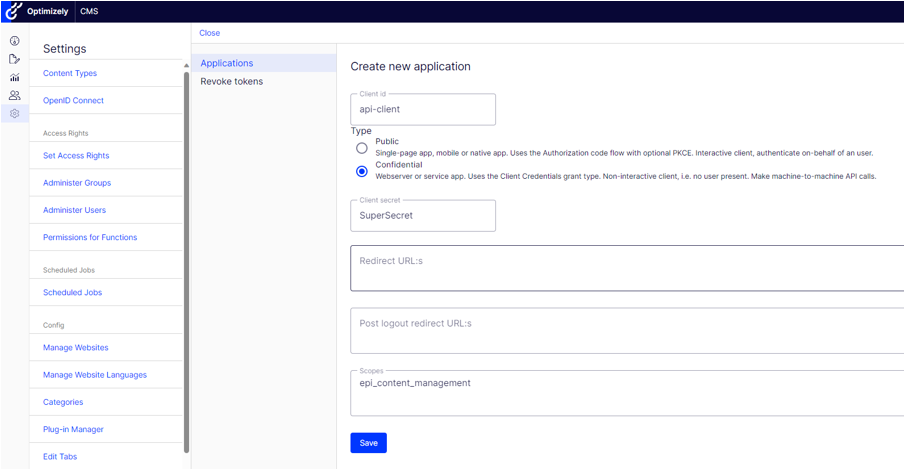
services.AddContentManagementApi(OpenIDConnectOptionsDefaults.AuthenticationScheme, options => { options.DisableScopeValidation = true; }); services.AddOpenIDConnect<ApplicationUser>( useDevelopmentCertificate: true, signingCertificate: null, encryptionCertificate: null, createSchema: true ); services.AddOpenIDConnectUI(); - After saving the file, build and run the solution and access Optimizely Admin mode. Look for "OpenID Connect" in Settings, create a new application (set Scopes as "epi_content_management").
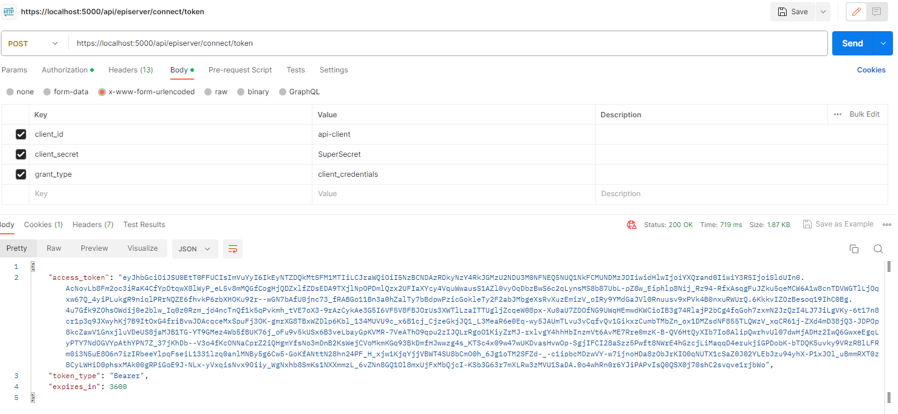
- Test if it all works by making a POST request in Postman to
/api/episerver/connect/tokenwith the following parameters:- client_id: api-client
- client_secret: SuperSecret
- grant_type: client_credentials
- You'll receive a time-limited access token.
Having got this far and sucessfully being able to generate a bearer token, we have to grant our newly created client permissions to create and publish content, we do this by managing access rights in Optimizely. Remove additional rights given to the "Everyone" group and add them to the api-client with the same rights instead.
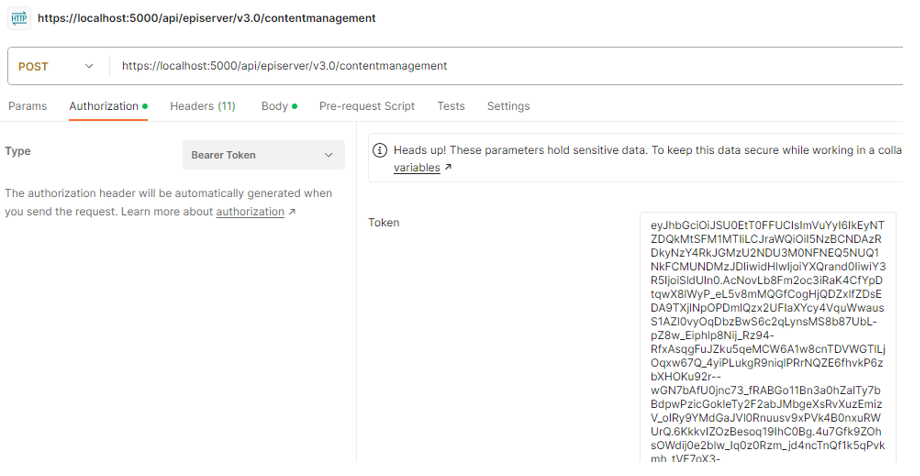
Finally, copy the access token from Postman and make another POST request to /api/episerver/v3.0/contentmanagement, this time also setting the Authorization Token.
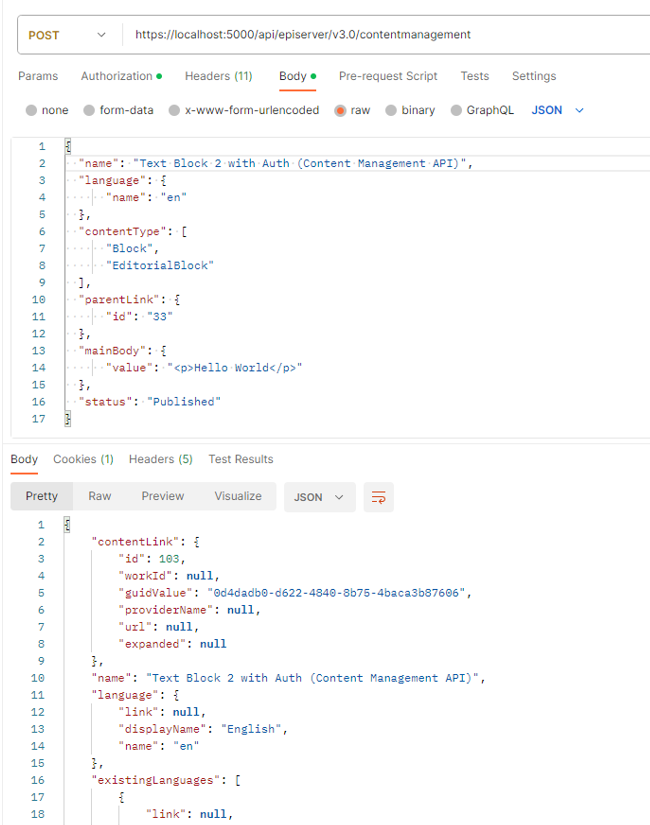
That's it! We're now securely creating content via the Content Management API using a JWT Bearer Token.
** For additional Security measures you can add some additional CORS policies to your Optimizely Solution so only certain services can call the Content Management API requests or even lock the API down via IP Restrictions.
Conclusion
The Content Management API alongside Content Definitions API are quite powerful tools, they are not difficult to setup and have many use cases for example with the Content Management API we can quite easily utilise for migration processes and import a large amount of content into the CMS in bulk all programmatically. With the recent announcement of the SaaS CMS offering the Content Definitions API is quite useful in creating Content Types and something that can quite easily be source controlled, so definitely something to look out for and try-out.
References
- Get started with Content Management API (optimizely.com)
- API authentication (optimizely.com)
- Examples of Content Management API (optimizely.com)
Comments