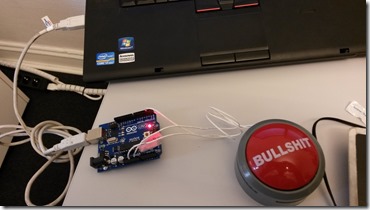
The physical Publish Button
What do you do when you are in between projects and got nothing to do? You build a physical publish button using an Arduino of course!
The Arduino is an Open Source electronics prototyping platform (http://www.arduino.cc/). It basically enables you to program the physical world through sensors, buttons or anything else your heart desires. So using this I am proud to announce that the gap between the physical world and EPiServer is bridged!
I recommend checking out the official arduino blog for more cool projects this wonderful platform has been used for. http://blog.arduino.cc/
Inspired by the “AWSOME button” at Makezine: http://makezine.com/2011/04/08/the-awesome-button/
Communication between the Arduino and javascript
The Arduino comes with a USB to Serial converter, which means you can communicate with it through the COM port. But how to execute javascript on a webpage every time the button is pressed?
I decided to make a Chrome extension and after some googeling I found this cross platform browser plugin for serial port communication from JavaScript https://github.com/billhsu/jUART
Chrome Extension
So the way this works is that the background page of the extension opens a connection to the COM port to listen for commands from the Arduino. Every time a command is received it passes it on to the contentscript in the tab that is currently open. The content script receives the command, and if the command is “Publish” it finds the publish button and simulate a click.
Just having the page published was kind of boring. So to give it a little more flare I added some fireworks to celebrate the birth/rebirth of a page. The fireworks code is just an adaptation of the code I found here: http://thecodeplayer.com/walkthrough/canvas-fireworks-tutorial
End notes
This was just the simplest and cheapest way of achieving the goal. This could have been done in many other fashions. There are Arduino boards small enough to fit inside the button or the communication could have been done with wifi, ethernet, bluetooth, infrared. You could also make it completely wireless by using batteries as a power source instead of getting power from the arduino board. Only the imagination sets a limit.
Hope you enjoyed this as much as I did making it.
Download full source code here: https://db.tt/x0JD21qC
For a more comprehensive walkthrough of the process download the complete guide here: https://db.tt/s67eUnnD


Sweet!
Always wanted a big red button to push for site launch!
You might want to change the label of the button before letting a customer publish their brand new site with it ;-)
Next step, add a second green button and connect it to the workflow
Sweet! :)