The DIBS payment provider is one of several payment solutions available for Episerver Commerce 8 and higher.
Copying DIBS source code files to your solution
- Download and install the DIBS project source code.
- Open the DIBS payment project. Make sure you have saved the solution to install NuGet packages.
- Install EPiServer.Commerce.Core page by executing the following command via Package Manager Console:
Install-Package EPiServer.Commerce.Core
You may want to install the version that your websites are using to avoid any assembly conflict. You do not need to apply any database transform or removing Common Framework components.
- Copy the EPiServer.Business.Commerce.Payment.DIBS.dll to the bin folder of the Sample template and Commerce Manager websites.
- Create a DIBS folder in Apps\Order\Payments\Plugins, and copy ConfigurePayment.ascx to it.
- Create a DIBS folder under Apps\Order\Payments\MetaData, and copy Edittab.ascx to it.
Note: In Episerver Commerce 7.5, the Apps folder is located in the Episerver Commerce Manager Shared Files Folder, typically: C:\EPiServer\<YourCommerceManagerSite>\eCommerceFramework\5.3\Shared
If you updated your Commerce Manager site to the latest version via NuGet, locate the Apps folder in the wwwroot folder. Refer to this Apps folder as your corresponding path for the Apps folder in this section.
E:\EPiServer\<YourCommerceManagerSite>\wwwroot\Apps
- Copy DIBSPayment.aspx to the page folder of the Sample site, (usually \Templates\ Sample\Pages).
- Copy PaymentMethods.ascx to the DIBS folder in plugin control folder of the Sample site, (usually \Templates\Sample\Units\CartCheckout\DIBS). Create a DIBS folder, if needed.
- Copy lang\DIBSPayment_en.xml to the lang folder of the Sample site, (usually Sample\lang).
Configuring the DIBS payment provider
- Log in to Commerce Manager.
- Go to Administration and Order System/Payments/<The language you want to use>.
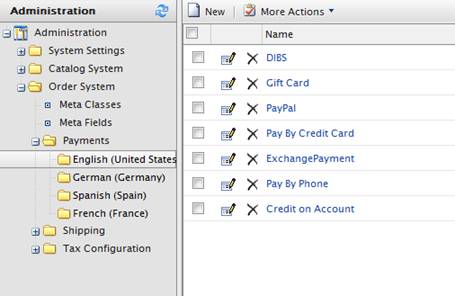
- Click New, and configure the parameters. The following parameters are required and must be configured as follows. Commerce Manager uses these to find the folder that contains .ascx files.
- System Keyword. DIBS
- Class Name. EPiServer.Business.Commerce.Payment.DIBS.DIBSPaymentGateway
- Payment Class. Mediachase.Commerce.Orders.OtherPayment
Set the other parameters as desired.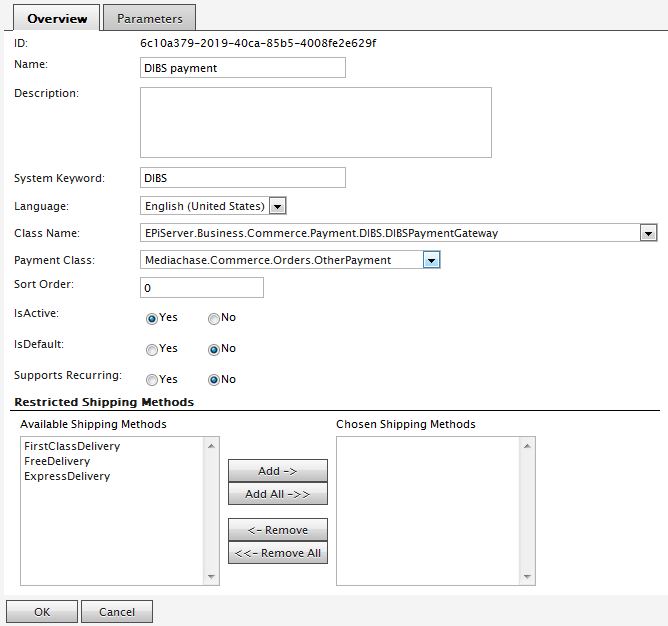
- Click OK to save the payment provider.
- In the payment provider list, click on DIBS payment, and click the Parameters tab, and set the parameters for DIBS. The API UserId and Merchant Password are the login/password for the administration page of DIBS. You need only the API UserId to let customers view, but to complete and return an order, you also must add a valid Merchant Password.
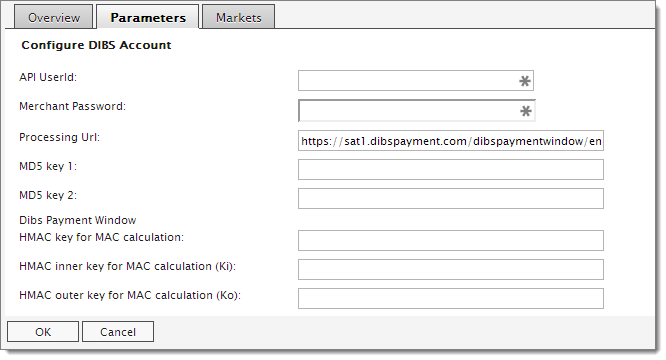
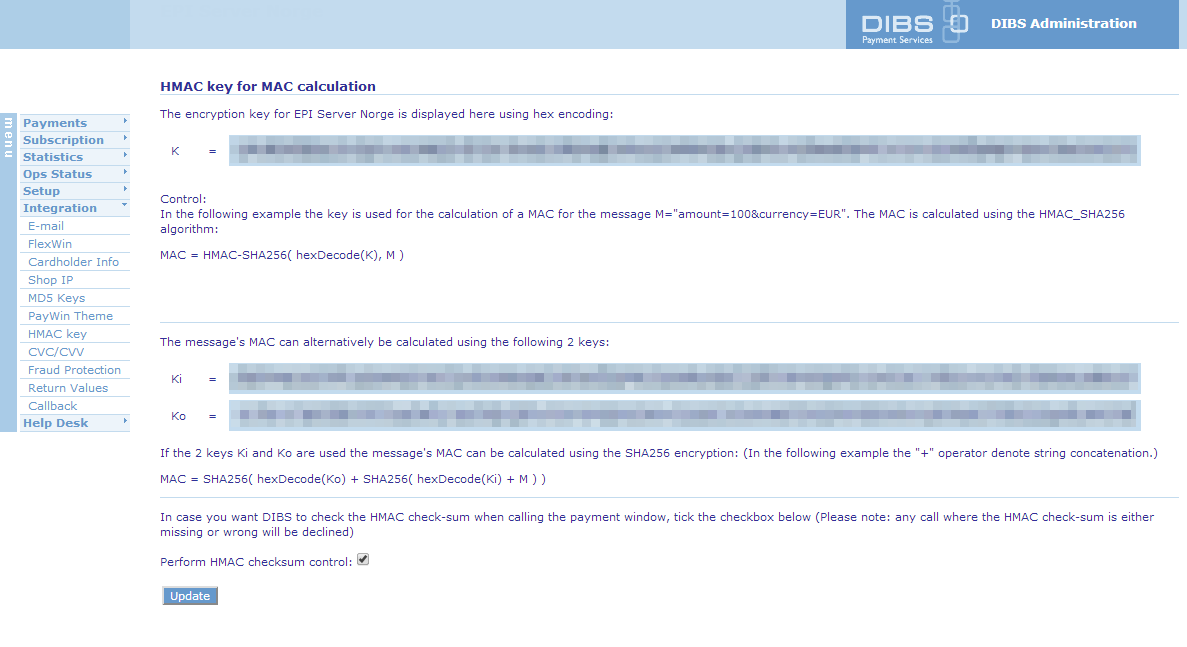
The HMAC values are available from the DIBS Administration interface:
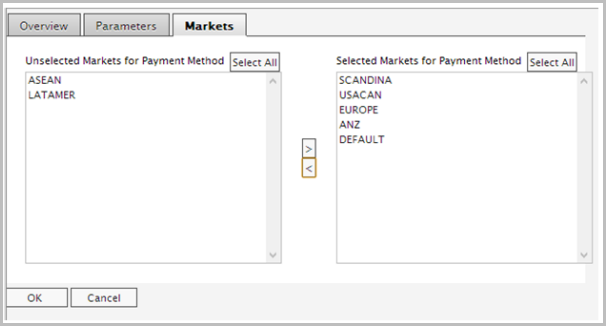
- Click the Markets tab and add the expected markets for this payment.
- Click OK to save the payment provider details.
Creating a page type for DIBS
To use the DIBS payment provider you also need to configure a page type to use. .
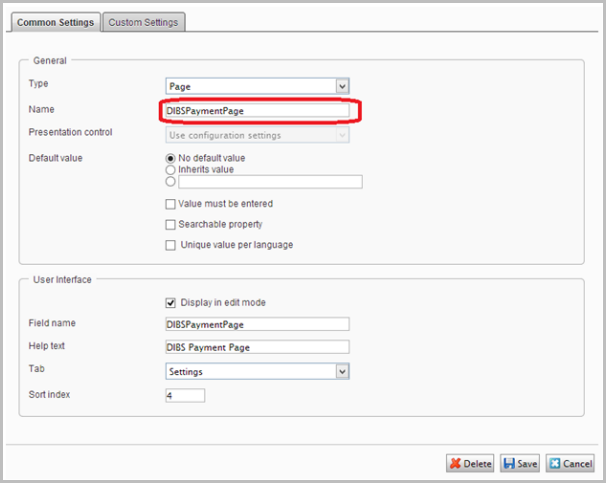
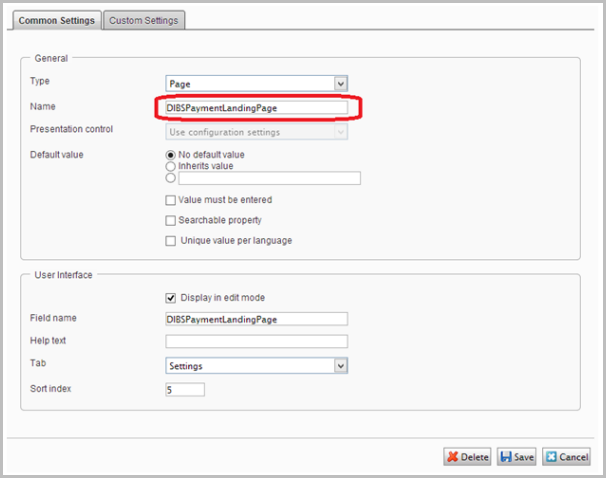
- Add two new properties of the type page to the website Home Page as shown in the following image. The name of the property must be DIBSPaymentPage and DIBSPaymentLandingPage. In this example the property is added to the Settings tab of the Home page.
- Switch to the EPiServer CMS Edit view.
- In the page tree structure, create a new page under Checkout based on the DIBS Payment page type, and publish it.
- Edit the Home page of the site, click on the Settings tab and define the two new properties:
- DIBSPaymentPage pointing to the new page you just created.
- DIBSPaymentLandingPage pointing to the Your Order page.
Using DIBS
When you have deployed and configured the DIBS payment provider, it appears as an option in the checkout procedure. Add a product to the shopping cart, proceed to checkout, and select DIBS as payment option.
Using Split payment
To support Split payment, open the DIBSPaymentGateway.cs file, go to line number 134, then update to set the supportSplitPayment variable to true. You need to enable Split Payment for your DIBS account. See http://tech.dibspayment.com/flexwin_api_other_features_split_payment.
Last updated: Apr 13, 2017