
Install and configure
Describes how to install and configure the Optimizely Service API, a service layer used for integration of Optimizely Commerce with external systems, such as PIM, DAM and ERPs.
Install Service API
Prerequisites
Install Optimizely updates through the NuGet Package Manager in Visual Studio.
- Open Visual Studio and follow the steps below.
- Set the target framework for your project to .NET 4.0 or higher by right-clicking on the project and choosing Properties.
- Select Tools > NuGet Package Manager > Manage NuGet packages for Solution... (or right-click on the solution References and select there).
- Click Settings to create a source pointing to the Optimizely NuGet feed.
- Open the Online section and select the source you just created.
- Install EPiServer.ServiceApi and EPiServer.ServiceApi.Commerce.
- Install EPiServer.OpenIDConnect to allow token authentication. You can also use other authentication schemes.
Note for versions 5 and below
Service API suppressed cookie authentication in the default configuration.
Configure authentication
See API authentication for more detailed information. The following example shows how to configure open connect for Service API.
services.AddOpenIDConnect<SiteUser>(
  useDevelopmentCertificate: true,
  signingCertificate: null,
  encryptionCertificate: null,
  createSchema: true,
  configureOptions =>
  {
    {
      //options.RequireHttps = !_webHostingEnvironment.IsDevelopment();
      var application = new OpenIDConnectApplication()
      {
        ClientId = "postman-client",
        ClientSecret = "postman",
        Scopes =
        {
          ContentDeliveryApiOptionsDefaults.Scope,
          ContentManagementApiOptionsDefaults.Scope,
          ContentDefinitionsApiOptionsDefaults.Scope,
          ServiceApiOptionsDefaults.Scope
        }
      };

      // Using Postman for testing purpose.
      // The authorization code is sent to postman after successful authentication.
      application.RedirectUris.Add(new Uri("https://oauth.pstmn.io/v1/callback"));
      configureOptions.Applications.Add(application);
    },
    configureSqlServerOptions: null);
  }
services.AddServiceApiAuthorization(OpenIDConnectOptionsDefaults.AuthenticationScheme);
If you are using OpenIdConnect and client credentials grant type you will need to add the application to the permissions to functions for read and or write access.
If you are using another authentication scheme you will need to make sure the claim identity has the correct roles defined for read and write access to the permissions to functions for Service API.
Disable SSL requirement for request
By default, Service API requires secure connections both for authentication and for API calls. You can disable this with an app setting, for example, for a debug configuration in development.
{
  "EPiServer" : {
    "ServiceApi" : {
      "RequireSsl":false
    }
  }
}

public void ConfigureServices(IServiceCollection services)
{
  services.Configure<ServiceApiOptions>(x => x.RequireSsl = false);
}
Note
Live sites should not disable SSL.
Authentication tokens
To use any EPiServer.ServiceApi RESTful method, you must obtain an OAuth 2 Bearer Token to send with the request.
using (var client = new HttpClient())
{
  client.BaseAddress = new Uri("https://mysite.com/");
  var fields = new Dictionary<string, string>
  {
    { "grant_type", "client_credentials" },
    { "client_id", clientIdValue },
    { "client_secret", clientSecretValue },
    { "scope", ServiceApiOptionsDefaults.Scope}
  };
  var response = client.PostAsync("/api/episerver/connect/token", new FormUrlEncodedContent(fields)).Result;
  if (response.StatusCode == HttpStatusCode.OK)
  {
    var content = response.Content.ReadAsStringAsync().Result;
    var token = JObject.Parse(content).GetValue("access_token");
  }
}

POST /episerverapi/token HTTP/1.1
Host: mysite.com
User-Agent: Mozilla/5.0 (Windows NT 6.2; Win64; x64) AppleWebKit/537.36 (KHTML, like Gecko) Chrome/32.0.1667.0 Safari/537.36
Content-Type: application/x-www-form-urlencoded;charset=UTF-8
Content-Length: 29
Accept-Encoding: gzip
grant_type=password
username=test
password=test
using (var client = new HttpClient())
{
  client.BaseAddress = new Uri("https://mysite.com/");
  var fields = new Dictionary<string, string>
  {
    { "grant_type", "password" },
    { "client_id", clientIdValue },
    { "client_secret", clientSecretValue },
    { "scope", ServiceApiOptionsDefaults.Scope },
    { "username", userNameValue },
    { "password", passwordValue }
  };
  var response = client.PostAsync("/api/episerver/connect/token", new FormUrlEncodedContent(fields)).Result;
  if (response.StatusCode == HttpStatusCode.OK)
  {
    var content = response.Content.ReadAsStringAsync().Result;
    var token = JObject.Parse(content).GetValue("access_token");
  }
}

POST /episerverapi/token HTTP/1.1
Host: mysite.com
User-Agent: Mozilla/5.0 (Windows NT 6.2; Win64; x64) AppleWebKit/537.36 (KHTML, like Gecko) Chrome/32.0.1667.0 Safari/537.36
Content-Type: application/x-www-form-urlencoded;charset=UTF-8
Content-Length: 29
Accept-Encoding: gzip
grant_type=password
username=test
password=test
HTTP/1.1 200 OK
Status: 200 OK
Content-Type: application/json; charset=utf-8
  ...
Content-Encoding: gzip
Content-Length: 140
{"token_type":"bearer","access_token":"AAAA%2FAAA%3DAAAAAAAA"}
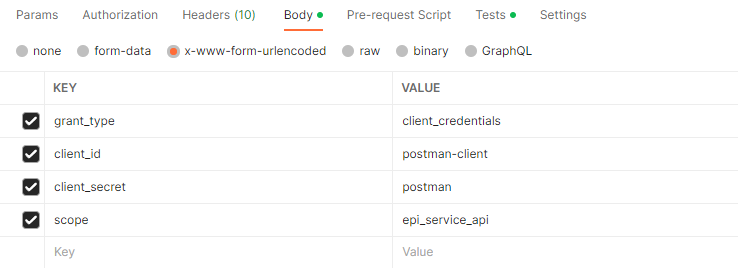
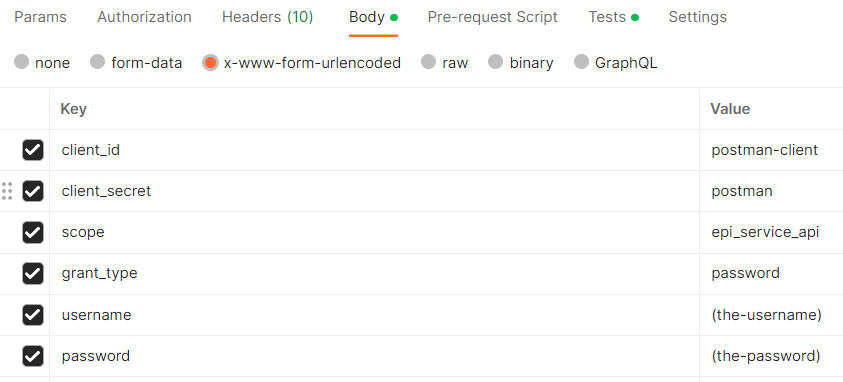
You need these headers and keys to retrieve a token in Postman:
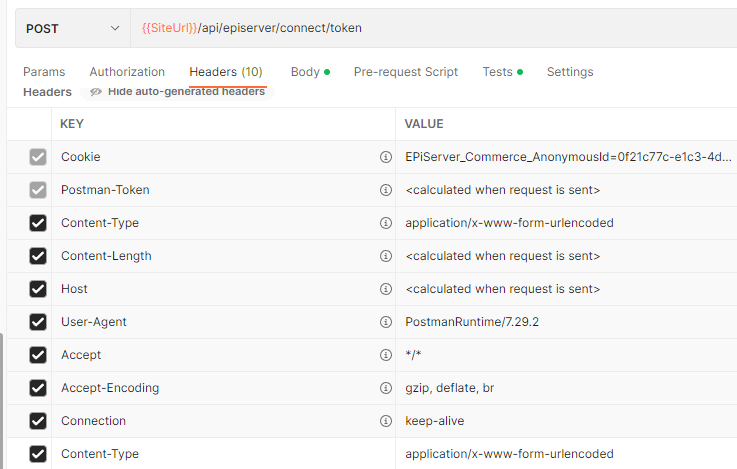
For Service API 6
For Service API 7
Sample cURL Command - Service API 6
curl --location --request POST 'https://localhost:5000/api/episerver/connect/token'
--header 'Content-Type: application/x-www-form-urlencoded'
--data-urlencode 'grant_type=client_credentials'
--data-urlencode 'client_id=postman-client'
--data-urlencode 'client_secret=postman'
--data-urlencode 'scope=epi_service_api'
Sample cURL Command - Service API 7
curl --location --request POST 'https://localhost:5000/api/episerver/connect/token'
--header 'Content-Type: application/x-www-form-urlencoded'
--data-urlencode 'grant_type=password'
--data-urlencode 'client_id=postman-client'
--data-urlencode 'client_secret=postman'
--data-urlencode 'scope=epi_service_api'
--data-urlencode 'username=the-username'
--data-urlencode 'password=the-password'
Send request with tokens
using (var client = new HttpClient())
{
  client.BaseAddress = new Uri("https://mysite.com/");
  client.DefaultRequestHeaders.Authorization = new AuthenticationHeaderValue("Bearer", token.ToString());
  var content = new MultipartFormDataContent();
  var filestream = new FileStream(path, FileMode.Open);
  content.Add(new StreamContent(filestream), "file", "Catalog.zip");
  var response = client.PostAsync("/episerverapi/commerce/import/catalog", content).Result;
  if (response.StatusCode == HttpStatusCode.OK)
  {
    var returnString = response.Content.ReadAsStringAsync().Result;
    returnString = returnString.Replace("\"", "");
    Guid taskId = Guid.Empty;
    Guid.TryParse(returnString, out taskId);
  }
}
Strongly typed catalog content types
Strongly typed catalog content types must be present in the context of a ServiceAPI site. If you install ServiceAPI to an existing website, this is solved automatically. However, if you install ServiceAPI as a standalone application, you must deploy the assembly that contains strongly typed catalog content types (and any dependencies of your assembly) to the ServiceAPI bin folder.
Troubleshoot Service API
The following issues may arise when you set up the Service API.
- Make sure there is a valid certificate on the server from a trusted certificate authority for the site.
- Make sure all Service API requests are HTTPS.
There is no rate limit set for the Service API.
See also Service API REST API reference.
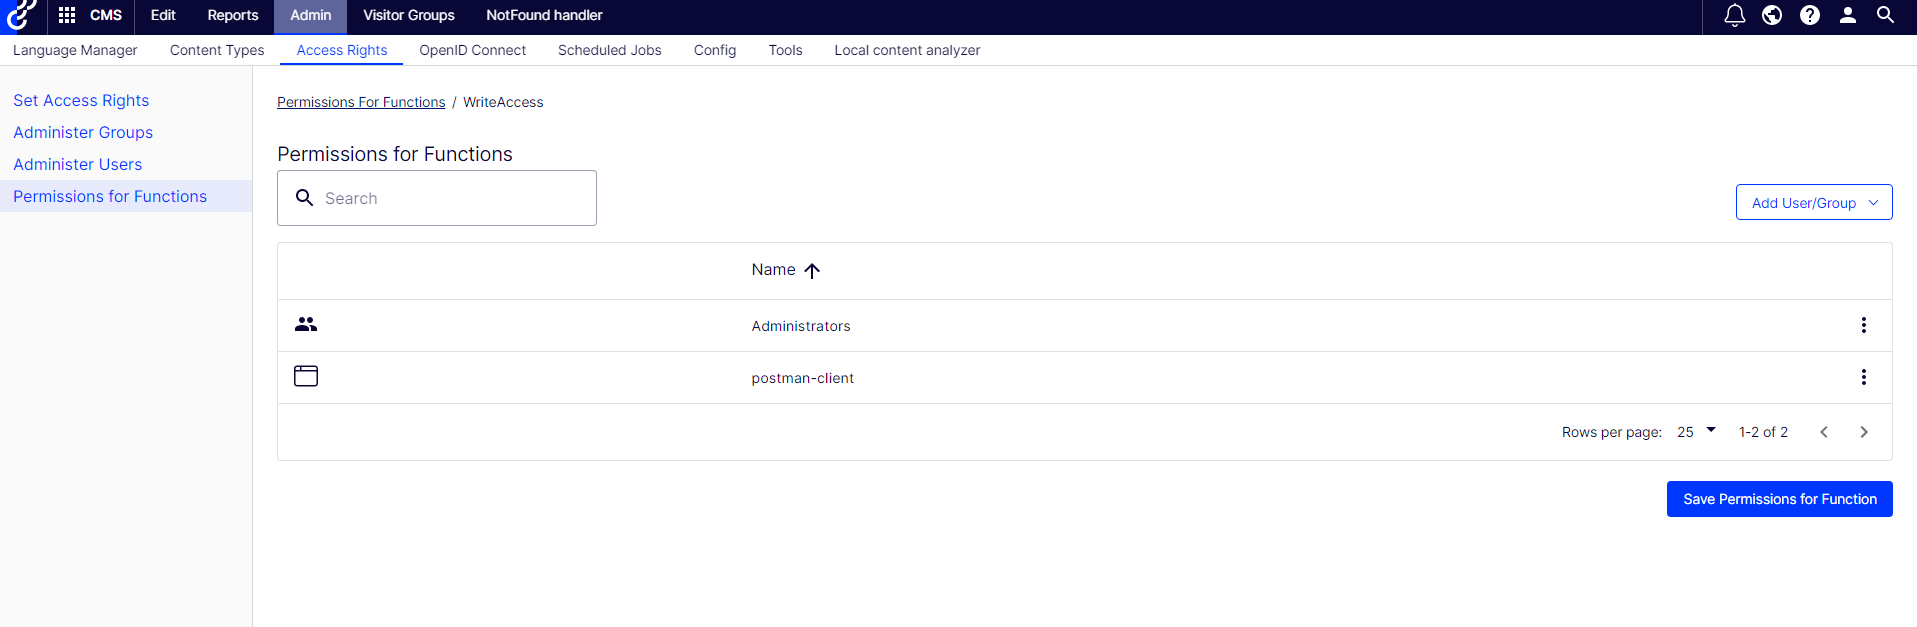
Permissions for functions
You can configure the read and write functions of the Service API in the Permissions for Functions area.
-
Go to Admin > Access Rights > Permissions for Functions.
-
Select ReadAccess or WriteAccess under EPiServerServiceApi, depending on the desired permission.
For instance, you may want to give access for reading or updating the catalog via endpoint, such as the following endpoints:
/episerverapi/commerce/export/catalog/
/episerverapi/commerce/import/catalog/ -
Add the User or the ClientId value that has been set up in the middleware configuration of the ServiceAPI.

Updated 3 months ago