WebDAV
|
Product version: |
EPiServer CMS 6.0 / 6 R2 |
|---|---|
|
Document last saved: |
Introduction
WebDAV is an extension of HTTP that allows for extended file handling. Moving from the readonly-internet that first emerged into a read and write enabled Web creates new needs. WebDAV meets those needs and provides a base for developers to extend the functionality of a site and its ease of use for an editor or administrator. In EPiServer CMS it is used to give easy access to files (such as Word documents, images, etc).
For more information on what WebDAV is, please visit www.WebDAV.org.
IMPORTANT! There are several issues and configuration parameters that may require modification for the built-in WebDAV clients in Windows to work properly with EPiServer CMS. Read the section Client Configuration carefully.
Table of Contents
- Advantages of WebDAV
- Setting up WebDAV in EPiServer CMS
- Client Configuration
- How to Connect to a WebDAV Share from Windows Explorer
- How to Connect to a WebDAV Share Using a Third-Party WebDAV Client
Advantages of WebDAV
- Easy file management.
- The possibility to support drag-and-drop operations of groups of files with no need for extra components, i.e. multiple file uploads.
This opens up possibilities for developers to create their own add-ins with extended file handling capabilities. You could for instance develop:
- Providers that convert EPiServer CMS content into traditional files and back. This would allow editors to use locally installed applications, such as Microsoft Word, to edit EPiServer CMS web content.
- Providers for reports. The developer could create the possibility to provide data as Excel files.
Setting up WebDAV in EPiServer CMS Running on IIS 6
Please note the configuration example below are for IIS6 or if you use Visual Studio built-in web server, see the technical note Changes between IIS6 and IIS7.
Edit web.config and make sure it contains the sections outlined below (note that WebFolder is simply a suggested default, you may change this to another name).
- Find the element <sectionGroup name="episerverModules"> under the <configSections> node and make sure it contains the webDav definition as follows:
<configSections>
  <sectionGroup name="episerverModules">
    <section name="webDav"
        allowDefinition="MachineToApplication"
        allowLocation="false"
        type="EPiServer.WebDav.Config, EPiServer.WebDav" />
  </sectionGroup>
</configSections> - Find the <episerverModules> node and make sure it contains a <webDav> sub-node. In the webDav sub-node, list the Virtual Path Providers that should be accessible via WebDAV. An example that exposes the Global VPP:
<episerverModules>
  <webDav name="WebFolder">
      <provider
        name="Global files"
        type="EPiServer.WebDav.Provider.VirtualDirectoryProvider,
              EPiServer.WebDav"
        virtualPath="~/Global/" />
  </webDav>
</episerverModules> - Find the <httpModules> node under the <system.web> and make sure it contains an add statement for webDAV as follows:
<system.web>
  <httpModules>
    <add name="WebDav" type="EPiServer.WebDav.Module, EPiServer.WebDav" />
  </httpModules>
</system.web> - On the same level as the <httpModules> section, add an <httpHandlers> node with an <add> statement for webDAV as follows:
<system.web>
  <httpModules>
    <add name="WebDav" type="EPiServer.WebDav.Module, EPiServer.WebDav" />
  </httpModules>

<httpHandlers>
   <add path="*" verb="OPTIONS,PROPFIND" type="EPiServer.WebDav.Handler, EPiServer.WebDav"/>
 </httpHandlers>
</system.web> - At the level directly below <configuration>, add a <location path="WebFolder"> element as follows:
<location path="WebFolder">
  <system.web>
    <httpHandlers>
      <add path="*" verb="*" type="EPiServer.WebDav.Handler, EPiServer.WebDav"/>
    </httpHandlers>
    <globalization requestEncoding="utf-8" responseEncoding="utf-8" />
    <authorization>
      <deny users="?" />
    </authorization>
  </system.web>
</location> - If you want to use Basic Authentication to access data in the WebDAV folder, you also need to enable the BasicAuthentication http module. It is present in the httpModules section, but commented out by default. To enable it, simply remove the XML-comment indicators:
<httpModules>
  <add name="BasicAuthentication" type="EPiServer.Security.BasicAuthentication, EPiServer" />
</httpModules>
Setting up WebDAV in EPiServer CMS Running on IIS 7
These instructions assume that you are running EPiServer on IIS7 under "Integrated Pipeline Mode" which is the default mode for an IIS7 EPiServer installation. If you have changed your installation to run under "Classic Mode" instead, you should follow the IIS 6 configuration instructions instead.
Edit web.config and make sure it contains the sections outlined below (note that WebFolder is simply a suggested default, you may change this to another name).
- Find the element <sectionGroup name="episerverModules"> under the <configSections> node and make sure it contains the webDav definition as follows:
<configSections>
  <sectionGroup name="episerverModules">
    <section name="webDav"
        allowDefinition="MachineToApplication"
        allowLocation="false"
        type="EPiServer.WebDav.Config, EPiServer.WebDav" />
  </sectionGroup>
</configSections> - Find the <episerverModules> node and make sure it contains a <webDav> sub-node. In the webDav sub-node, list the Virtual Path Providers that should be accessible via WebDAV. An example that exposes the Global VPP:
<episerverModules>
  <webDav name="WebFolder">
      <provider
        name="Global files"
        type="EPiServer.WebDav.Provider.VirtualDirectoryProvider,
              EPiServer.WebDav"
        virtualPath="~/Global/" />
  </webDav>
</episerverModules> - Find the <modules> node under <system.webServer> and add the <add> statement for webDAV as follows: Note that this statement should be entered after the UrlRewriteModule
<system.webServer>
  <modules>
    <add name="UrlRewriteModule" type="EPiServer.Web.UrlRewriteModule, EPiServer" preCondition="managedHandler" />
    <add name="WebDav" type="EPiServer.WebDav.Module, EPiServer.WebDav" preCondition="managedHandler" />
  </modules>
</system.webServer> - Find the <handlers> node under <system.webServer> node and add the <add> statement for webDAV as follows:
<system.webServer>
 <handlers>
   <!--Should have remove statement to avoid duplicate OPTIONSVerbHandler name -->
   <remove name="OPTIONSVerbHandler"/>
   <add name="OPTIONSVerbHandler" path="*" verb="OPTIONS" type="" modules="ProtocolSupportModule" scriptProcessor="" resourceType="Unspecified" requireAccess="None" allowPathInfo="false" preCondition="" responseBufferLimit="4194304" />
   <add name="PROPFINDVerbHandler" path="*" verb="PROPFIND" type="EPiServer.WebDav.Handler, EPiServer.WebDav" resourceType="Unspecified" requireAccess="None" allowPathInfo="true" preCondition="" responseBufferLimit="4194304" />
 </handlers>
</system.webServer> - At the level directly below <configuration>, add a <location path="WebFolder"> element as follows:
<location path="WebFolder">
  <system.webServer>
    <handlers>
      <add name="wildcard" path="*" verb="*" type="EPiServer.WebDav.Handler, EPiServer.WebDav" />
    </handlers>
  </system.webServer>
  <system.web>
    <globalization requestEncoding="utf-8" responseEncoding="utf-8" />
    <authorization>
      <deny users="?" />
    </authorization>
  </system.web>
</location> - If you want to use Basic Authentication to access data in the WebDAV folder, you also need to enable the BasicAuthentication http module. It should be added to the <modules> node under <system.webServer> section.:
<system.webServer>
  <modules>
    <add name="WebDav" type="EPiServer.WebDav.Module, EPiServer.WebDav" preCondition="managedHandler" />
    <add name="BasicAuthentication" type="EPiServer.Security.BasicAuthentication, EPiServer" preCondition="managedHandler" />
  </modules>
</system.webServer>
It may be required to remove native IIS WebDavModule if it is enabled and you don't use it:
<system.webServer>
  <modules>
    <remove name="WebDAVModule" />
  </modules>
</system.webServer>
Client Configuration
If you are experiencing problems connecting to an EPiServer CMS WebDAV folder from a Windows computer, please make sure you have updated the WebFolder software to the latest version. The WebFolder update can be downloaded here.
Note: You may have to enable Basic Authentication handling for your WebDAV client in order to logon to an EPiServer CMS WebFolder. See Microsoft Knowledge Base article 841215 for information on how to do this in Windows. The information for Windows Vista also applies to Windows 7.
If the site is configured to use Windows Authentication the previous steps should not be needed.
Note: If you are using Windows 7, Windows Vista or Windows 2003 Server as a WebDAV client, you need to disable locking support for these clients since the EPiServer implementation of WebDAV does not yet support locking.To disable locking, follow these steps:
- Click Start, and then click Run.
- In the Open box, type regedit, and then click OK.
- Locate and then click the following registry key:
HKEY_LOCAL_MACHINE\SYSTEM\CurrentControlSet\Services\WebClient\Parameters - Click on the value "SupportLocking".
- On the Edit menu, click Modify.
- In the Value data box, type 0, and then click OK.
- Exit Registry Editor, and then restart the computer.
Note: If the client cannot access the WebDAV folder after configuration, try to make WebDAV use basic authentication without SSL by setting the value for the registry key HKEY_LOCAL_MACHINE\SYSTEM\CurrentControlSet\Services\WebClient\Parameters\BasicAuthLevel to 2.
How to Connect to a WebDAV Share from Windows Explorer
Perform the following steps to map a drive to a WebDAV share:
- Open Windows Explorer and select Map Network Drive under the Tools menu option. You will see the following screen:

- Select a drive letter and enter the URL to your site followed by the name of the designated WebDAV folder, as shown above.
Note: If you need to log on to the site using a different user name than the currently logged on Windows user, click Connect using a different user name and enter the user name and password in the dialog that appears. - Click Finish. You should now have a new drive under the My Computer section in Windows Explorer that links directly to your shared folder (possibly protected by a log in).
Note: The Windows WebDAV client has a number of issues and you may experience problems while using the shared folder. Therefore, you may want to look into using a different client program, such as NetDrive (see below).
How to Connect to a WebDAV Share Using a Third-Party WebDAV Client
Note: The information in this section is only applicable if you are having problems with the built-in Windows WebDAV support. If not, there's no need to install and use NetDrive.
This section describes how to use EPiServer CMS WebDAV features from a third-party client, in this case exemplified with NetDrive.
NetDrive is a third-party WebDAV client that is more WebDAV-compliant than the built-in Windows client. Download the program from http://www.freewarereview.info/pub/netdrive.exe and install it with the default options.
- Launch NetDrive from the Start menu and click the New Site button in the lower left corner. You will see the following:
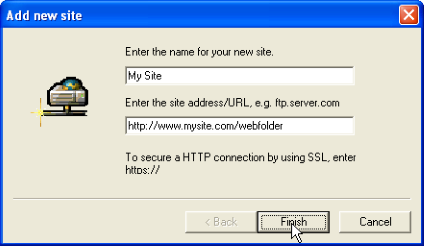
- Enter a name for the site (any name will do) and the URL to your site followed by the name of the designated WebDAV folder, as shown above. Click Finish. You should see the following window:
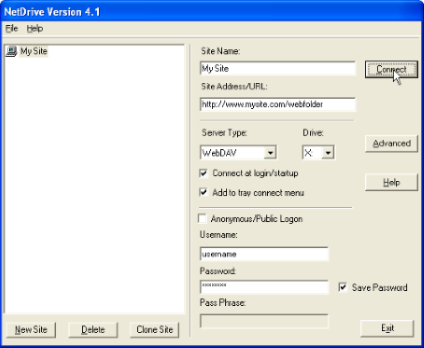
- Clear the Anonymous/Public Logon check box, enter your user name and password and make sure that WebDAV is selected under Server Type. Then click Connect and (possibly with some delay) the shared folder will be mapped and opened. It can then be found as a new drive under the My Computer section in the explorer.