Microsoft Office Integration
|
Product version: |
EPiServer CMS 5 R2 SP1 |
|---|---|
|
Document version: |
1.0 |
|
Document last saved: |
Introduction
This technical note describes the functionality of the Microsoft Office integration with EPiServer CMS from a technical point of view, including customization and filters.
The EPiServer CMS Office Integration has been created to make it possible to publish content into EPiServer CMS using Microsoft® Office programs Word, Excel or PowerPoint. The user downloads a client application that will install an add-in in Word, Excel and PowerPoint. A new toolbar button, Publish to EPiServer CMS, is available to help the user create a new page in EPiServer CMS 5, based on the current document.
Table of Contents
System Requirements
See System Requirements for general system requirements
The Microsoft Office integration has the following additional requirements on the server setup:
- Only Forms Authentication and Integrated Authentication with automatic logon is supported when publishing from Office applications.
- The EPiServer CMS 5 Office integration add-in components are backwards compatible with EPiServer CMS 4.62 or later on the server.
| Note The Office Integration client components needs permission to read and write the registry. The default security settings in Microsoft Windows Vista prevents Internet Explorer from writing registry settings which causes the site activation to fail. The easiest way to resolve this is to add the EPiServer edit URL to the trusted sites in Internet Explorer. |
| Note Basic authentication is not supported. |
Office Integration Package
The EPiServer CMS 5 Office Integration package consists of a server-side and a client-side application that communicate with each other using HTTP. SSL is supported.
The server side is built into EPiServer CMS 5 and is activated from Admin mode by setting the appropriate access rights for the function in Permissions for Functions under the Security section of the Config tab in Admin mode.
The client-side application is installed from Edit mode under the Microsoft Office Add-In tab on the EPiServer CMS 5 welcome page.
Enabling Office Integration in web.config
| Note This step should not be done when the EPiServer CMS 5 UI is set up to use Integrated Authentication. |
<location path="<custom_ui_location>/OfficeIntegration">
    <system.web>
        <authorization>
            <allow users="*"/>
        </authorization>
    </system.web>
</location>
The Publishing Process
Overview
When you select Publish to EPiServer in one of the supported Microsoft Office applications, a wizard is activated. In the first part of the wizard the user selects a site and location to publish the page to. The next steps in the wizard are, technically, Web pages placed on the Web server, but shown in the wizard.
After the user has chosen to save and view, a script is downloaded from the server that creates local HTML documents, images and other files. The resulting files are then uploaded to the EPiServer CMS 5 page folder of the newly created page and a filter is activated on the server that creates the final HTML output.
Detailed Description
The main flow can be divided into the following parts:
1. Select location, enter metadata and properties in the wizard.
2. Creation of the EPiServer CMS 5 page.
3. Preparation of HTML.
4. Uploading files.
5. Filtering of the HTML content.
6. Preview.
Step 1 – The Wizard
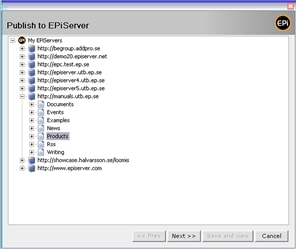
The most visible part of the solution is the wizard, which is activated from the Microsoft Office programs Word, Excel and PowerPoint. First, the wizard lets the user choose the EPiServer CMS 5 site to publish to. (Information about EPiServer CMS 5 Web sites that are available for the user is stored in the registry together with an activation key.)
When the user selects a Web site, the wizard will contact the server using a Web service, receive pages from the site and make it possible for the user to choose a location for the new page. If no password or session cookie has been stored earlier, a login prompt will appear. A session cookie for an authenticated connection will be stored until the user logs off the computer.
| Note If the Microsoft Office document was unsaved, the user will be prompted to save the document or cancel before the process continues. |
| Note When a document is published for the first time, a Microsoft Office property will be placed in the document to describe where the document has been published, if the AllowDocumentUpdate property is used on the page type and set to true. This applies, for example, on the Document page type by default. If a user tries to republish a document that has already been published, a warning appears. The user can now decide if the EPiServer CMS 5 page based on the document should be updated or if a new page should be created. |
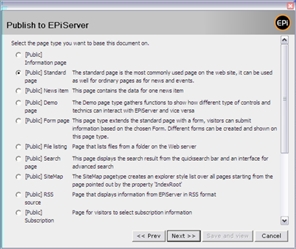
When the user has selected a location for the page, an EPiServer page type must be selected. This step has the same behavior as the "Create new page" functionality in EPiServer CMS 5 and will display page types based on the allowed child page types from the parent page type. If the parent page only allows one kind of page type, the wizard will jump to the next step.
As we need to convert the source document to fit the page type we add another restriction that the page type needs both a configured filter, script and wizard for the current document type (based on the extension). By default all page types have support for extensions .DOC, .DOCX, .XLS, .XLSX, .PPT and .PPTX.
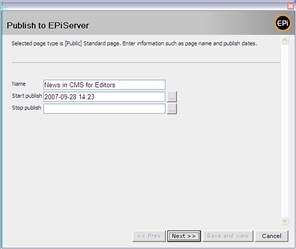
The next step in the wizard will make it possible for the user to enter metadata for the page. The fields that will be available are configured by the system administrator or developer. A selection of metadata will be displayed by default, such as page name. The fields shown are ordinary EPiServer CMS 5 properties and will behave exactly as they would if they were shown in EPiServer CMS 5 Edit mode.
Tip! If you want to add complex custom functionality in a step, configure a step in the wizard to be rendered by a custom user control.
| Note The DHTML editor is not supported in the wizard, if you need to add a property to let the user enter text, you should use an ordinary text area. |
Step 2 - Create the EPiServer CMS 5 Page
The wizard is completed by selecting Save and view. This will activate the next step in the publishing process, which is the creation of an unpublished page in EPiServer CMS 5. (The page will be published later in the process.) After the page has been created with the data entered by the user, some information is returned to the client, e.g. Page ID, to be able to continue with the next step.
Step 3 - Preparing Data on the Client
When a page has been created, the process of preparing the data to be sent to the server will start. All Office programs can produce an HTML version of the document. The basic HTML preparation is therefore done on the client side using the program that the document was created in. The preparation is from a technical point of view handled by a script file (.wsc), which is downloaded from the Web server. This also means that a developer can create new script files without updating the client computers. You can configure different scripts for different EPiServer CMS 5 page types and different Office applications (actually different file extensions).
All scripts will produce output in the form of HTML files, images and other resources. These files will be placed in a temporary, local resource folder.
Tip! If you want to automatically create publication formats other than HTML (e.g. PDF, RTF or XML), add this functionality to a custom script file. The final output of a customized format should be placed in the Resource Folder to be automatically uploaded.
| Note If the property IsDocumentPageType is not present on the page, the original document will not be uploaded. The built-in scripts will also customize the output as this property indicates that the rich HTML version is not needed in, for example, PowerPoint. This property exists in the new page template Document. |
Step 4 – Uploading Files
The client application will upload all files to EPiServer CMS 5 by posting one file at a time to the server. If a file is larger than 4MB in size, it will be split into smaller parts to make sure that an upper restriction in the ASP.NET environment is not hit and to keep memory usage down.
Step 5 - Filtering and Final Adjustments
When the page is created and files are uploaded, a Web Service is called to commit data from the uploaded files to properties of the page. This Web Service will start an HTML washer on the server to clean the HTML produced by the client based on server defined rules.
Microsoft Office programs often produce some unwanted HTML tags that will not be displayed in a proper way on the Web site, which may interfere with the overall Web site design. Some of them will also break XHTML 1.1 and WAI compatibility. As a result of this, the filter will need to remove some HTML tags used to build up the document design to make sure it gets adapted to EPiServer CMS 5.
One advantage of the filter is that it has support to replace styles used in Word with styles used on the Web site. This has to be configured manually if you use custom styles on your Web site other than the default H1-H6. All style sheets in EPiServer CMS are configured for paragraphs that use H1-H6 by default. For further information on the filters, refer to the Filters chapter.
Tip! If you want to programmatically adjust the page created by the Office Integration package, listen to the EPiServer.UI.OfficeIntegration.ContentImport.ImportedPage event that will be triggered before the page is saved with the new content. For example, you could take the content created and add index to the page, adjust internal links or split the page into more pages. You can also use any information or file uploaded from the client side conversion process, for example adding customized metadata from the document.
Step 6 – Preview
The user previews the document and selects Publish when satisfied with the document. If the user selects Cancel the document and the uploaded files will be deleted.
Filters
The conversion of Microsoft Office documents from Office format to EPiServer CMS 5 format consists of two main steps. The first step uses the Office functionality to save the document in HTML format, as described in the previous chapter. The second step uses a filter to remove unnecessary formatting code and to adapt the document for EPiServer CMS 5. This chapter describes the filter functionality.
Depending on which filter is used, you can decide which formatting code is to be removed, which is to be allowed and which is to be modified. At the present there are two filter levels: a strict level and a tolerant level. The strict filter removes almost all formatting in order to fully apply the EPiServer Web style sheet (CSS formatting) instead, in accordance with the current XHTML recommendations. The tolerant filter allows a greater part of the formatting code in order to preserve the formatting of tables etc., giving a result that agrees more with the original document. However, this alternative does not fully live up to the current recommendations.
When the filter has been completed, the content will be saved into a predefined property of the page defined in the filter configuration. This is by default the MainBody property.
The EPiServer Office Integration package does not only produce a filtered HTML edition. It also saves the complete HTML representation produced by the Office program if the IsDocumentPageType property has been set. This is especially interesting to use when publishing Excel or PowerPoint documents. A published PowerPoint presentation is fully operational even when saved as HTML. The problem is that it will not fit a normal Web page and because of this, the Document template provided in the package will open this pure HTML version in a new window. The Document template does not use filtering at all and enables a very rich view of a document.
Strict Filter
The strict version of the filter is designed to remove all inline formatting, to make the resulting HTML rely merely on CSS formatting, in accordance with current XHTML recommendations. Applying this filter will result in the following:
- Font, font size and font colors are removed. Before filtration, this formatting is included in the style attribute of a <span> tag, and all <span> tags are removed.
- Table formatting is removed – colors, alignments, widths/heights etc. Before filtration, some of this formatting is included in the style attribute of a <span> tag, and all <span> tags are removed. The rest is removed from the corresponding tags (<table>/<tr>/<td>).
- Bold/Italic/Underlined text format is preserved. Formatting is made by <b>/<i>/<u> tags, which are preserved.
- Image alternative texts are preserved. Attributes of the <img> tag and these attributes are preserved.
- Hyperlink information is preserved. Attributes of the <a> tag and these attributes are preserved.
- Hyperlink indices are preserved. Attributes of the <a> tag and these attributes are preserved.
- Empty paragraphs (caused by blank lines) are removed. Before filtration, these are represented by <p> </p>, but they are removed.
- Script blocks and xml blocks are removed.
Tolerant Filter
The tolerant version of the filter is designed to remove some of the inline formatting, to make the resulting HTML rely both on CSS formatting in combination with inline formatting. This does not fully live up to the current XHTML recommendations, but is a compromise to make the Office integration as helpful as possible for editors by giving them the expected results when converting their documents to EPiServer. Applying this filter will result in the following:
- Font family is removed in order to assure Web style according to the style sheet. However, font size and font colors are preserved in tables. Font size and font colors in tables consist of the style attribute of the <span> tag in a <td> tag.
- Table formatting is preserved – colors, alignments, widths/heights etc. This formatting is included as attributes of <table/tr/td> tags.
- Bold/Italic/Underlined text format is preserved. Formatting is made by <b>/<i>/<u> tags, which are preserved.
- Image alignment and alt texts are preserved. Attributes of the <img> tag and these attributes are preserved.
- Hyperlink information is preserved. Attributes of the <a> tag and these attributes are preserved.
- Hyperlink indices are preserved. Attributes of the <a> tag and these attributes are preserved.
- Empty paragraphs (caused by blank lines) are removed. Before filtration, these are represented by <p> </p>, but they are removed.
- Script blocks and xml blocks are removed.
Characteristics and Limitations of the Conversion
Word Documents with Images and Tables
The Word document is first saved as filtered HTML using Word’s functionality, and is then passed through a filter and is finally saved as an EPiServer page.
|
WAI |
Alternative texts can be specified for images. Titles and descriptions can be specified for hyperlinks. CSS is used to format headings and text. No identification of column headers or row headers for tables is made. | |
|
Strict filter |
Tolerant filter | |
|
No table formatting. |
Inline table formatting instead of CSS. | |
|
XHTML |
CSS is used to format headings and text. | |
|
Strict filter |
Tolerant filter | |
|
- |
Inline table formatting instead of CSS. | |
|
Editor |
Alignments and alt texts of images are preserved. Texts, targets and titles of hyperlinks are preserved. CSS is used to format headings and text to Web look. | |
|
Strict filter |
Tolerant filter | |
|
Table formatting is lost. |
Table text colors, background colors, borders and alignments of tables are preserved. | |
PowerPoint Documents
Each page of the PowerPoint presentation is converted into a .PNG image when published to a non-document page type, and the images are inserted one beneath the other.
|
WAI |
No alternative texts are created for the images created from the presentation pages. |
|
XHTML |
- |
|
Editor |
In order to provide alt texts for the images, the HTML code view has to be used. |
Note The slide show functionality, including any animations, is preserved in the full HTML version of the PowerPoint document. However, this version will be available only when publishing using the “Document” page type.
Excel Documents
The active sheet, or the selected area in the case an area has been selected, of the Excel document is saved in filtered HTML format using Word’s functionality*, and is then passed through a filter to finally be saved as an EPiServer page.
* ) This way, the style classes used in Excel can be converted to inline styles in Word, which after filtering and rearranging styles makes the code adapted to EPiServer’s Editor for subsequent formatting.
|
WAI |
Alternative texts can be specified for images. No alternative texts can be specified for charts. CSS is used to format text that has not been specifically formatted. No identification of column headers or row headers for tables is made. | |
|
Strict filter |
Tolerant filter | |
|
No table or headings formatting. |
Inline table and headings formatting instead of CSS. | |
|
XHTML |
CSS is used to format text that has not been specifically formatted. | |
|
Strict filter |
Tolerant filter | |
|
No table or headings formatting. |
Inline table and headings formatting instead of CSS. | |
|
Editor |
Alignments and alternative texts of images are preserved. Alignments of charts are preserved, in order to provide alternative texts the HTML code view has to be used. CSS is used to format text that has not been specifically formatted to Web look. | |
|
Strict filter |
Tolerant filter | |
|
No formatting of contents. |
Font sizes, text colors, background colors, borders, widths, heights and alignments are preserved. | |
Customization
It is possible to modify the behavior of the script being executed, the wizard configuration, the filter, and the start page.
Getting Started
If configuration is not added, a default configuration will be used. This example configuration can be added to web.config to reconstruct the default behavior and get a start to configuration.
<configuration>
  <configSections>
    <sectionGroup name="episerverModules">
      <section name="officeIntegration" allowDefinition="MachineToApplication" allowLocation="false" type="EPiServer.UI.OfficeIntegration.ConfigurationHandler, EPiServer.UI" />
    </sectionGroup>
  </configSections>
  <episerverModules>
    <officeIntegration>
      <filters>
          <filter pageTypes="*" extensions="*" src="WordHtml.config" />
      </filters>
      <wizards>
        <wizard pageTypes="*" extensions="*" src="Default.config" />
      </wizards>
      <scripts>
        <script pageTypes="*" extensions="doc,docx" src="EPiServer.Word.wsc" />
        <script pageTypes="*" extensions="xls,xlsx" src="EPiServer.Excel.wsc" />
        <script pageTypes="*" extensions="ppt,pptx" src="EPiServer.PowerPoint.wsc" />
      </scripts>
    </officeIntegration>
All sections support both page type and extension as criteria for selection—a page type must match all three of these sections to show up in the wizard. In this configuration we point all page types to the default files. The page type's attribute should be the ID number of the page type or a comma-separated list of ID numbers.
| Note Do not edit the default files such as WordHtml.config, because it may be modified during an upgrade. |
Configuring Wizards
Wizards are displayed from the Microsoft Office application whenever a user selects a special page type. Wizard configuration files must be placed in the folder <UI_Folder>/OfficeIntegration/Wizard and only the name of the file is configured in the src attribute of the wizard tag.
The following example adds a custom wizard for page type 38.
      <wizards>
        <wizard pageTypes="38" extensions="xls" src="OnlyCategories.config" />
        <wizard pageTypes="*" extensions="*" src="Default.config" />
      </wizards>
The wizard configuration looks like this:
<?xml version="1.0" encoding="utf-8" ?>
<wizard name="Default" targetProperty="MainBody">
    <step name="MetaData" title="Meta data">
        <property name="PageName" />
        <property name="PageStartPublish" />
        <property name="PageStopPublish" />
        <property name="MainIntro" />
    </step>
    <step name="Done" title="Done" customcontrol="./Done.ascx" />
</wizard>
| Note The DHTML editor is currently not supported in a wizard step. |
Configuring Scripts
Scripts are executed to convert a document to HTML in a customized way. The scripts are treated as COM components so you can either use a .wsc file located on the server or specify a CLSID of a COM object. This option will require you to install the object on the client machines.
If you specify the script as a .wsc file it must be placed in the folder <UI_Folder>/OfficeIntegration/Components
<scripts>
        <script
            pageTypes="*"
            extensions="doc,docx"
            src="EPiServer.Word.wsc" />
        <script
            pageTypes="*"
            extensions="xls,xlsx"
            src="EPiServer.Excel.wsc" />
        <script
            pageTypes="*"
            extensions="ppt,pptx"
            src="EPiServer.PowerPoint.wsc" />
</scripts>
The COM object must support 2 methods: Convert and Cleanup. The convert method must take a single argument which is the configuration of the current execution. The following method exercises the input object.
Function Convert(oConfig)
       oConfig.DebugWrite "Entering My Convertor (script file)"
       sPath = oConfig.FilePath
       oConfig.PageName = "New Page Name"
       If oConfig.IsDocumentPageType Then
              (..)
       End If
       oConfig.UploadFolder = myResourceFolder
              End Function
Note The oConfig.DebugWrite method writes an entry to a log file that always exists on the client computer to make it easy to troubleshoot. The file is stored in C:\Documents and Settings\<user>\Local Settings\Application Data\EPiServer. The Local Settings folder is used to make sure the file doesn’t get replicated to a roaming profile in a Microsoft domain.
Configuring the Start Page
It is possible to configure the start page for the Office add-in so that it is set to a different start page than that used by the Web site. The start page is the root that appears and expands the Web site when clicking Publish to EPiServer in Microsoft Office programs.
The setting is done in in the episerver siteSettings section of web.config. If you do not include this value, the start page for the site is used instead.
pageOfficeStartId="3"
Configuring Filters
Overview
Filters are used to prepare and clean HTML for the DHTML editor in EPiServer CMS. It is possible to change the default configuration, so that all page types use the built-in strict filter instead:
<filters>
  <filter pageTypes="*" extensions="*" src="WordHtmlStrict.config" />
</filters>
Tip! If you are building a customized filter, copy one of our files and save it in your own folder.
Functionality
Global Settings for the Filters
The following attributes are available on the global settings node for the filter config file. The values for these can be either true of false.
- cleanstyles
Global setting that defines if styles should be cleaned according to the rules defined in the allowedstyles section. - removefonttags
Not used (Depreciated) - removeunknownnamespaces
Global setting that defines if unknown namespaces should be removed from content. - removecomments
Global setting that defines if comment nodes should be removed from content. - allowedclassregex
A regular expression that defines which classes should be spared if they are not defined under the classmapping node.
Allowed Styles
All styles to be kept in the final HTML should be configured here. You can specify styles for all tags using an asterisk (*) or specify styles to be kept for a specific tag.
Example:
<allowedStyles>
    <add key="*" value="" />
    <add key="table" value="border,width" />
</allowedStyles>
Node Mappings
This part can be used to replace one tag with another. It is especially useful to convert a tag like <h1> to a class-based tag like <p class=’heading1’>. The value should be the complete tag encoded for a XML attribute.
Example:
<nodemappings>
<add key="h1" value="<p></p>" />
</nodemappings>
Delete Tags
In deletetags you can specify which tags should be totally removed from the HTML. This section does not remove content inside the tag. Use deleteblock for that function.
Example:
<deletetags>
   <add key="span" />
</deletetags>
Class Mappings
In classmapping you can define the class that a class in Word should represent on the Web. The filter will change all styles accordingly.
Example:
<classmapping>
   <add key="WordStyle1" value="WebStyle1" />
</classmapping>
Delete Blocks
Tags defined in deleteblock will be deleted with all content contained in the tag.
Tip! If you want to remove all instances of <p> </p>, you could write the syntax below. It will use the search ability in the filter and search for all <p> tags that include . The whole tag will be deleted.
Example:
<deleteblock>
<add key="p[text()='&nbsp;']" />
</deleteblock>
Delete Tag Attributes
If you want to delete specific attributes in a tag, you should specify them here.
Example:
<deletetagattributes>
   <add key="*" value="hspace, vspace" />
</deletetagattributes>
Document Page Template
The Document page template was built to be able to display the rich HTML version of a document without losing any functionality or overall design.
The reason why this page type behaves differently is defined in a number of properties that you can use on any page type. The properties are stand-alone and are independent of each other.
|
Property name |
Description |
|---|---|
|
DocumentInternalPath |
If the IsDocumentPageType is set, this property will contain the path to the uploaded source document. |
|
DocumentInternalHtmlPath |
If the IsDocumentPageType is set, this property will contain the path to the starting point for the rich HTML version. |
|
DocumentExternalPath |
The path to the location of the source document may be used, for example, by other editors to see which document was used to publish this page. |
|
IsDocumentPageType |
Controls if the client application should upload a copy of the original document. This will also be sent to the convert scripts that will skip building a rich HTML version if this property has not been set. |
|
AllowDocumentUpdate |
Controls if the client application should add properties to the word document so that the user can republish the document. |
WAI and XHTML
Within this solution, it is possible to create pages that follow XHTML 1.1 recommendations. The filter must, however, be configured rather strictly, which leads to a loss of graphical design elements. It is up to the system administrator to decide on the level of HTML to be produced.
The solution does support adding descriptions of images (ALT attribute) using Word and Excel. Some images such as charts in Excel does not support descriptions, this means that some pages created using Office Integration needs to be adjusted within EPiServer to fully follow WAI recommendations.
It is possible to add an alternative text to an image in Microsoft Word so that it will be shown in the HTML edition:
- In Microsoft Word 2003, right-click on the image and select Format Picture. Go to the Web tab, type your alternative text and click OK.
- In Microsoft Word 2007, right-click on the image and select Size. Go to the Alt Text tab, type your alternative text and click OK.
Security Issues
In the Office Integration solution, calls will be made to a Web Service that makes it possible to read and alter data in EPiServer CMS. Calls will also be made to different .aspx pages to read data, alter data and upload files.
The security model used is that all server-side parts of the solution require that users have specific permission to the function called “View and publish pages from Microsoft Office Add-In”. The user is not required to have access to Edit mode to be able to use the Office Integration, but will need access to Edit mode to be able to activate the account. You can, of course, allow a user temporary access to Edit mode to activate the account.
On activation in Edit mode, a randomized string, which is cryptographically unique per user, will be created. This key is stored both in EPiServer CMS and on the client. This activation key is then used to encrypt the password using 128-bits encryption whenever sent to the server and then decrypted by the server with the same key. The user can activate the account on different machines as the activation key is not regenerated after first created. The activated sites are stored per user in Microsoft Windows on the client, so different profiles on the same computer can have different settings. The activation key is not used by the individual Web services and Web forms. You still have to be restrictive with the permissions for functions. The activation key is an extra layer of protection on top of both the authentication Web service and the user's password, while transmitted over the network.
The client application has an option to remember the user's password. If the user selects this option, the password will be stored in the local registry encrypted based on the local user account and not the activation key. Neither the encrypted password nor the activation key can therefore be moved to another user.