Don't miss out Virtual Happy Hour this Friday (April 26).
Try our conversational search powered by Generative AI!
AI OnAI Off
Don't miss out Virtual Happy Hour this Friday (April 26).
|
Product version: |
EPiServer CMS 5 R2 SP1 |
|---|---|
|
Document version: |
1.0 |
|
Document last saved: |
EPiServer CMS 5 Enterprise is a solution that shares the same file structure and can store different types of information on the Web site in the same database. This tech note describes the configuration and the technology behind EPiServer CMS 5 Enterprise.
EPiServer CMS 5 Enterprise is intended for environments that have several similar Web sites set up that are able to share information. When the enterprise configuration is complete, it is possible to link information from one Web site to another and edit every Web site in Edit mode.
To enable Enterprise functions, an EPiServer CMS 5 Enterprise license is required. There are two different types of licenses:
Load Balance Scenario requires 2 licenses?
If you are running a load balanced senario with all files on a file share (all the files on one server and then two web servers infront with access to the same files), then you have to be able to add two License.config files to the same folder. To get around this problem you can add your computername to the name of the License.config file.
The Enterprise license can be used to run a number of different Web sites on the same server without sharing information between the sites, for example, the Enterprise license is used to purchase multiple EPiServer CMS 5 licenses. This does not require extra administration and will not be mentioned in this document.
This is the actual Enterprise configuration. Its purpose is to allow files and information to be shared between Web sites. This means that the Web sites will share the same database and set of files. In the Internet Information Server each site's home directory will be mapped to the same directory on the local hard drive.
EPiServer CMS 5 R2 has support for the following scenarios:
This configuration has the following restrictions:
To install EPiServer CMS 5 Enterprise a few extra steps need to be performed when compared to the EPiServer Professional installation.
This is a regular EPiServer CMS 5 installation using an Enterprise license file. For installation instructions, see the technical note EPiServer CMS 5 R2 Installation Instructions.
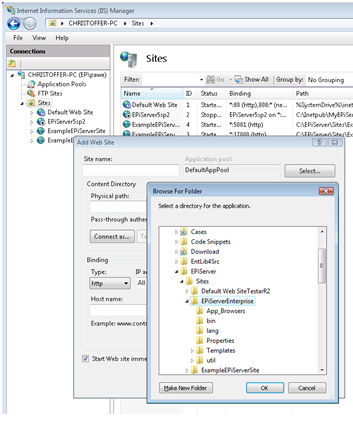
To set up multiple Web sites follow the instructions below:

In IIS integrated pipeline mode the ASP.NET functionality is fully integrated into the main request processing in IIS, which means that all ASP.NET features are now available for any type of requests
<handlers accessPolicy="Read, Script">
...
<add name="ASP.NET-ISAPI-2.0-Wildcard"
 path="*" verb="GET,HEAD,POST,DEBUG"
 modules="IsapiModule"
 scriptProcessor="%windir%\Microsoft.NET\
 Framework\v2.0.50727\aspnet_isapi.dll"
 preCondition="classicMode,runtimeVersionv2.0,
 bitness32" responseBufferLimit="0" />
<add name="StaticFile"...
...
</handlers>
<site siteId="ExampleSite1" description="Example Site 1">
  <siteSettings
  enableEvents="true"
  enableRemoteEvents="true"
  pageStartId="3"
  siteUrl="http://www.company.com/"
  uiUrl="http://www.company.net/yourUI/"
  utilUrl="~/Util/"
  pageWastebasketId="2"
  pageRootId="1"
  categoryId="1"
  siteDisplayName="Example Site 1" />
</site>

<site siteId="ExampleSite2" description="Example Site 2">
  <siteSettings
  enableEvents="true"
  enableRemoteEvents="true"
  pageStartId="0"
  siteUrl="http://enterprise2/"
  uiUrl="~/yourUI/"
  utilUrl="~/Util/"
  pageWastebasketId="2"
  pageRootId="1"
  categoryId="1"
  siteDisplayName="Example Site 2" />
</site>
Add a <siteHosts> section in each <site> section. This is used to determine which <site> section to use based on the host name of the incoming request.
NOTE: One site must have a name="*". This is used to indicate the default site which will receive requests not mapped to any other host names. Also a host name may only appear once.
The <siteHosts> section is also used to control default language mapping for a host. See the EPiServer CMS Globalization tech note for more information on language mapping.
<site siteId="EampleSite1" description="Example Site 1">
  <siteHosts>
    <add name="www.company.com" />
    <add name="www.company.net" />
  </siteHosts>
  <siteSettings  ... />
</site>
<site siteId="ExampleSite2" description="Example Site 2">
  <siteHosts>
    <add name="*" />
  </siteHosts>
  <siteSettings  ... />
</site>
Public Templates can be installed on the new Web site. See the EPiServer CMS 5 R2 Installation Instructions for further information.
The unique site configuration information for each site will be stored in a section in the web.config file under <Sites>. For example, the site servicing requests for host name "enterprise" and "altenterprise" could have a section similar to the one below:
<episerver>
  <sites>
    <site siteId="ExampleSite" description="Example Site">
        <siteHosts>
            <add name="enterprise" />
            <add name="altenterprise" />
        </siteHosts>
        <siteSettings
          enableEvents="true"
          enableRemoteEvents="true"
          siteUrl="http://enterprise/"
          uiUrl="~/yourui/"
          utilUrl="~/Util/"
          siteDisplayName="Enterprise Site
          uploadDir="~/upload/"
          pageFolderVirtualPathProvider="EPiServerPageVPP"
          uiTheme=""
          pageWastebasketId="2"
          pageOfficeStartId="0"
          uiMaxVersions="0"
          uiVersionMerging="true"
          pageValidateTemplate="false"
          uiKeepUserLoggedOn="true"
          ...=""
          />
    </site>
  </sites>
</episerver>
The <siteHosts> section acts as a selector, determining the requests will be routed to a specific enterprise instance. The siteUrl attribute acts as a "default URL to the web site" in cases where you need to generate links to the web site without having a request to base the response upon, for example in subscription scenarios. Also note that the uiUrl attribute now supports the application-relative syntax, i e it is no longer necessary to enter the complete URL with protocol and host name. The application-relative version of a uiUrl will allow you to access the UI (edit and admin) with any host name that you can use to access the site. If you enter a complete URL, you will be restricted to accessing the site via that specific host name and port.
NOTE: Each Web site specifies all of it’s parameters independently of others.
A feature that the Enterprise edition has introduced is intelligent cache updates. From a .NET viewpoint, all your enterprise Web sites are completely separate applications, running in their own appDomains. Since all sites share the same database and may be affected by page updates on other sites, the system needs to be able to update page information between all the enterprise Web sites.
The cache update between sites, regardless of whether they are running on the same machine or not, is done via UDP network traffic. The only configuration that is needed is to make sure that enableEvents and enableRemoteEvents are both set to true as per the examples above.
When a site starts, it registers its siteId in the database (if it's not already there). It then reads all siteId's back from the database and registers an interest in receiving cache notifications for each one.
If the cache update mechanism does not appear to work, the cause is most likely that you have network devices between your servers that prevent UDP broadcasts from being relayed. Software-based firewalls (i.e. the Windows Firewall) may also need to be configured to allow the UDP traffic to reach the machine.
A possible misconception regarding authentication in Enterprise solutions is that logging out on one site while being logged in on other sites would log you out from these Web sites as well. This is not the case. When logging out from an Enterprise site, for example, to leave the computer, make sure to log out from other Web sites.