Configuring EPiServer CMS 5 R2 SP1 Enterprise
|
Product version: |
EPiServer CMS 5 R2 SP1 |
|---|---|
|
Document version: |
1.0 |
|
Document last saved: |
2009-02-27 |
Introduction
EPiServer CMS 5 Enterprise is a solution that shares the same file structure and can store different types of information on the Web site in the same database. This tech note describes the configuration and the technology behind EPiServer CMS 5 Enterprise.
Table of Contents
- Information
- License Requirements
- Supported Enterprise Scenarios
» Multiple Stand-Alone Sites
» Sharing Information Between Web Sites
» Scenarios Supported in EPiServer CMS 5
» Configuration Restrictions - Installation
» Install the First Enterprise Web Site
» Install Multiple Enterprise Web Sites
» Configuration Restrictions - Configuration
» Start Page Setup - Technical Details
» Web.Config
» Local and Remote Cache Update - Additional Information
» Security
Information
EPiServer CMS 5 Enterprise is intended for environments that have several similar Web sites set up that are able to share information. When the enterprise configuration is complete, it is possible to link information from one Web site to another and edit every Web site in Edit mode.
License Requirements
To enable Enterprise functions, an EPiServer CMS 5 Enterprise license is required. There are two different types of licenses:
- Single Enterprise License - All Web sites that have purchased a single Enterprise license must run on one server.
NOTE: A valid single license must be purchased before running the "master" Enterprise license. - Enterprise CMS 5 Enterprise License - With the purchase of an EPiServer CMS 5 Enterprise license you can request up to three load-balancing licenses. Each Web site running a "master" Enterprise license can be deployed on up to three additional load-balancing servers.
NOTE: The load-balancing licenses are only valid for sites running on a "master" enterprise license.
EPiServer License Center streamlines the ordering process for EPiServer partner companies and makes it equally easy for independent users to generate a free demo license.
Supported Enterprise Scenarios
Multiple Stand-Alone Sites
The Enterprise license can be used to run a number of different Web sites on the same server without sharing information between the sites, for example, the Enterprise license is used to purchase multiple EPiServer CMS 5 licenses. This does not require extra administration and will not be mentioned in this document.
Sharing Information Between Web Sites
This is the actual Enterprise configuration. Its purpose is to allow files and information to be shared between Web sites. This means that the Web sites will share the same database and set of files. In the Internet Information Server each site's home directory will be mapped to the same directory on the local hard drive.
Scenarios Supported in EPiServer CMS 5 R2
EPiServer CMS 5 R2 has support for the following scenarios:
- Multiple EPiServer CMS installations under a single IIS site, i.e. in their own virtual directories.
- Serveral IIS sites may use the same web.config <site> section. This is especially useful when building globalized Web sites, where you use the <siteHosts> section to map a host name to a default language. If you have several IIS sites, they must use the same start page ID, since the sites are configured identically.
Configuration Restrictions
This configuration has the following restrictions:
- The sites must be installed on the same computer. Running sites on a different computer is regarded as load-balancing from an EPiServer CMS 5 Enterprise standpoint. See load balancing configuration for more details.
- The sites must use the same start page template file (default.aspx in the site's root folder). This limitation can be overcome by overriding the method GetDefaultDocuments in your global.asax.cs file. See documentation for EPiServer.SiteBase.GetDefaultDocuments for more details.
- Each EPiServer CMS 5 Enterprise site that uses its own <site> section must have a unique Start page ID. See Scenarios Supported in EPiServer CMS 5 R2.
- Each EPiServer CMS 5 Enterprise site must use the same Wastebasket page ID and Root page ID.
Installation
To install EPiServer CMS 5 Enterprise a few extra steps need to be performed when compared to a non Enterprise EPiServer CMS 5 R2 installation.
Install the First Enterprise Web Site
This is a regular EPiServer CMS 5 installation using an Enterprise license file. For installation instructions, see the technical note EPiServer CMS 5 R2 SP1 Installation Instructions.
Install Multiple Enterprise Web Sites
To set up multiple Web sites follow the instructions below:
- Create a new Web site in Internet Information Services Manager (IIS Manager).
- Configure the home directory to point to the same home directory as your first Enterprise Web site.
IIS 7: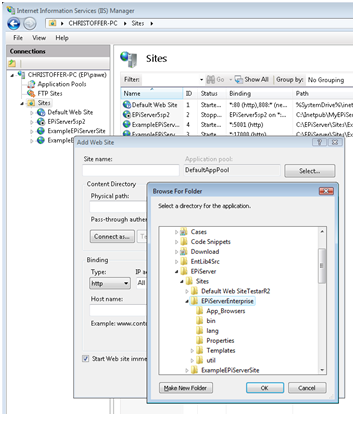
IIS 6: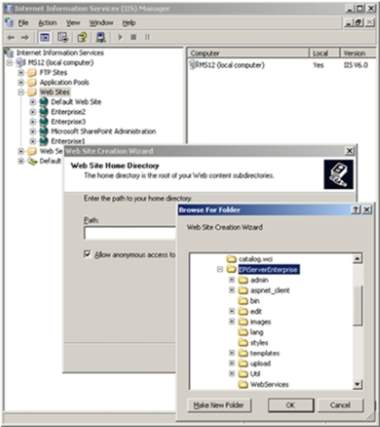
- Configuring Wildcard Mapping
Note: Usually when residing on IIS7, EPiServer CMS 5 R2 Web sites are set to integrated pipeline mode - no steps will be required to achieve wild card mapping.
Windows Server 2003 / IIS 6
CIn the Properties dialog box, go to the Home Directory tab and click Configuration.
Click Insert... to add a new mapping to a wildcard that points to the aspnet_isapi.dll file (the path to this file can be copied from the .aspx extension mapping). Do not select the "Verify that the file exists" check bo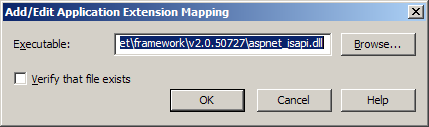
In IIS 7 there two ways to achieve wild card mapping:
Windows Server 2008 / IIS7IIS 7 integrated pipeline mode (instead of wildcard script mapping)
In IIS integrated pipeline mode the ASP.NET functionality is fully integrated into the main request processing in IIS, which means that all ASP.NET features are already available for any type of requests
With classic pipeline mode the ASP.NET is plugged into the IIS request processing pipeline as an ISAPI extension - exactly the same way as it was in IIS 6. Open %WINDIR%\system32\inetsrv\config\applicationHost.config file and locate the <handlers> section.
IIS 7 classic pipeline mode
Configure wildcard mapping for the ASP.NET running in classic mode by adding one more handler mapping to the <handlers> section - before the handler mapping for static files (the order is important), see below:<handlers accessPolicy="Read, Script">
...
<add name="ASP.NET-ISAPI-2.0-Wildcard"
path="*" verb="GET,HEAD,POST,DEBUG"
modules="IsapiModule"
scriptProcessor="%windir%\Microsoft.NET\
Framework\v2.0.50727\aspnet_isapi.dll"
preCondition="classicMode,runtimeVersionv2.0,
bitness32" responseBufferLimit="0" />
<add name="StaticFile"...
...
</handlers> - Make a new site section (usually in the first Enterprise Web Site) in the <sites> block of your site's Web.config file. To distinguish between the sites, you must supply a siteId attribute for each site. See the following example of a site's section with two sites. A siteId attribute is simply an abstract unique name.
<site siteId="ExampleSite1" description="Example Site 1">
  <siteSettings
  enableEvents="true"
  enableRemoteEvents="true"
  pageStartId="3"
  siteUrl="http://www.company.com/"
  uiUrl="http://www.company.net/yourUI/"
  utilUrl="~/Util/"
  pageWastebasketId="2"
  pageRootId="1"
  categoryId="1"
  siteDisplayName="Example Site 1" />
</site>

<site siteId="ExampleSite2" description="Example Site 2">
  <siteSettings
  enableEvents="true"
  enableRemoteEvents="true"
  pageStartId="0"
  siteUrl="http://enterprise2/"
  uiUrl="~/yourUI/"
  utilUrl="~/Util/"
  pageWastebasketId="2"
  pageRootId="1"
  categoryId="1"
  siteDisplayName="Example Site 2" />
</site>
Note: See the tech note Configuration in EPiServer CMS 5 R2 for further information about configuration settings. -
Add a <siteHosts> section in each <site> section. This is used to determine which <site> section to use based on the host name of the incoming request.
NOTE: One site must have a name="*". This is used to indicate the default site which will receive requests not mapped to any other host names. Also a host name may only appear once.
The <siteHosts> section is also used to control default language mapping for a host. See the EPiServer CMS Globalization tech note for more information on language mapping. -
If desired, Public Templates can be installed on the new Web site. See the EPiServer CMS 5 R2 SP1 Installation Instructions for further information.
<site siteId="EampleSite1" description="Example Site 1">
  <siteHosts>
    <add name="www.company.com" />
    <add name="www.company.net" />
  </siteHosts>
  <siteSettings  ... />
</site>
<site siteId="ExampleSite2" description="Example Site 2">
  <siteHosts>
    <add name="*" />
  </siteHosts>
  <siteSettings  ... />
</site>
Technical Details
web.config
The unique site configuration information for each site will be stored in a section in the web.config file under <Sites>. For example, the site servicing requests for host name "enterprise" and "altenterprise" could have a section similar to the one below:
<episerver>
  <sites>
    <site siteId="ExampleSite" description="Example Site">
        <siteHosts>
            <add name="enterprise" />
            <add name="altenterprise" />
        </siteHosts>
        <siteSettings
          enableEvents="true"
          enableRemoteEvents="true"
          siteUrl="http://enterprise/"
          uiUrl="~/yourui/"
          utilUrl="~/Util/"
          siteDisplayName="Enterprise Site"
          pageFolderVirtualPathProvider="EPiServerPageVPP"
          uiTheme=""
          pageWastebasketId="2"
          pageOfficeStartId="0"
          uiMaxVersions="0"
          uiVersionMerging="true"
          pageValidateTemplate="false"
          uiKeepUserLoggedOn="true"
          ...=""
          />
    </site>
  </sites>
</episerver>
The <siteHosts> section acts as a selector, determining the requests will be routed to a specific enterprise instance. The siteUrl attribute acts as a "default URL to the web site" in cases where you need to generate links to the web site without having a request to base the response upon, for example in subscription scenarios. Also note that the uiUrl attribute now supports the application-relative syntax, i e it is no longer necessary to enter the complete URL with protocol and host name. The application-relative version of a uiUrl will allow you to access the UI (edit and admin) with any host name that you can use to access the site. If you enter a complete URL, you will be restricted to accessing the site via that specific host name and port.
NOTE: Each Web site specifies all of it’s parameters independently of others.
Local and Remote Cache Update
A feature that the Enterprise edition has introduced is intelligent cache updates. From a .NET viewpoint, all your enterprise Web sites are completely separate applications, running in their own appDomains. Since all sites share the same database and may be affected by page updates on other sites, the system needs to be able to update page information between all the enterprise Web sites.
The cache update between sites, regardless of whether they are running on the same machine or not, is done via UDP network traffic. The only configuration that is needed is to make sure that enableEvents and enableRemoteEvents are both set to true as per the examples above.
When a site starts, it registers its siteId in the database (if it's not already there). It then reads all siteId's back from the database and registers an interest in receiving cache notifications for each one.
If the cache update mechanism does not appear to work, the cause is most likely that you have network devices between your servers that prevent UDP broadcasts from being relayed. Software-based firewalls (i.e. the Windows Firewall) may also need to be configured to allow the UDP traffic to reach the machine.
Additional Information
Security
A possible misconception regarding authentication in Enterprise solutions is that logging out on one site while being logged in on other sites would log you out from these Web sites as well. This is not the case. When logging out from an Enterprise site, for example, to leave the computer, make sure to log out from other Web sites.