Installation Instructions for Episerver Relate 2 R2
| Product version: | EPiServer Relate 2 R2 |
|---|---|
|
Document last saved: |
Introduction
The Relate 2 R2 package contains EPiServer Community 4.1, EPiServer Mail 5.1, and the Relate Templates 2.1, for integration with EPiServer CMS 6 R2. This document describes how to install Relate 2 R2 with its components.
The installation of the Relate package is done through the EPiServer Deployment Center.
Table of Contents
- Prerequisites for Relate
- Downloading Relate
- Express Installation
- Application Files Installation
- Installing Relate on an existing site
- Configuring an Account for the Video Gallery in Relate
- Upgrading Relate
Prerequisites for Relate
EPiServer Relate 2 R2 requires EPiServer CMS 6 R2.
Downloading Relate
The Relate download zip file contains the Microsoft Installer files and the Setup.exe. Running the "Setup.exe" file will start the installation of the various components, the EPiServer Deployment Center and optionally a database and an example website.
Perform these steps to download Relate installation files
- Download the Relate zip file and unzip the contents to your hard drive.
- Run the "Setup.exe" file. When running setup.exe, the installer will check if the required software components and versions are installed on the machine. If any of the software components or versions are incorrect then a dialog will appear informing you of the software that is required to be installed or updated.
- Accept the terms of the license agreement by clicking in the accept box and then click OK.
- The Relate Setup Wizard will appear - click Next in the dialog to continue with the installation.
- Choose the type of installation you want and click Next:
Application Files will install the Relate application files. The Relate website can then be created later through the EPiServer Deployment Center.
Express will in addition to deploying all necessary file also create an example website and database using default names.
Each of these options are described in more detail below. - Click Install to begin the installation.
The next steps depends on which installation type you have chosen of Express installation or Application files installation, the procedure for each option is described in more detail below.
Express Installation
If you have chosen the Express installation option, the installer will complete the installation using default values. You will only be asked to select a license file and to enter a username/password for creating an administration account for the website.
Perform these steps to install Relate using the Express Installation option
- Provide paths for the license configuration files that you want to use for the site, one for Relate and one for EPiServer CMS. This is optional at this point, if omitted the site will be created but will report licensing errors.
Click Next to continue. - Create an account for the site administration, provide Administration account username/password. This will be used when logging in to the Relate website the first time.
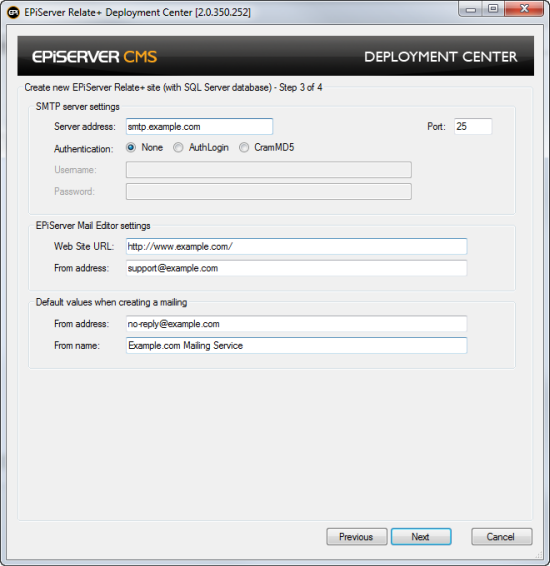
Click Next to continue. - In order to set up EPiServer Mail properly, you need to provide some configuration settings for the mail server and mailings:
SMTP Server settings
Server Address: Enter the name of the SMTP Server instance to use and the Port number. This is the mail server from where the e-mail messages will be sent - if it is the same server as where the EPiServer CMS website resides entering localhost should be sufficient.
Authentication: None, AuthLogin, CramMD5. Determines the connection authentication.
Username; If required add the username. Password; If required add the password.
EPiServer Mail Editor Settings
website URL: Web address of the site you will be running EPiServer Mail from.
From address: e-mail address from where the e-mail messages are sent.
Default values when creating e-mail messages
From address: e-mail address that is visible in the sent e-mail messages (can be used to mask the e-mail address from where the e-mail messages are sent - see above).
From name: name of the sender of the e-mail messages.
Replace the default values with the values for your mailing settings and click Next to continue.
- A summary of all the steps that will be taken by the wizard when it completes will be displayed.Click Install to continue.
- When the installation is finalized, the new Relate site will be opened, and you can login using the administration account created earlier.
- If the site is not opened in a web browser, click Finish to finalize the installation. Use the IIS Manager to manually start the site if required.
- When the installation is completed you can choose to launch the EPiServer Deployment Center and to display the "Getting started" information. Click OK to continue. From the "Getting Started" information you can access the EPiServer Deployment Center, which will give you various options to continue working with your Relate website.
Application Files Installation
If you have chosen the Application Files installation option, you can finalize the installation from the EPiServer Deployment Center. You will have the possibility to customize the installation according to your needs.
Perform these steps to install Relate using the Application Files Installation option
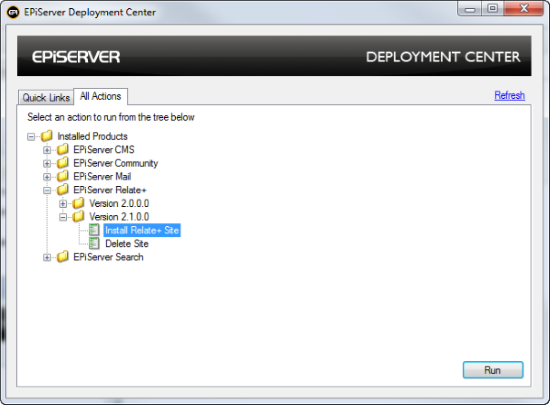
- Open the EPiServer Deployment Center from the program menu. To install a Relate example website, choose the option Install Relate Site under EPiServer Relate/Version 2.1.0.0, and click Run to start the installation.
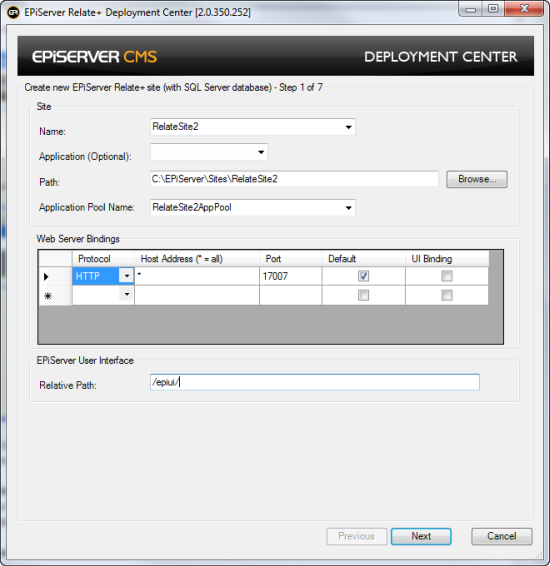
- In the next step you will have the possibility to provide configuration for your web server, or you can select the predefined values:
- Enter a name for the site to be installed in the site Name field.
- Enter Application (optional).
- Enter Path for the site.
- Enter Application Pool Name (optional, not supported by IIS on Windows XP).
- Enter Web Server Bindings.
- Enter EPiServer User Interface Relative Path.
Click Next to continue.
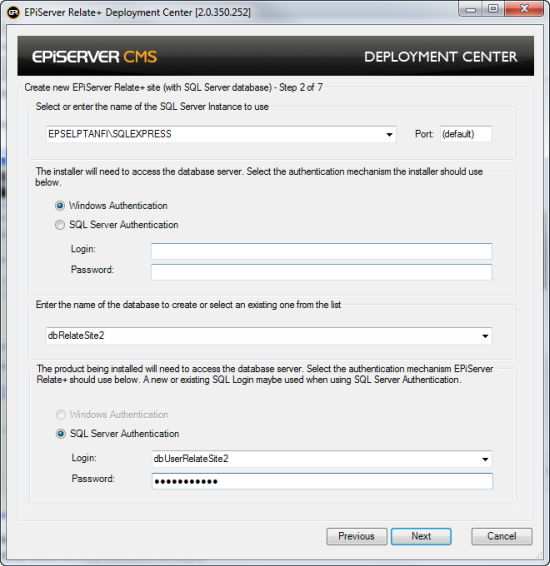
- This step will gather information about how to connect to the database server and information about the Relate database about to be created. NOTE During the installation, the existing SQL database collation (sort order) will be used when creating the database. If you have specific collation requirements, consider your choice of collation and create a database which meets your requirements ahead of deployment.
- Select or Enter the name of the SQL Server Instance to use and the Port number
(default) in the Port field defines the database server's default port. If you wish to install to another database server port, change the value to the desired port number.
- Select the authentication mechanism to use when accessing the SQL Server, this is the account that will be used for creating the database.
- Enter the name of the database to create or select an existing one from the list
- Enter the name of the user you want EPiServer to use when accessing the database or select an existing one from the list
Owner rights to the database (passwords must include lower and upper case, a digit and a non-alphanumeric character). In the Password field, type the password associated with the specified user.
Click Next to continue.
- In the Path field, select or create the folder where Virtual Path Provider files will be stored for the site. Each VPP will create a child folder under the folder selected in the wizard.
Click Next to continue. - Provide paths for the license configuration files that you want to use for the site, one for Relate and one for EPiServer CMS. This is optional at this point, if omitted the site will be created but will report licensing errors.
Click Next to continue. - Create an account for the site administration, provide Administration account username/password. This will be used when logging in to the Relate website the first time.
Click Next to continue. - In order to set up EPiServer Mail properly, you need to provide some configuration settings for the mail server and mailings:
SMTP Server settings
Server Address: Enter the name of the SMTP Server instance to use and the Port number. This is the mail server from where the e-mail messages will be sent - if it is the same server as where the EPiServer CMS website resides entering localhost should be sufficient.
Authentication: None, AuthLogin, CramMD5. Determines the connection authentication.
Username; If required add the username. Password; If required add the password.
EPiServer Mail Editor Settings
website URL: Web address of the site you will be running EPiServer Mail from.
From address: e-mail address from where the e-mail messages are sent.
Default values when creating e-mail messages
From address: e-mail address that is visible in the sent e-mail messages (can be used to mask the e-mail address from where the e-mail messages are sent - see above).
From name: name of the sender of the e-mail messages.
Replace the default values with the values for your mailing settings and click Next to continue.

- A summary of all the steps that will be taken by the wizard when it completes will be displayed. Click Install to continue.
- The Relate site will be created.
- When the installation is finalized, the new Relate site will be opened, and you can login using the administration account created earlier. If the site is not opened in a Web browser, click Finish to finalize the installation. Use the IIS Manager to manually start the site if required. Opening the EPiServer Deployment Center from the programs menu will give you various options to continue working with your Relate website.
Installing Relate on an Existing Site
Follow the instructions in the Downloading Relate section above, select the Application Files setup type. After the installations is finished, open EPiServer Deployment Center.
Install EPiServer Community
- Expand the EPiServer Community node and the appropriate version node (4.1) below it.
- Select the Install Community on existing site option and click the Run button.
- At the first wizard step select the existing EPiServer CMS site you wish to install to.
- At the second step you must decide if you want to have EPiServer Community use the same database as EPiServer CMS or if it should have a separate database.
- If you want to use the same database you should first create a backup of it. Then select the existing CMS site's database from the drop-down and input the SQL user's name and password which can be found in the connectionStrings.config file of the existing CMS site.
- If you want Community to have a separate database you simply input a new database name, SQL username and password.
- Continue through the steps in the wizard and click Install button on the final step.
Install EPiServer Mail
- Expand the EPiServer Mail node and the the appropriate version (5.1) node below it.
- Select the Install Mail on existing site option and click the Run button.
- At the first wizard step select the existing EPiServer CMS/Community site you wish to install to.
- Continue through the steps in the wizard and click Install button on the final step.
Install Relate templates (optional)
| NOTE! For the Relate templates and import package to work "out of the box" you need to make the "Home" page (imported via the RelatePlus.episerverdata file) the start page of the whole site by updating the pageStartID attribute in web.config. If you don't want to change the start page you must either copy the properties and values from the "Home" page to your own start page or rewrite the code in the Relate project. |
- Open Microsoft SQL Management Studio and connect to the server where the EPiServer Community database is located. This database may be separate or shared with EPiServer CMS depending on what option you chose.
- Open a new query window for the Community database and paste the content of the C:\[Program Files]\EPiServer\RelatePlus\[version]\Install\Database\SQL\RelatePlus.sql file into it. Execute the query.
- Now you have to decide if you want to integrate the Relate template project with your existing project or if you want to keep the projects separate.
- To integrate the projects you need to copy the bin, customEntity, flvplayer, lang and templates folders and the properties/Settings.Designer.cs and properties/Settings.settings files located in C:\[Program Files]\EPiServer\RelatePlus\[version]\Application into your existing project. Then open your project and, click the "Show all files" icon and add all files in the /Templates/RelatePlus, /CustomEntity and /Properties folders to the project.
- If you choose to keep the projects separate you simply set up a separate project based on the files in the C:\[Program Files]\EPiServer\RelatePlus\[version]\Application folder and copy the output of that project to your site.
- Now you need to add references to your merged project. Add references to these assemblies in the /bin folder:
AjaxControlToolKit.dll
BoneSoft.CSS.dll
DotNetOpenAuth.dll
EPiServer.ApplicationModules.dll
EPiServer.Common.*.dll
EPiServer.Community.*.dll
System.CompnentModel.Composition.dll
...and these assemblies in the GAC:
System.Runtime.Serialization.dll
System.ServiceModel.Web.dll - If you project is set to treat warnings as errors you might have to turn that off due to warnings about non-CLS-compliant classes.
- Apply the XML updates from the files in the C:\[Program Files]\EPiServer\RelatePlus\[version]\Install\Configuration to the web.config file of your project. The changes in the web.config.xmlupdate should always be applied and the changes in EITHER web.config.iis6.xmlupdate OR web.config.iis7.xmlupdate should be applied depending on your IIS version. Use our PowerShell commands to apply the changes like:
Add-PSSnapin -Name EPiServer.Install.Common.1
Update-EPiXmlFile -TargetFilePath [Your web.config file] -ModificationFilePath [The xmlupdate file to apply] - Clean up configuration files:
Replace any references to {SiteUrl} with the siteUrl attribute value set in episerver.config.
Set the active attribute on the episerver.search element to true.
Replace all references to the EPiServer.Templates.RelatePlus assembly with the name of your project's output assembly. - Import the RelatePlus.episerverdata file using the import function in Admin mode.
Configuring an Account for the Video Gallery in Relate
This feature is no longer supported.
Upgrading
In Relate 2 R2, two new properties have been added to the page types "News", and "Articles". Those properties will not be created on existing templates when upgrading from Relate 2.0 version, but they can be added manually after.
CommentsNeedModeration
The "CommentsNeedModeration" property is an "Selected/Not selected" property, that makes it possible to hide comments from users until an administrator confirms the content in the comment. If this property not exist, comments will always be approved.
DisableCommentsAndRating
The "DisableCommentsAndRating" property is an "Selected/Not selected" property, that makes it possible to disable comments and rating on a page. If this property not exist, comments and rating will always be enabled.