Installation Instructions – Episerver 7 Connect for CRM
This document describes the necessary steps to install the EPiServer 7 Connect for CRM and EPiServer 7 Connect for CRM Templates using the EPiServer Deployment Center.
Contents
- Prerequisites
- Installation Packages
- Installing Connect for CRM
- Installing Connect for CRM Templates
- Finishing installation
- Manual installation of customizations and plug-in
Prerequisites
Check the system requirements for EPiServer 7 Connect for CRM before you start the installation, to ensure that the system requirements are met for the target environment.
- A working installation of an EPiServer 7 CMS website and its prerequisites.
- The following CRM systems are supported:
- Microsoft Dynamics CRM 2011 with 2007 service endpoints and Active Directory authentication
- Microsoft Dynamics CRM 4.0 with 2007 service endpoints and Active Directory authentication
- SalesForce CRM with enabled SOAP API; latest tested API version is 26
Installation packages
The following installation packages are available for EPiServer Connect for CRM module:
- Connect for CRM package
- Connect for CRM Templates package
Connect for CRM package – ConnectForCRM.msi
This package is the actual module Connect for CRM. It contains implementation of loading and saving data in CRM system, storing and synchronizing user profile information on web site and in CRM application and virtual role provider based on CRM entity properties.
Connect for CRM Templates package – onnectForCRMTemplates.msi
This package contains shared block, business logic and presentation components that allow managing registration and profile editing for site users. The package includes source code and should be installed on top of Connect for CRM.
Installing Connect for CRM
- Download and run the installation package (MSI file). After installation is complete the installation window will be closed automatically.
- Open EPiServer Deployment Center.
- Select Install EPiServer 7 Connect for CRM option under the Modules node and run installation. Select Always run option if you are asked for confirmation.
- Select the EPiServer CMS site to install the module on.
- Select CRM system to connect to: Microsoft Dynamics CRM or SalesForce CRM.
- Define connection settings for selected CRM system.
- The following settings are available for Microsoft Dynamics CRM:
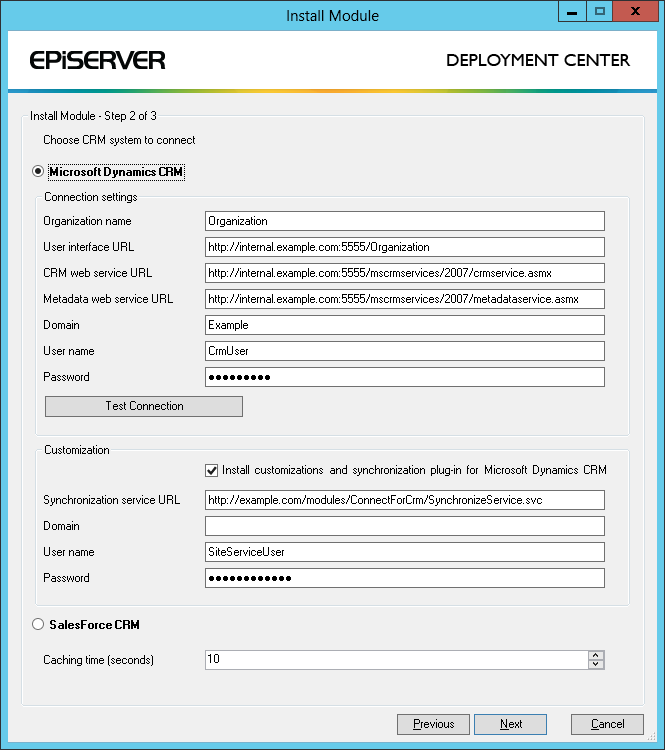
- Organization name. The name of the organization in Microsoft Dynamics CRM system.
- User interface URL. The URL that can be used to access Microsoft Dynamics CRM in web browser.
- CRM web service URL. The URL of CRM web service that is the part of 2007 service endpoints.
- Metadata web service URL. The URL of Metadata web service that is the part of 2007 service endpoints.
- Domain . The domain name to login to Microsoft Dynamics CRM.
- User name. The Active Directory user name to login to Microsoft Dynamics CRM.
- Password. The Active Directory user password to login to Microsoft Dynamics CRM
- Select Install customizations and synchronization plug-in for Microsoft Dynamics CRM to add the set of custom fields for contact entity in CRM to store user names and virtual roles roles.
- The synchronization plug-in will be installed in CRM system when Install customizations and synchronization plug-in for Microsoft Dynamics CRM option is selected. This plug-in notifies the synchronization service on the web site when the contact data has been changed in Microsoft Dynamics CRM. The synchronization service is deployed as a part of Connect for CRM module. You can correct the suggested Synchronization service URL to make sure that service will be available from the CRM system. Domain, User name and Password options are not required, specify these settings if synchronization service location is going to be restricted for certain users or groups and authentication is required when CRM plug-in sends the notification about changed contact to the synchronization service.
- The following settings are available for SalesForce CRM:
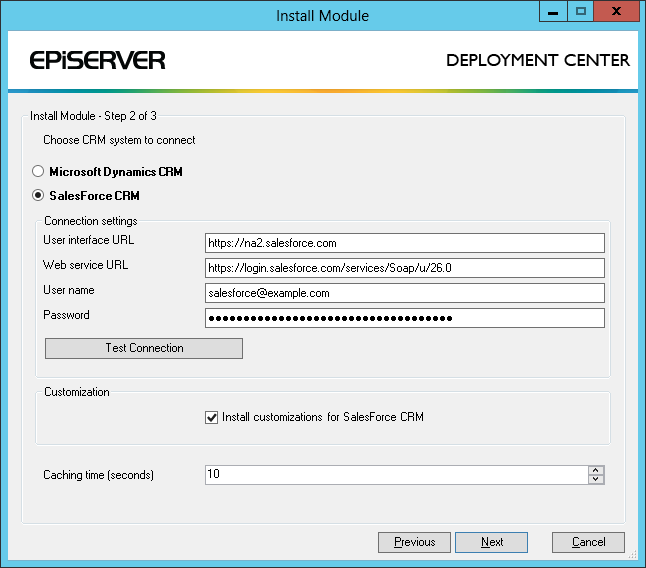
- User interface URL. An URL of your SalesForce CRM application, it is used to create links to website data (for example links to new registered user contact). Log in with your account on SalesForce.com and copy the base address in your browser, for example https://na2.salesforce.com
- Web service URL. The URL to SalesForce SOAP web service. Web service API should be enabled for your account. Latest tested version of SalesForce SOAP web services is 26.
- User name. SalesForce user name that has access to SOAP API.
- Password. SalesForce user password plus security token. Security token can be requested and reset on your SalesForce CRM application. Log in with corresponding user account on SalesForce CRM, go to Setup and navigate to Personal Setup / My Personal Information / Reset My Security Token section. After receiving an e-mail with security token enter the password and security token in the Password field. For example, assuming that password is "myPassword" and your security token is "12345", you should enter myPassword12345 value as a password.
- Select the Install customizations for SalesForce CRM option to add the set of custom attributes for contact entity in SalesForce CRM in order to store user names and virtual roles roles. If this option is selected, new browser window is going to be opened after installation is complete. Please login with your SalesForce account and follow instructions to install the customization.
- The following settings are available for Microsoft Dynamics CRM:
- You can verify connection settings for selected CRM system by clicking the Test Connection button.
- Enter caching time (in seconds) for CRM data. Value 0 (zero) means no caching. Standard ASP.NET cache is used for caching CRM data in web site application.
- Click Next to continue.
- Select license file for Connect for CRM. This is optional step and can be skipped. For example, when Connect for CRM license is included in shared License.config file that is already deployed on website.
- Click Install.
Installing Connect for CRM templates
-
Download and run the installation package (MSI file). After installation is complete the installation window will be closed automatically.
-
Open EPiServer Deployment Center.
-
Select Install EPiServer 7 Connect for CRM Templates option under Modules node and run installation. Select Always run option if you are asked for confirmation.
-
Select the EPiServer CMS site to install the module on.
-
Click Install.
Finishing installation
Consider following after-installation steps.
Configuring EPiServer Connect for CRM
In order to complete Connect for CRM configuration, please refer to the tech note Configuring EPiServer 7 Connect for CRM. For example, you may need to setup user profile properties that should be connected to contact data in CRM system.
Displaying custom fields in Microsoft Dynamics CRM
You can customize which fields should be displayed on entity form in CRM system, so you can add custom fields that were created during customization installation to the contact forms. Login to Microsoft Dynamics CRM, go to Settings, navigate to Customizations and click Customize the System (Customize Entities in MS Dynamics CRM 4.0). Select Contact entity and edit required Forms. Add fields that should be displayed on form: User name, Low, Medium and High.
Publish your customizations.
Displaying custom fields in SalesForce CRM
Login to SalesForce CRM, go to Setup and navigate to App Setup / Customize / Contacts / Page Layouts section. Edit page layout where custom fields need to be displayed. You can create new section and add custom fields that were created during the customization package installation: User name, Low, Medium and High.
Using Connect for CRM Templates to create registration and profile editing page
Please refer to Using EPiServer 7 Connect for CRM Templates article.
Manual installation of customizations and plug-in
By default customizations and plug-in are installed when you run Connect for CRM installation using Deployment Center and corresponding options are selected in installation wizard. Refer this section if you need to manage customizations and plug-in manually.
Manual installation of customizations and plug-in for Microsoft Dynamics CRM
Customizations and plug-in are deployed during Connect for CRM installation if Install customizations and synchronization plug-in for Microsoft Dynamics CRM option is selected.
You can install it manually by running PowerShell script Install MS CRM Customizations.ps1. The script is located in Connect for CRM installation folder, usually the path is C:\Program Files (x86)\EPiServer\CMS\7.0.586.1\Install\Modules\ConnectForCRM\Install MS CRM Customizations.ps1. Please look at file content for more information about required script parameters, like CRM web service URLs, user credentials and so on. For example:
Powershell "& '.\Install MS CRM Customizations.ps1'" -crmServiceUrl "http://internal.example.com:5555/mscrmservices/2007/crmservice.asmx" -metadataServiceUrl "http://internal.example.com/mscrmservices/2007/metadataservice.asmx" -crmOrganizationName "Organization" -crmDomain "Example" -crmUserName "CrmUser" -crmPassword "CrmUserPassword" -synchronizationServiceUrl "http://example.com/modules/ConnectforCrm/SynchronizeService.svc" -synchronizationUserName "SiteServiceUser" -synchronizationPassword "SiteServiceUserPassword" -resourcesPath ".\bin" -solutionsDataFilePath ".\PluginSolutions.xml"You may have to specify full path to Connect for CRM installation directory instead of relative path .\ when you run script from outside of that folder.
Consider adding .NET 4.0 to the list of supported runtimes if you face with assembly loading exception like "This assembly is built by a runtime newer than the currently loaded runtime and cannot be loaded." In this case you need to create or edit PowerShell.exe.config file in directory where PowerShell.exe resides. Typical location is C:\Windows\System32\WindowsPowerShell\v1.0\. You need edit or create configuration file in folders of 32 and 64 bit versions of PowerShell if you use both of them. Make sure that .NET 4.0 is in the list of supported runtimes:
<configuration>
  <startup useLegacyV2RuntimeActivationPolicy="true">
    <supportedRuntime version="v4.0.30319"/>
    <supportedRuntime version="v2.0.50727"/>
  </startup>
</configuration>
You can use CRM Plugin Registration Tool to manage synchronization plug-in for Microsoft Dynamics CRM manually. This tool is also included in Microsoft Dynamics CRM 2011 SDK.
CRM entity metadata like information about available contact fields is cached on CMS side. Consider restarting your website after changing CRM data structures, for example after installing or uninstalling customizations.
Manual installation of customizations for SalesForce CRM
Customizations installation is initiated during Connect for CRM installation if Install customizations for SalesForce CRM option is selected.
You can install customizations manually by running PowerShell script Install SalesForce Customizations.ps1. The script is located in Connect for CRM installation folder, usually the path is C:\Program Files (x86)\EPiServer\CMS\7.0.586.1\Install\Modules\ConnectForCRM\ Install SalesForce Customizations.ps1. This script does not require any parameters.
Consider adding .NET 4.0 to the list of supported runtimes as it is described in previous topic if you face with assembly loading exception like "This assembly is built by a runtime newer than the currently loaded runtime and cannot be loaded."
CRM entity metadata like information about available contact fields is cached on CMS side. Consider restarting your website after changing CRM data structures, for example after installing or uninstalling customizations.
Last updated: November 11, 2013