Configuring EPiServer Connect for CRM
|
Product version: |
EPiServer Connect for CRM 1.2 |
|---|---|
|
Document last saved: |
|
Introduction
This tech note describes the configuration of the EPiServer Connect for the CRM demo package for EPiServer CMS 6. Configuration instructions for the CRM applications Microsoft Dynamic CRM and Sales Force CRM is described in this document.
Contents
Prerequisites
In order to proceed with the configuration, you need to have installed EPiServer Connect for CRM. Please refer to the Installation Instructions for EPiServer Connect for CRM.
Configure CRM Settings in the Web.config File
To use solutions based on a CRM connection (RegistrationWizard, Provider, etc), you also need to customize the web.config (or app.config) file of your project. This is described in detail in this document.
CRM connector section
The most important part is to configure the CRM mappings correctly. The next step is to create a new section in the configuration file. The name of section has to be the same as in the section description (in our case it is crmConnector).
The common structure of the section is:
<crmConnector>
  <crms>
    <add>
      <entities>
        <add>
          <attributes>
            <add />
            ...
          </attributes>
        </add>
        ...
      </entities>
    </add>
    ...
  </crms>
</crmConnector>
Elements
crmConnector element
Handles common parameters of the connector. It requires only one attribute, showing which connection is currently used.
Attributes:
current (required) – shows which CRM connection is in use. It must match one of the CRM names under the "crms" section described below).
crms element
Consists of one or more “add” elements, each of them setting up the connection to the CRM system. The folllowing attributes could appear in each of the “add” sections.
Attributes:
name (required) – the name of the CRM system. In this example it could be either “MSCRM” or “SalesForce” (the “current” attribute of the crmConnector element must be set to one of them).
webServiceUrl (required, only for Microsoft CRM application (MSCRM)) – the URL identifier for the Microsoft Dynamics CRM web service.
metadataServiceUrl (required, only for MSCRM) – the URL identifier for the Microsoft Dynamics CRM metadata web service.
interfaceUrl (required, only for MSCRM) - the URL identifier for the user interface of the Microsoft Dynamics CRM.
userName – user name to connect to the CRM system.
password – password to connect to the CRM system.
domain – domain part to connect to the CRM system.
timeout (in milliseconds) – connection timout for CRM web services.
entites element
Describes the mapped entity from the CRM system. It must consist of the mappings of all entities used in the solution. In our case the "Account" and "Contact" entites are needed. Each mapping has to be added under the element “add”.
Attributes:
name (required) – defines the external name of the entity. This is the name which will be used inside the solution. All connections to the entity must be done through this name.
crmName (required) – defines the internal name of the entity in the CRM system. This name shows which entity is being used, and the external project will then ask for the entity using its external name.
linkName (required, only for MSCRM) – defines the name part of the URL that is used to create the direct link to the entity. To define it look into the Microsoft CRM SDK.
idAttribute (required) – the attribute that handles the unique identificator for the entity inside the CRM system.
attributes element
Defines mappings between the entity attribue and external data. It has to include all attributes for the enitity used in solution. Each mapping has to be added under the element “add”.
Attributes:
name (required) – external attribute name. This name must be used to refer to attribute data from inside the external solution.
crmName (required) – the name of the attribute inside the CRM system, please refer to the CRM documentation to define this. This attribute is referenced when the external solution asks for data from the CRM system.
CRM registration wizard section
The crmRegistrationWizard section defines elements that describe parameters used for the wizard to work correctly.
The common structure of this section is:
<crmRegistrationWizard>
    <blackList />
    <log />
    <notificationEmail />
    <confirmationEmail />
</crmRegistrationWizard>
Elements
blackList element
The list of public email domains that should not be used to find an existing company in registration form.
Attributes:
domains (required) – a list of the public email domains, separated by comma or semicolon.
log element
Defines the logging functionality for major events during the registration process.
Attributes:
name – defines the name of logger (see documentation on log4net).
enabled (“true” or “false”, default “false”) – defines if the logging functionality is on.
notificationEmail element
Handles data used to send notification email to the administrator(s) of the system when a user was successfully registered.
Attributes:
from (required) – the email address which will be set as the "from” field in the notification email.
to (required) – the list of email addresses of system admimistrators, separated by comma or semicolon.
confirmationEmail element
Handles data used for the confirmation email that is sent to users during the registration process.
Attributes:
from (required) – the email address which will be set as the “from” field in the confirmation email.
Profile section
In order for the profile provider from the CRM system to work correctly, you also need to modify the profile section of the configuration file, including the profile provider, Fallback profile provider and specify properties of profile which should be stored in CRM.
CRM and Fallback profile providers
After installation two providers will be added to the <providers> sub section: the CrmProvider and Fallback providers.
The CRM provider is defined as below:<add name="CrmProvider" type="EPiServer.CRMConnector.Provider.CRMProfileProvider, EPiServer.CRMConnector.Provider" applicationName="EPiServerSample" fallbackProvider="FallBackSqlProfile" />
Check the following settings:
fallbackProvider - defines provider which is used when no connection to CRM is available (see below).
applicationName - should be the same as for other profile providers of this application.
Fallback provider is defined as below:<add name="FallBackSqlProfile" type="System.Web.Profile.SqlProfileProvider, System.Web, Version=2.0.0.0, Culture=neutral, PublicKeyToken=b03f5f7f11d50a3a" connectionStringName="EPiServerDB" applicationName="EPiServerSampleFallBack" />
Check the following settings:
applicationName - should be different from the CRM profile provider for correct work
User profile properties
To configure which user profile properties should be taken from CRM system sub-section <properties> should be updated.
Before using properties from the CRM system they should be mapped with the user profile properties. Refer to the CRM product documentation for information about how to map properties.
During the installation process several user profile properties are mapped automatically: Low, Medium and High.
To specify that specific property should be taken from the CRM system, set the provider attribute to the CrmProvider value (the name of the provider from providers section). Note that provider name is case sensitive.
You should restart IIS to clear the cached properties metadata.
Additionally set the customProviderData attribute if the name of the property is a different name to that of the property in CRM system. This attribute maps profile property to property in CRM system. See the example in the end of this section.
The properties Low, Medium and High are special properties which define user roles. These properties are used by the virtual role provider. See the CMS product tech notes if you want to change the roles.
The example below shows how to do this correctly:
<profile enabled="true" defaultProvider="SqlProfile" automaticSaveEnabled="true">
   <properties>
     <add name="Address" type="System.String" provider="SqlProfile" />
     <add name="ZipCode" type="System.String" provider="SqlProfile" />
     <add name="Locality" type="System.String" provider="SqlProfile" />
     <add name="Language" type="System.String" provider="SqlProfile" />
     <add name="Company" type="System.String" provider="SqlProfile" />
     <add name="SubscriptionInfo" type="EPiServer.Personalization.SubscriptionInfo, EPiServer" provider="SqlProfile" />
     <add name="CustomExplorerTreePanel" type="System.String" provider="SqlProfile" />
     <add name="FileManagerFavourites" type="System.Collections.Generic.List`1[System.String]" provider="SqlProfile" />
     <add name="EditTreeSettings" type="EPiServer.Personalization.GuiSettings, EPiServer" provider="SqlProfile" />
     <add name="ClientToolsActivationKey" type="System.String" provider="SqlProfile" />
     <add name="FrameworkName" type="System.String" provider="SqlProfile" />      <add name="Email" type="System.String" provider="CrmProvider" />
     <add name="FirstName" type="System.String" provider="CrmProvider" />
     <add name="LastName" type="System.String" provider="CrmProvider" />
     <add name="Country" type="System.String" provider="CrmProvider" />
     <add name="Title" type="System.String" provider="CrmProvider" customProviderData="JobTitle" />
     <add name="RolesLow" customProviderData="RolesLow" type="bool" provider="CrmProvider" />
     <add name="RolesMedium" customProviderData="RolesMedium" type="bool" provider="CrmProvider" />
     <add name="RolesHigh" customProviderData="RolesHigh" type="bool" provider="CrmProvider" />
   </properties>
   <providers>
     <clear />
     <add name="SqlProfile" type="System.Web.Profile.SqlProfileProvider, System.Web, Version=2.0.0.0, Culture=neutral, PublicKeyToken=b03f5f7f11d50a3a" connectionStringName="EPiServerDB" applicationName="EPiServerSample" />
     <add name="FallBackSqlProfile" type="System.Web.Profile.SqlProfileProvider, System.Web, Version=2.0.0.0, Culture=neutral, PublicKeyToken=b03f5f7f11d50a3a" connectionStringName="EPiServerDB" applicationName="EPiServerSample" />
     <add name="CrmProvider" type="EPiServer.CRMConnector.Provider.CRMProfileProvider, EPiServer.CRMConnector.Provider" applicationName="EPiServerSample" fallbackProvider="FallBackSqlProfile" />
   </providers>
</profile>
See the MDSN article Implementing a Profile Provider (http://msdn.microsoft.com/en-us/library/0580x1f5(VS.80).aspx ) for more detailed information on this subject.
Opening the Demo Project in Visual Studio
- From the File menu in Visual Studio, select Open and then Project/Solution…
- Browse to the root of the site where you installed the demo templates and open EPiServer.CRMConnector.Sample.csproj or...
- In Solution Explorer, right-click the solution and select Add and then Existing Project... to include EPiServer.CRMConnector.Sample.csproj in your solution.
The Microsoft CRM Customization Package
The package adds a set of new custom fields to the Account and Contact tables of the CRM data store. It also adds a tab to the Account form where you can view and edit these custom fields.
For execution of this package you need to complete the following steps:
- Login to MS CRM.
- Open the Settings panel > Customization > Import Customization.
- Download and run the customization package (ZIP file) and click Upload.
- Open the Settings panel > Customization > Customize Entities.
- Select the Account and Contact rows and click Publish.
Microsoft CRM Synchronization Plug-in
The Synchronization plug-in notifies EPiServer Connect for CRM when contact data (user profile) has been changed in MS CRM. This notification is used for updating data in the Fallback provider. If you are not going to use fallback feature you do not need to install this plug-in.
- Download and run the plug-in package (ZIP file) on the server where the Microsoft CRM system is installed (to a temporary location).
- Find the register.xml file and modify it to specify the connection to EPiServer CMS:
a) Change the CustomConfiguration attribute for all <step> elements to URL of CRM Connector Synchronize web service in your EPiServer CMS. Also add to this URL userName, userPassword, and domain delimited with semicolon which is used to log into web service. For example:
http://mycompany.com/EPiServer.CRMConnector.Synchronize/SynchronizeService.svc;userName;userPassword;domain
b) Verify your settings in a web browser before continuing:
Enter the value from CustomConfiguration attribute in your browser. You should get a correct response from the WCF service.
c) Change following attributes of the <Register> element:
Server - URL to the MS CRM server.
Org - Organization name that the plug-in or workflow activity is registered under.
Domain – Domain name for MS CRM application.
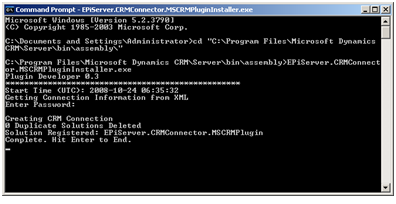
UserName - Username of the system user that is registering the assembly for CRM application. - Run the EPiServer.CRMConnector.MSCRMPluginInstaller.exe file.
- Enter the password of the system user. It verifies CRM plug-in settings and adds a new plug-in into MS CRM. On successful synchronization a message stating "Complete" should be shown in the console window.
Sales Force CRM Customization Package
The package adds a set of new custom fields to Account and Contact tables in SalesForce. Also it adds a special tab to the Account form where you can view and edit these custom fields. PLease note that this package is not a separate file. It is installed using SalesForce website with providing a link to a package.
In order to add a package to your SalesForce account you need to complete the following steps:
- Login to your SalesForce site.
- Execute https://login.salesforce.com/packaging/installPackage.apexp?p0=04t40000000PtYX link.
- Continue through installation the wizard steps.
- Configure manually the contact page layout.