Klarna payment provider - installation and user guide
Table of content
Introduction
This document describes how to install and use the Klarna payment provider for EPiServer Commerce.
- Download the Klarna payment provider for EPiServer Commerce.
- The Klarna module for 1 R3 requires a working installation of EPiServer Commerce with the Enoteca sample templates.
Prerequisites: a Klarna account is required for the installation to work.
Installation
Do the following to install the Klarna payment provider source code:
- Download and unzip the Klarna payment provider files.
- Open the EPiServer.Business.Commerce.Payment.Klarna.csproj in Visual Studio.
- Replace the references to these libraries (Library folder) with the existing one in your Commerce front-end site:
- Mediachase.Commerce.dll
- Mediachase.Commerce.Plugins.Payment.dll
- Mediachase.Commerce.Website.dll
- Mediachase.MetaDataPlus.dll
- Mediachase.WebConsoleLib.dll - Rebuild the project.
- Copy the EPiServer.Business.Commerce.Payment.Klarna.dll to the bin folder in both the Commerce front-end and back-end sites.
- Copy the two files CookComputing.XmlRpcV2.dll and KlarnaAPI.dll in the Klarna\Lib folder to the bin folder in both the Commerce front-end and back-end sites.
- Copy all of the xml files in the EPiServer.Business.Commerce.Payment.Klarna project lang folder to the lang folder in the Commerce front-end site.
- a. For Klarna Invoice:
- Create a folder named KlarnaInvoice in \Templates\Enoteca\Units\Placeable\Plugins\Payment\ in the Commerce front-end site.
- Copy these files and folders: PaymentMethod.ascx and ClientResources folders in Klarna\KlarnaInvoice to the KlarnaInvoice folder which has been created.
b. For Klarna Part Payment:
- Create a folder named KlarnaPartPayment in \Templates\Enoteca\Units\Placeable\Plugins\Payment\ in Commerce the front-end site.
- Copy these files and folders: PaymentMethod.ascx and ClientResources folder in Klarna\KlarnaPartPayment to the KlarnaPartPayment folder which has been created. - a. For Klarna Invoice:
- Create a folder named KlarnaInvoice in \eCommerceFramework\5.3\eCommerceFramework\ Shared\Apps\Order\Payments\Plugins\ in the Commerce front-end site.
- Copy the ConfigurePayment.ascx file in Klarna\KlarnaInvoice to the KlarnaInvoice folder which has been created.
b. For Klarna Part Payment:
- Create a folder named KlarnaPartPayment in \eCommerceFramework\5.3\eCommerceFramework\ Shared\Apps\Order\Payments\Plugins\ in the Commerce front-end site.
- Copy the ConfigurePayment.ascx file in Klarna\KlarnaPartPayment to the KlarnaPartPayment folder which has been created. - a. For Klarna Invoice:
- Copy the Klarna\MetaData\KlarnaInvoice folder to \eCommerceFramework\5.3\eCommerceFramework\Shared\Apps\Order\Payments\MetaData.
b. For Klarna Part Payment:
- Copy the Klarna\MetaData\KlarnaPartPayment folder to \eCommerceFramework\5.3\eCommerceFramework\Shared\Apps\Order\Payments\MetaData.
Configuring Klarna
Follow the steps below to configure Klarna in Commerce Manager.
- In Commerce Manager, go to Administration > Order System > Payments > Your country.
- Click New to create a new payment method. Examples of the configuration are shown below.
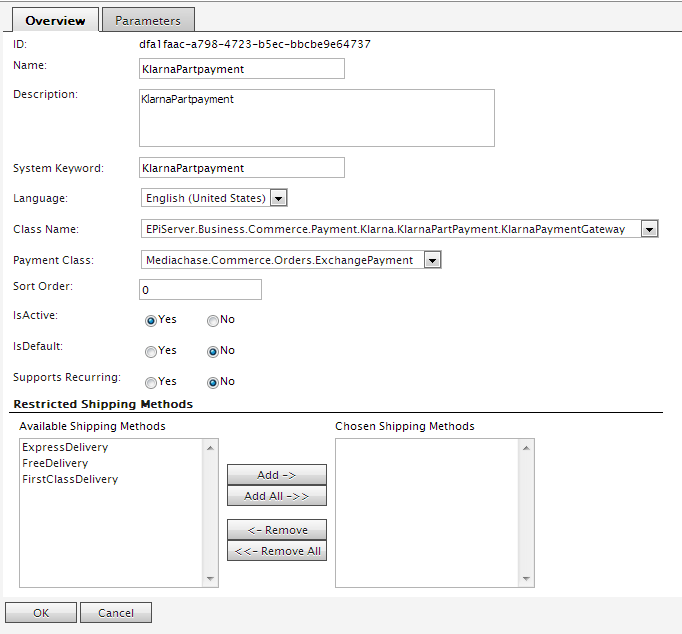
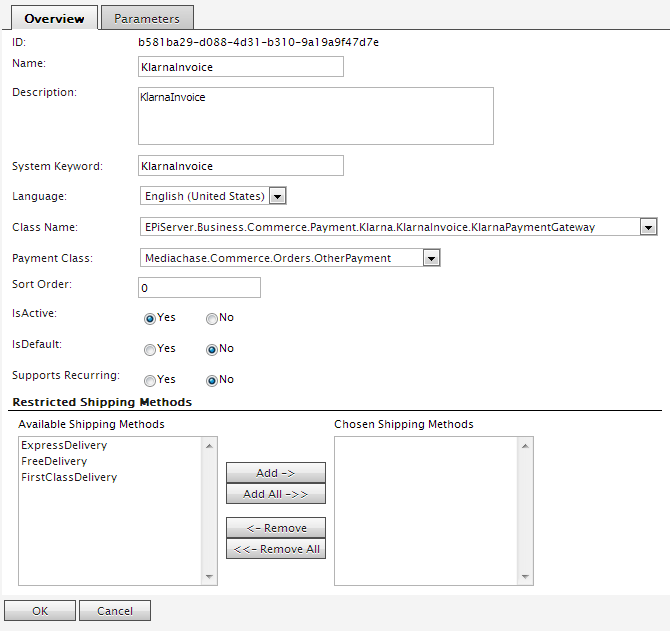
- In the Overview tab, enter the following required information for the Klarna Invoice or Part Payment methods respectively:
Field name For Klarna Invoice For Klarna Part Payment Name Klarna Invoice Klarna Part Payment
Description Klarna Invoice payment gateway Klarna Part Payment gateway System Keyword KlarnaInvoice KlarnaPartPayment Language The language of your choice
The language of your choice Class Name EPiServer.Business.Commerce.Payment.
Klarna.KlarnaInvoice.KlarnaPaymentGatewayEPiServer.Business.Commerce.Payment.Klarna.
KlarnaPartPayment.KlarnaPaymentGatewayPayment Class Mediachase.Commerce.Orders.ExchangePayment Mediachase.Commerce.Orders.ExchangePayment IsActive Yes Yes IsDefault No No Supports Recurring No No Restricted Shipping Methods Add only if you want to restrict any shipping method.
Add only if you want to restrict any shipping method. - Click OK to save the data.
- Go back to the Parameters tab to add more information, see examples below. Note that the Merchant ID and Shared secret string in the sample images are for demonstration, you need to register an account with Klarna to get a live one.
Configuration example for Klarna Part Payment.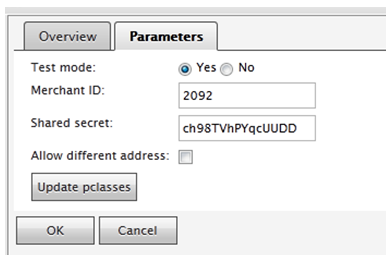
Configuration example for Klarna Invoice.
- Enter the following required information:
Field name Description Value Test mode
If you set this flag, an invoice is created in test mode, even if your store is fully operational.
Recommended for testing without disrupting regular invoicing.Yes or No Merchant ID An e-store ID referring to your store in Klarna's database. This ID is provided by Klarna.
Sample value: 2092 Shared secret A shared secret used to secure all traffic exchanged by Klarna and your store. This string is provided by Klarna.
Sample value: ch98TVhPYqcUUDD
Allow different address If this flag is checked, the EPiServer Commerce system will not verify the address entered by a customer.
Instead it will depend totally on Klarna to verity the address.Yes or No Update pclasses button Only for Klarna Part Payment: this will update the pclasses from Klarna. Click button to update - Click OK to save the data.
- Add the following setting to the <system.serviceModel >\<services > node to the web.config of your Commerce front-end site:
<service behaviorConfiguration="CommerceSiteBehavior" name="EPiServer.Business.Commerce.Payment.Klarna.Services.KlarnaService">
<endpoint address="" binding="webHttpBinding"
contract="EPiServer.Business.Commerce.Payment.Klarna.Services.IKlarnaService"
behaviorConfiguration="CommerceSiteBehavior" />
</service> - Copy the KlarnaService.svc file in the Klarna\Services folder to the Services folder in your Commerce front-end site.
Using Klarna part payment
When you have deployed and configured the Klarna payment provider, it will appear as an option in the checkout procedure. See below for examples of how Klarna Part Payment appears with different country settings.
Placing an order
- Add item(s) to a shopping basket and proceed to checkout.
- Select a shipping address, shipping option and continue to payment options.
- Depending on your current country in the billing address, different forms for input will appear.
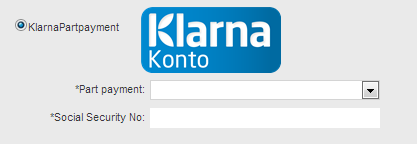
Sweden, Finland, Denmark and Norway
The following applies for customers from Sweden, Finland, Denmark and Norway:
- In the Payment Method section, select the Klarna Part Payment option.
- In the field Social Security No, enter your social security number.
- Click Continue to place the order. NOTE that Klarna Part Payment will not accept a company account.
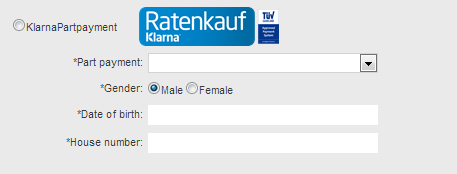
Netherlands and Germany
The following applies for customers from Netherlands and Germany:
- In the Payment Method section, select the Klarna Part Payment option.
- Enter Gender, Date of birth, House number and House extension (optional).
- Click Continue to place the order.
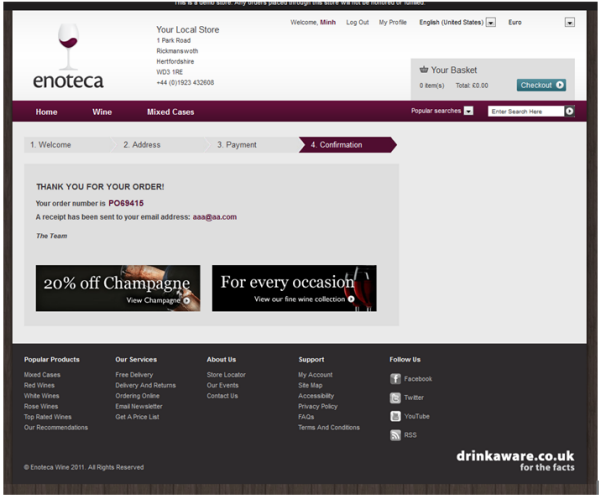
- If your order is processed successfully, you will see your order number. An e-mail is also sent to you to confirm your order.

- If you are a store owner, you can see the details of the order in the invoice part of the Klarna system. You can use the TestPerson from Klarna for testing, find out more here: https://integration.klarna.com/en/testing/test-persons.
Using Klarna invoice
When you have deployed and configured the Klarna payment provider, it will appear as an option in the checkout procedure. See below for examples of how Klarna Invoice appears with different country settings.
Placing an order
- Add item(s) to a shopping basket and proceed to checkout.
- Select a shipping address, shipping option and continue to payment options.
- Depending on your current country in the billing address, different forms for input will appear.
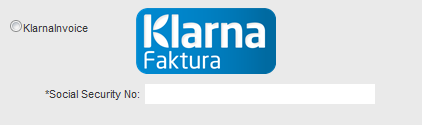
Sweden, Finland, Denmark and Norway
The following applies for customers from Sweden, Finland, Denmark and Norway:
- In the Payment Method section, select the Klarna Invoice option.
- In the Social Security No field, enter a Company registration no for a company, then click Continue to select an address from the list.
- Click Continue again to place the order.
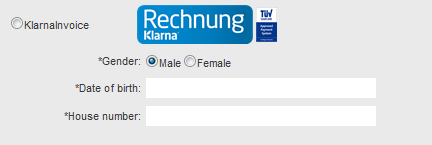
Netherlands and Germany
The following applies for customers from Netherlands and Germany:
- In the Payment Method section, select the Klarna Invoice option.
- Enter Gender, Date of birth, House number and House extension (optional).
- Click Continue to place the order.
- If your order is processed successfully, you will see your order number. An e-mail is also sent to you to confirm your order.
- If you are a store owner, you can see the details of the order in the invoice part of the Klarna system. You can use the TestPerson from Klarna for testing, find out more here: https://integration.klarna.com/en/testing/test-persons.