DataCash Payment Provider - Installation and User Guide
|
Product version:
|
EPiServer Commerce 1 R2 SP2
|
|
Document last saved:
|
|
Table of Contents
Introduction
This document describes how to install and use the DataCash payment provider, one of several payment solutions available for EPiServer Commerce.
Real Time Fraud Prevention
The "3rd man real time fraud prevention" is available for a live account only. If you are using a live account and would like to enable the real time fraud checking,follow the instructions in step 4 of the Build project section below.
Build the Project
- Download and install the source code files.
- Open the EPiServer.Business.Commerce.Payment.DataCash project.
- Go to the EPiServer.Business.Commerce.Payment.DataCash\DataCash\Lib folder. Replace the files listed below in the folder, with the corresponding files in the Commerce front-end bin folder:
- EPiServer.dll
- EPiServer.BaseLibrary.dll
- Mediachase.Commerce.dll
- Mediachase.Commerce.Plugins.Payment.dll
- Mediachase.Commerce.Website.dll
- Mediachase.MetaDataPlus.dll
- Mediachase.WebConsoleLib.dll
- If you are using a live account instead of a test account, uncomment the following line in order to activate the "3rd Man real time fraud checking" service:
Line 221: requestDoc.set("Request.Transaction.TxnDetails.The3rdMan.Realtime.real_time_sha1", HashCode(merchantReference));
- Rebuild the project.
Deployment
Do the following to deploy the files needed for enabling the DataCash payment provider:
- Copy EPiServer.Business.Commerce.Payment.DataCash.dll to the bin folder of both the Commerce front-end and back-end sites.
- Copy EPiServer.dll, EPiServer.BaseLibrary.dll, ICSharpCode.SharpZipLib.dll and Transaction.dll in the folder "DataCash\Lib" to the bin folder of both the Commerce front-end and back-end sites. If ICSharpCode.SharpZipLib.dll already exists, do not replace.
- In the Shared folder (this folder is the "EPiServer Commerce Manager Shared Files Folder" that you selected when you installed Commerce), you should see the folder Plugins by following "Shared\Apps\Order\Payments\Plugins". Create a new folder named DataCash, then copy ConfigurePayment.ascx to this folder.
- Create a DataCash folder in "Shared\Apps\Order\Payments\MetaData". Deploy EditTab.ascx to that DataCash folder.
- Create a DataCash folder under "Templates\Enoteca\Units\Placeable\plugins\payment" (or under "Templates\Everything\BusinessControls\CheckoutControls\plugins\payment" if you are using an older version than EPiServer Commerce 1.1) of the Commerce front-end site. Copy CountriesCodes.txt, DataCashLandingPage.aspx, PaymentMethod.ascx and the ClientResources folder to the DataCash folder.
- Copy the lang folder to the root folder of the Commerce front-end site
Configuration
This section describes how to configure the DataCash payment provider for your website.
Prerequisites: a DataCash account is required here. Please go to the DataCash website to register an account if you do not have one.
Note: for testing purpose, request DataCash to activate these two services manually (these services are not configured by default):
- HPS service
- The 3rd Man Service
Do the following to configure the DataCash payment provider:
- In Commerce Manager, go to Administration > Order System > Payments > Your country.
- Click New to create a new payment method. Enter data in these fields:
- Name: DataCash
- Description: DataCash payment
- System Keyword: DataCash
- Language: English(United States)
- Class name: EPiServer.Business.Commerce.Payment.DataCash.DataCashPaymentGateway.
- Payment Class: Mediachase.Commerce.Orders.ExchangePayment
- Sort Order: 1
- IsActive: Yes
- IsDefault: Yes
- Supports Recurring: Yes
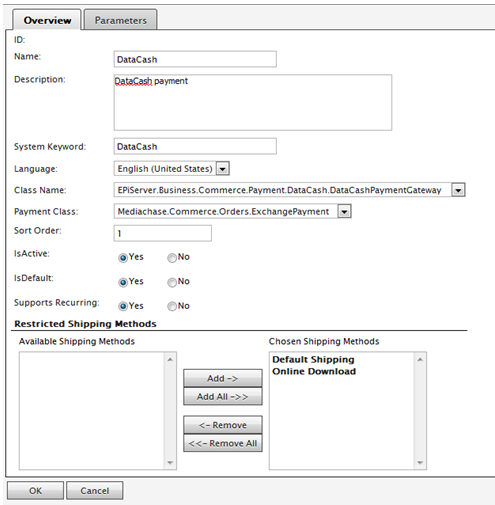
- Click OK.
- Open the DataCash payment that you just created and go to the Parameters tab.
- Configure the parameters as follows:
- Host address: the URL of the DataCash server to send transactions (required)
- vTID: DataCash account number (required)
- Password: password for vTID (required)
- Log file: the log file where the API writes the output log. Note that the folder containing a log file should be available, and make sure that IUSR, IIS_IUSR have modify permissions to this file. If a log file is not configured no logging will take place.
- Time out: number of seconds for a transaction time out. If time out is not configured sixty seconds will be used as default.
- Logging level: the level that should be logged.
- Payment page Id: the ID of payment page (configured by DataCash) that you wish to display.
- Proxy: the URL of a proxy to connect through. If a proxy is not configured the default proxy of the server will be used.
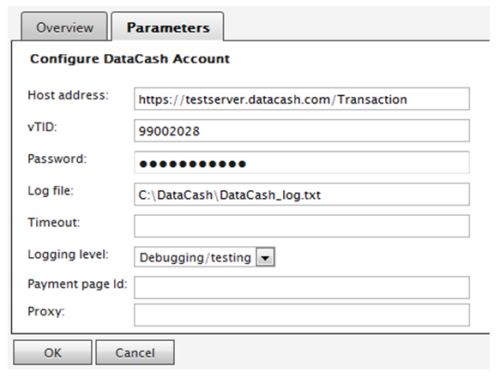
- Click OK to finalize.
Using DataCash
When you have deployed and configured the DataCash payment provider, it will appear as an option in the checkout procedure.
- Add a product to the basket and proceed to checkout.
- Under Payment Options, select DataCash.
- Enter your card information (refer to the "DataCash Magic Card Numbers" table for testing purposes).
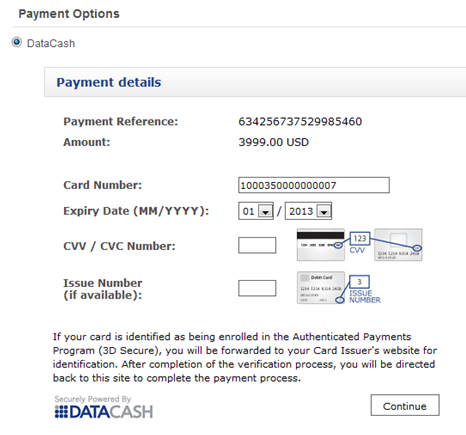
- Click Continue in the DataCash form to place the order. You will automatically be redirected to the confirmation page.