Installation Instructions - Demo Site
|
Product version: |
EPiServer CMS 6.0 |
|---|---|
|
Document version: |
1.0 |
|
Document last saved: |
This document describes the necessary steps to install the demo site for EPiServer CMS 6. When installing the demo site you can use the EPiServer CMS Deployment Center for an automated installation of the template files and content.
Prerequisites
The following conditions must be met before installing the demo package:
- EPiServer CMS 6 is required.
- Templates from the public package must be installed (can be done from the EPiServer Deployment Center). These templates are used by the demo site. See installation instructions for EPiServer CMS 6.
NOTE: If you have modified the templates from the public package, you may receive unexpected results when compiling or viewing the website. The demo package installation does not overwrite any files included in the public package.
NOTE: If you plan to use Live Monitor on the EPiServer CMS 6 Demo Site, it is recommended to install the demo site first, before installing Live Monitor.
Installing the Demo Site onto an Existing Website
- Download and install the DemoTemplates.msi package. Follow the instructions in the setup procedure to finalize the installation.
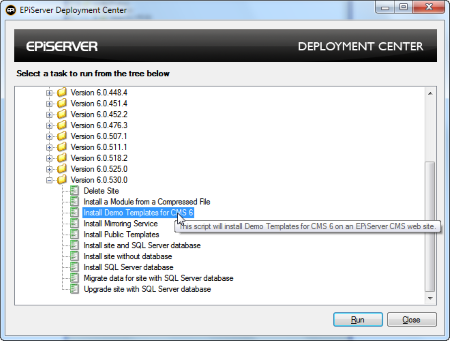
- Start the EPiServer Deployment Center. The EPiServer Deployment Center can be found in the EPiServer folder on the start menu.
- Expand the EPiServer CMS version for which the demo templates belongs to (6.0.530.0) and select “Install Demo Templates for CMS 6” and then click “Run”.
- Select what you want to install and click "Next".
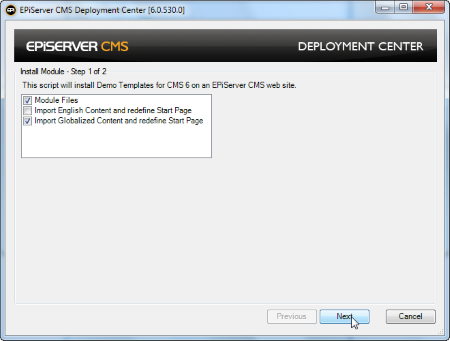
- Module Files installs the demo template application components.
- Import English Content and redefine Start Page
Installs content in English only, and sets a new start page.
- Import Swedish Content and redefine Start Page
Installs content in Swedish only and sets a new start page.
- Import Globalized Content and redefine Start Page
Installs both English and Swedish content and sets a new start page.
- Select the website where you want to install the demo site and click “Install”.

Windows membership provider is the default membership provider. During the installation procedure you will be prompted to activate the Multiplexing role and membership provider. You can chose to do this if you want to be able to register users in the "Customer Zone" extranet function of the demo site.
- When the installation is finalized, open the website to access the "Alloy Technologies" Demo Site.
Logging On
Use your Windows username and password to log on to the demo site.
Blog Adaptations
-
Problems with IIS7 (Win 2008) http modules
To avoid problems with IIS7, you should add the following to the configuration/system.webServer/modules section:
<system.webServer>
<modules>
<add name="BlogEventHandlers" type="EPiServer.Blog.EventHandlers, EPiServer.Blog" />
</modules>
</system.webServer> -
Scheduled Job for Blogs
The blog template is installed with a scheduled job, which is not activated by default. It is recommended that you activate the job to obtain full functionality. The job may take a long time to run on a large blog, so keep this is mind when you decide how often to run the job. The job updates the values used for the tag cloud and the tag clouds will not be updated if the job is not run. The job also deletes categories and tag pages that are not used.
-
Adding Support for MetaWeblog (Windows Live Writer)
To be able to use MetaWeblog and blog from WIndows Live Writer, you need to add the attribute enableXmlRpcHeader="true" on the <siteSettings ... /> tag in the web.config file.
Related Information
Installation Instructions for EPiServer CMS 6 (including description of the EPiServer Deployment Center).