EPiServer CMS 5 R2 SP1 Installation Instructions
|
Product version: |
EPiServer CMS 5 R2 SP1 |
|---|---|
|
Document version: |
1.0 |
|
Document last saved: |
Introduction
Installation and upgrade of EPiServer CMS 5 R2 SP1 is performed with the EPiServer Deployment Center. This is slightly different to EPiServer CMS 5 R2, which was installed with EPiServer CMS Installation Manager. The Deployment Center is an upgrade of Installation Manager, which enables the installation and maintenance of other EPiServer products.
This document describes how to install, upgrade and delete EPiServer CMS 5 R2 SP1 and its components. Further information about installation and deployment of EPiServer CMS can be found in the EPiServer CMS Installation and Deployment System Overview technical note.
The EPiServer CMS 5 R2 SP1 installation comprises of EPiServer CMS 5 R2 SP1 assemblies and various components for installation of Web sites. The Express Installation is a "one click installation" scenario - making it very quick and easy to install a first version of EPiServer CMS.
EPiServer Deployment Center is also the fundamental for future product installations. It is based on PowerShell Scripts, which makes it easy for any third party company to use the same installer for their products as well.
Table of Contents
- Overview
- First Installation
» Express Installation
» Custom Installation
» Application Files Only - EPiServer Deployment Center Instructions
» Install Public Templates
» Delete Site
» Install Database (SqlServer) Only
» Install Site (No database)
» Install Site (Sql Server)
» Upgrade site from 5.1 SP2 - Oracle Database Configuration
- SDK documentation
- Module Installation
- Setting up IIS7
- Installation Components in Detail
» EPiServer Structure On Disk - Troubleshooting
» Logging
» Opening Public Templates Project in VS 2008
» Breaking Changes
» Demo Templates Package
» Upgrading
» Empty Web site
» Reboot the system - Windows PowerShell Installation
Overview
EPiServer CMS 5 R2 SP1 can be found in the download section - here on EPiServer World. Included in the downloaded EPiServer CMS R2 SP1 zip file are the Microsoft Installer files and the Setup.exe. Running the "Setup.exe" file will start the installation of the various components, the EPiServer Deployment Center and optionally a database and an example Web site.
After setup of EPiServer CMS 5 R2 SP1 is complete, installation of the integrated Visual Studio 2008 tools and EPiServer CMS 5 R2 SP1 SDK can be carried out. This is performed by running the EPiServerVsIntegration.msi file that is part of the installation package.
Here is an overview of the EPiServer CMS R2 SP1 installation components:
- Setup.exe
Run this file to begin installation. This executable is responsible for checking and installing some prerequisites such as Windows PowerShell and IIS. See the First Installation section below for further when installing for the first time on the machine. Setup.exe uses the files in the unzipped folder - all except for the EPiServerVsIntegration.msi which must be run manually. - EPiServerShared.msi
This package contains the components that are shared by all (5.2 +) versions of EPiServer CMS, i.e. the different Windows Services and the EPiServer Deployment Center. The EPiServer Deployment Center is a a lightweight Windows Application that is used to initiate all installation-related actions by browsing and selecting PowerShell scripts to run; see below for further information. - EPiServerCMS.msi
This package contains all necessary files to install and upgrade to a specific version of EPiServer CMS, this includes PowerShell scripts, assemblies and example templates. - Powershell Redist
Microsoft Powershell installation files - EPiServerVsIntegration.msi
Run this file to install the integrated Visual Studio 2008 tools and the EPiServer CMS 5 R2 SP1 SDK.
First Installation
The installation has been slightly changed in EPiServer CMS 5 R2 SP1 and the EPiServer CMS Installation Manager has been replaced by EPiServer Deployment Center. EPiServer Deployment Center also supports installation of other EPiServer modules, packages and connectors.
If during EPiServer CMS installation Microsoft Windows Powershell is not found on the target machine then the EPiServer CMS installer will install it as part of the installation process. EPiServer Shared Components will be installed as well as database and Web site creation - if opted for. When performing a first installation the followling steps should be carried out:
- Download the EPiServer CMS 5 R2 SP1 release zip file and unzip the contents to your hard drive.
- Run the "Setup.exe" file. On running setup.exe the installer will check if the required software components and versions are installed on the machine. If any of the software components or versions or incorrect then a dialog will appear informing you of the software that is required to be installed or updated. See the EPiServer CMS 5 R2 SP1 system requirements.
- In order to install EPiServer Deployment Center, Windows and EPiServer CMS 5 R2 Microsoft Windows Powershell is required to be installed on the machine.
Installation of Microsoft Windows Powershell may take several minutes.
Click OK.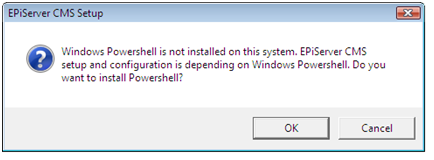
- The EPiServer CMS Setup Wizard will appear - click Next in the dialog to continue with the installation.
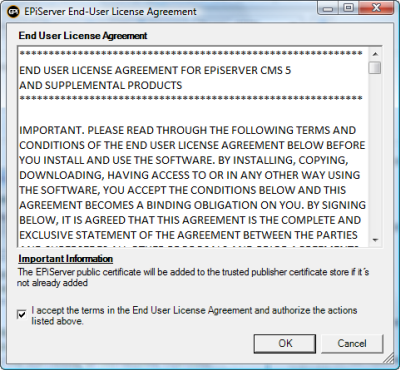
- Accept the terms of the license agreement by clicking in the accept box and then click Next.
- Choose the type of installation you want to install
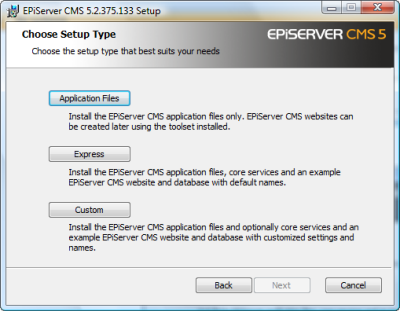
- "Application Files" will only deploy EPiServer components on the target machine. Selecting this option will not give you any more options in the wizard.
- "Express" will in addition to deploying all necessary file also create a sample site. Selecting this will not give you any more options in the wizard. See Express Installation below for further information.
- "Custom" will make it possible to choose which features to install. Selecting this option will provide you with a new wizard step. If you choose to install Example Site additional input will be required for specifying the properties of the example site. See the Custom Installation guide below for further information and instruction.
- Click the Install button in the EPiServer CMS Wizard to begin installation.
- Click the Finish button in the EPiServer Installation Wizard.
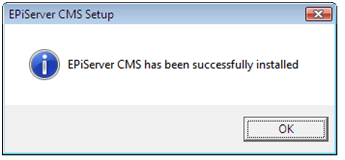
- Click OK and the chosen installation should now be complete.
- EPiServer Deployment Center has now been installed on the machine and should be listed under EPiServer along with the other programs installed on the machine. For the EPiServer Deployment Center file structure see the EPiServer Structure On Disk section.
Express Installation
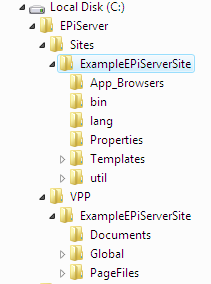
Selecting an "Express" installation will create a sample Web Site on the local machine without dialog interaction. The file structure of this Web Site should be similar to the image below. The EPiServer CMS 5 R2 SP1 installation file structure is described in the section EPiServer Structure On Disk.
To perform an Express Installation an SQL server is required to be installed on the local machine otherwise the option will be disabled - see the system requírements concerning which SQL Server databases are supported.
Currently an express installation is only available when you you install EPiServer CMS 5 R2 SP1 for the first time. Though it is possible to carry out an express installation from a command prompt, see this blog post for further information.
Custom Installation
After selecting "Custom" complete the additional steps that are required:
- Click on the icon and then next In order to choose the features you want to install:
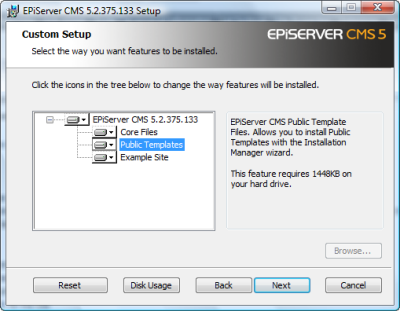
Core Files - Install EPiServer CMS application files
Public Templates - Install EPiServer CMS Public Template Files. Allowing you to install Public Templates with the Installation wizard.
Example Site - Will create an EPiServer Web site and database with customized settings and names. - You will need to provide configuration for your Web server:
- Enter a name for the site to be installed in the Site name box
- Enter Application (Optionally)
- Enter Path for the SIte
- Enter Application Pool Name
- Enter Web Server Bindings
- Enter EPiServer User interface information - Relative Path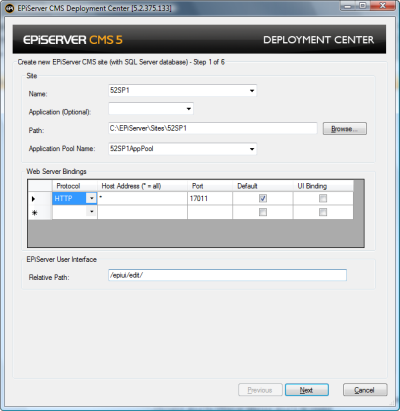
Click Next. - The next step will gather information about how to connect to the database server and information about the EPiServer CMS database about to be created:
- Select or Enter the name of the Server instance to use and the Port number (default) in the Port field defines the database server's default port. If you wish to install to another database server port, change the value to the desired port number.
- Select the authentication mechansim to use when accessing the server
- Select the name of the database you intend using from the Existing Database list or enter the name of a new database. If an existing database is selected it must contain the EPiServer CMS database schema for the installation to succeed. You can use EPiServer Deployment Center to create databases with the EPiServer CMS schema, see the EPiServer Deployment Center Instructions section for more information.
- Either create a new user and password or select an existing user that has owner rights to the database (passwords must include lower and upper case, a digit and a non-alphanumeric character). In the Password box type the password associated with the specified user. Note that the user running EPiServer Deployment Center must have owner access rights to access the database.
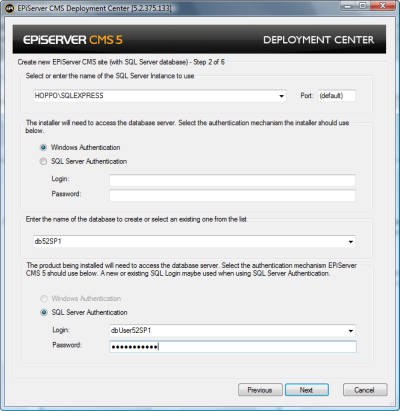
- Click Next.
- Select or create the folder where Virtual Path Provider files will be stored for the site. Each VPP will create a child folder under the folder selected in the wizard:
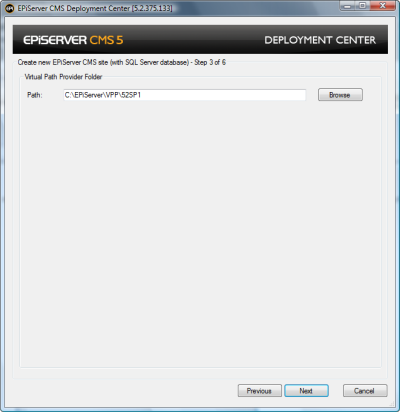
Click Next. - In the next step, check the Install Public Templates if desired:
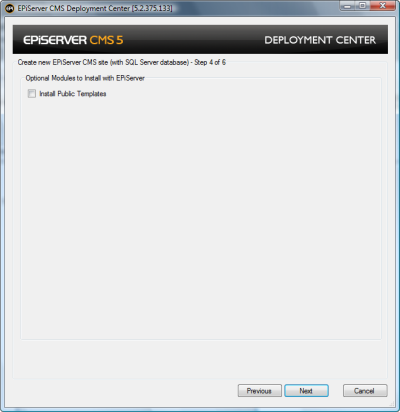
Click Next. - In the next step you can optionally provide a path for a license.config file that you want to use for the site. If omitted the site will be created but will report licensing errors:
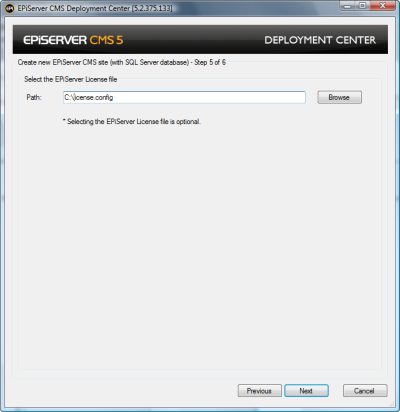
Click Next. - The last step is a summary of all the steps that will be taken by the wizard when it completes.
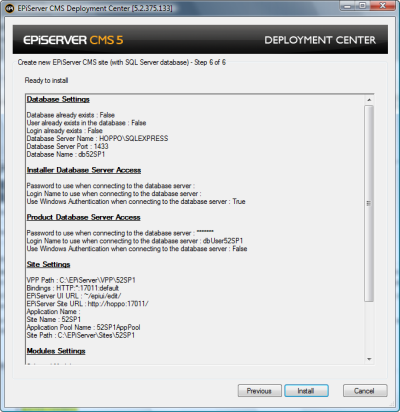
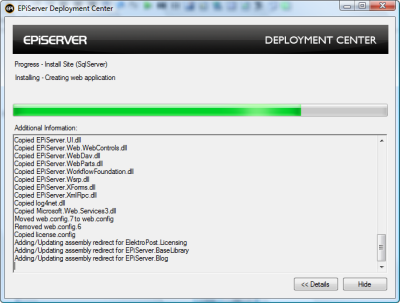
Click Install. - The progress dialog will report all steps performed and the site will be created.
- The installation is almost complete and you are now opted to launch deployment center and display the EPiServer CMS 5 Get Started documentation.

- Reboot the system in order to complete the installation.
Application Files Installation
Choosing "Application Files" will only deploy EPiServer CMS components on the target machine. Selecting this will not give you any more options in the wizard.
EPiServer Deployment Center Instructions
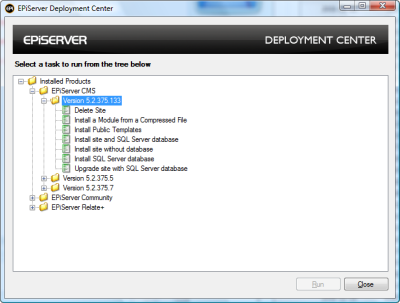
When opening the EPiServer Deployment Center, the different versions of EPiServer CMS currently installed on your machine will be listed. The EPiServer CMS Web sites currently on the machine will be listed under the relevant version of EPiServer CMS. Select the task you wish to perform on a listed Web Site and click on the Run button.
-
Delete Site
-
Install a Module from a Compressed File
-
Install Public Templates
-
Install site and SQL Server database
-
Install site without database
-
Install SQL Server Database
-
Upgrade site with SQL Server database
Delete Site
Choose this option if you wish to delete a Web site and optionally its database, users and VPP.
- After choosing Delete Sites in EPiServer Deployment Center, all your existing EPiServer CMS sites are displayed. Choose the Web site to be deleted:
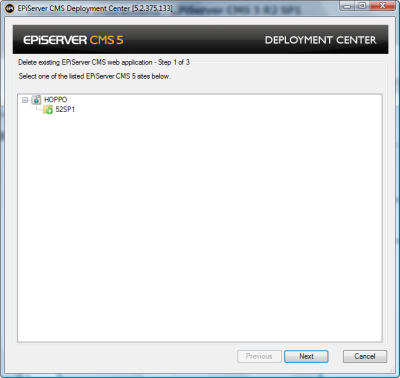
Click Next. - Select the parts of the installed site that you want to delete. The default setting is to delete all parts of the site. Clear the relevant check boxes if you do not want:
Delete the application files folder
- Delete the IIS Application Pool used
- Delete the database
- Delete the database login used by EPiServer CMS
- Delete the VPP folders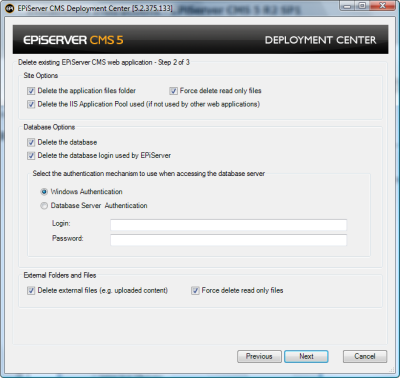
Click Next. - An overview of the objects that shall be deleted will be displayed. Click Uninstall and Web site deletion will commence. A progress bar of the deletion process will then be displayed.
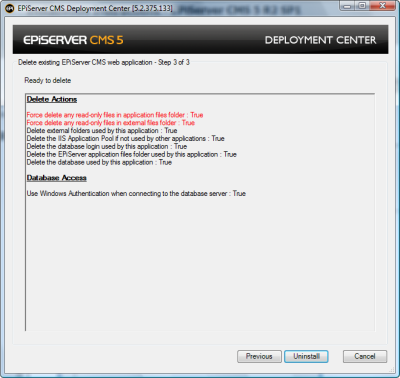
- "Finished" is displayed in the progress bar when Web site deletion is completed.
Note: As Windows membership provider is the default membership provider logging on should be achieved by entering your Windows username and password.
Install a Module from a Compressed File
Choosing this option allows you to install an EPiServer module from a compressed zip file.
Install Public Templates
Choosing this option imports the EPiServer CMS Public Templates.
Install site and SQL Server database
Choosing this option installs a Web site with a database. Most of the steps for this option are identical to that when performing a Custom Installation. See the information from Step 2 in the Custom Installation section.Install site without database
Choosing this option installs a Web site without a database. Most of the steps for this option are identical to that when performing a Custom Installation - though not Step 3 (select/create database) . See the information in Step 2 and from Steps 4 to 6 in the Custom Installation section.
Install SQL Server Database
Choosing this option installs a database only. The steps for installing a database only are the same as Steps 3 and 7 in the Custom Installation section except that you can not choose an existing database.
Oracle Database Configuration
It is possible to configure EPiServer CMS 5 R2 with an Oracle database. See the document Configuring EPiServer CMS R2 with an Oracle Database for further information.
SDK Installation
The EPiServer CMS 5 R2 SP1 SDK (.chm) help-file is installed on your machine after running the EPiServerVsIntegration.msi file. It should be listed with the EPiServer Deployment Center (..\Program Files\EPiServer). The SDK documentation is also available online - EPiServer CMS 5 SDK .
The EPiServer CMS integrated Visual Studio 2008 tools are also installed after running the EPiServerVsIntegration.msi file. These consist of the EPiServer project template and the following templates for EPiServer CMS 5 R2 SP1 development - page template, GUI plugin, Web user control and custom property.
Module Installation
For information regarding installation of your own module see Fredrik Tjärnberg's blog post. This blog post also includes a Visual Studio project template for download (that builds upon Windows Installer Xml (WiX)) that will help you create your own module installation package for EPiServer CMS 5 R2 SP1.
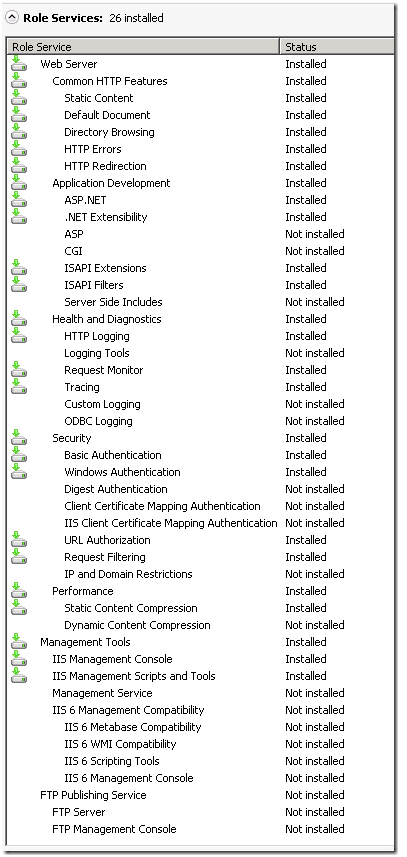
Setting up IIS7 (Windows Server 2008 and Vista)
IIS 7 requires you to select exactly which modules you wish to run on your Web Server. If IIS7 has not been configured, the Deployment Center will give the option to install all the IIS features needed for running EPiServer CMS 5 R2. Here is a list of recommended Role Services that should be installed to successfully deploy EPiServer CMS 5 R2:
Installation Components in More Detail
Windows Installer Files
Installing EPiServer CMS is built on Windows Installer to support installation, uninstallation, component upgrade as well as component and installation integrity. Windows Installer has built in support for User Account Control and requests user elevation when necessary (Vista and WS 2008). We use windows installer technology for deploying files, updating registry and checking prerequisites. As a final step depending on user input during the installation wizard the windows installer can call into EPiServer Deployment Center (see below) for performing site creation and deletion (during uninstall).
We use windows installer technology for deploying files, updating registry and checking prerequisites.In order to get a running site a new tool called EPiServer Installation Manager (EPiServerInstall.exe) is used.
EPiServer Deployment Center
In order to get a running site a new tool called EPiServer Deployment Center (EPiServerInstall.exe) is used. This tool launches Windows PowerShell and executes one of several predefined scripts. The idea is that we want a script based configuration of the site since it is easier to maintain over time and also provides a way for partners and customers to customize the way an EPiServer CMS site is created / deleted or how an EPiServer CMS module is applied. Modules packages e.g. Public Templates which comes with a default EPiServer CMS installation can provide their own logic to be executed by the installer. EPiServerInstall can be run in interactively or from the command line. When launching it without parameters it will show a UI presenting all available scripts to execute for each individual version of EPiServer CMS.
Setup.exe (bootstrapper)
This executable is responsible for checking and installing some prerequisites such as Windows PowerShell and IIS (if not present on the target machine) and for launching windows installer installations. It also migrates unregister older version of the EPiServer Services (Scheduler, Indexing and Log services) and migrating the configuration to the new services for R2.
If you wish to change, repair or remove the EPiServer CMS 5 R2 SP1 installation then click on the Setup.exe file and then Next. The Dialog below will then appear. Click on the appropriate button.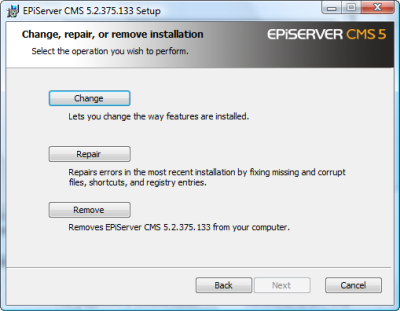
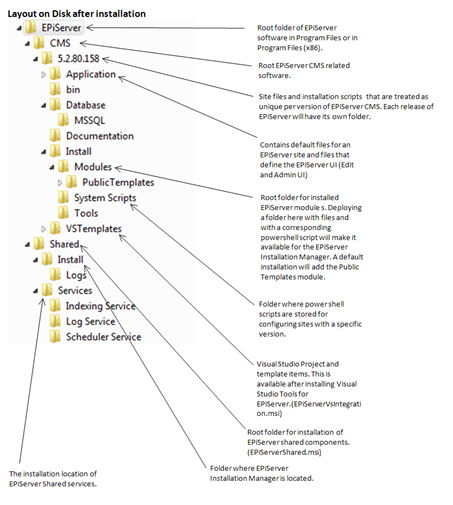
EPiServer Structure On Disk
Below is an example of a EPiServer file structure layout:
Troubleshooting
Logging
When the installation fails for some reason and you don't get a satisfying indication why it failed it might be a good idea to take a look at log files.
There are different log files involved when installing EPiServer CMS:
EPiServer Installation Manager
The installation manager logs all its activity in %ProgramFiles%\EPiServer\Shared\Install\Logs
Setup.exe
Setup.exe will log everything by default. The result is three log files located in the same directory as the Setup.exe files.
EPiServerVsIntegration.msi
Since the VS tools for EPiServer are installed using a windows installer file you need to launch the installation from the command line to turn on logging. The following command should help:
msiexec /i EPiServerVsIntegration.msi /lv VsInstallationLog.txt
Problems opening Public Templates in Visual Studio 2008
If you experience problems opening the Public Templates Project in Visual Studio 2008 you may wish to try the following:
- Open the PublicTemplates.csproj file in a text editor and change the UseIIS attribute to false - <UseIIS>false</UseIIS>.
- Save the file.
- Open the the project file in Visual Studio 2008.
Logging on to an 'Empty' Web Site
If you have created an empty Web site and are experiencing problems entering Edit/Admin mode in the Web config file verify that pageStartId is set to a positive value.
Reboot System
Reboot the system if the installation does not appear to be operating correctly.
Breaking Changes
See breaking changes in EPiServer CMS 5 R2.
Web Site base on EPiServer Demo Templates Package
The Demo Templates package for R2 is now released, see the Demo Package Installation Instructions for further information. The EPiServer Demo Templates package for R1 is not completely compatible with EPiServer CMS 5 R2. For more information see the IPageStore removed forum thread regarding this.
Upgrading
This blog post describes some of the issues when EPiServer World was upgraded to run on EPiServer CMS R2.
Windows PowerShell Installation
The setup program will install PowerShell when it is missing on the target machine. The PowerShell installation is launched without a UI and if anything goes wrong the setup program only reports that PowerShell installation failed. When this happens it can be useful to launch the PowerShell installation manually to find out more about why it is failing.
The PowerShell redist folder inside the installation folder contains all installers for all supported platforms except Windows Server 2008. The following table shows which installer to use on for a given platform.
| OS | PowerShell Installer |
| Windows Vista 64 bit |
Windows6.0-KB928439-x64.msu |
| Windows Vista 32 bit |
Windows6.0-KB928439-x86.msu |
| Windows Server 2003 64 bit |
WindowsServer2003.WindowsXP-KB926139-x64-ENU.exe |
| Windows Server 2003 64 bit Itanium |
WindowsServer2003-KB926139-ia64-ENU.exe |
| Windows Server 2003 32 bit |
WindowsServer2003-KB926139-x86-ENU.exe |
| Windows XP 64 bit | WindowsServer2003.WindowsXP-KB926139-x64-ENU.exe |
| Windows XP 32 bit | WindowsXP-KB926139-x86-ENU.exe |
Installing Windows PowerShell on Windows Server 2008
On Windows Server 2008, PowerShell is enabled by executing the following command:
pkgmgr.exe /iu:MicrosoftWindowsPowerShell
You can also report bugs to the EPiServer Developer Support (this requires partner access).