Creating and using a workflow
Note: This topic has no later version.
The workflow extensions in EPiServer CMS are based on Windows Workflow Foundation 3.5 (WF). Workflows in EPiServer will change in coming versions of the platform due to the upgrade of WF by Microsoft (in .NET 4.5). Note that from update 40 (CMS core 7.15.0), workflows are disabled by default. Refer to Activating workflows for information on how to enable them.
Table of contents
Introduction
The process of creating a workflow in Visual Studio, deploying it to EPiServer CMS and then registering it is easy. This example will show how to create a simple workflow that assigns a task to a group of users whenever a page is created in a specific node in the site structure.
Creating the workflow
The first step will be to create the workflow project in Visual Studio.
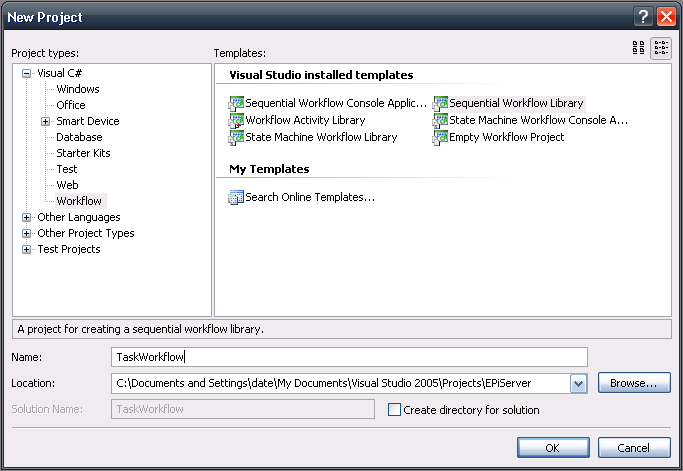
Creating the workflow DLL
Create a workflow DLL as follows:
- Select New > Project from the File menu in Visual Studio.
- Find and select the Workflow node under the Visual C# root in the Project types area.
- Select Sequential Workflow library in the Templates area.
- Name it (in this example the project will be called TaskWorkflow) and click OK.
Visual Studio will now create a project for you containing an empty workflow definition with a canvas that you can drag and drop workflow items to.
Renaming the class
By default, Visual Studio has named the workflow class Workflow1. Rename and refactor your class as follows:
- Start by entering the code-behind by right-clicking the canvas and selecting View Code.
- Right-click the class name in the type definition declaration and select Refactor > Rename.
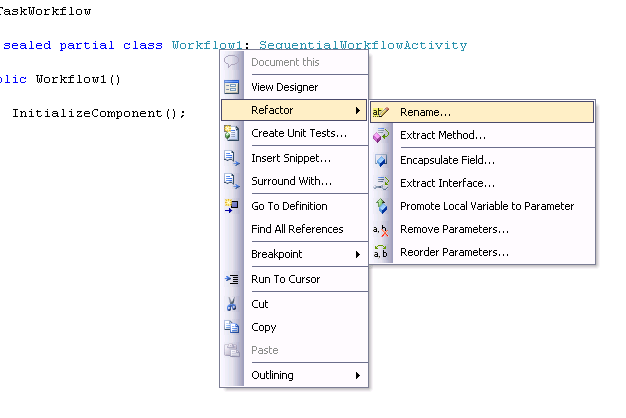
- Type an appropriate name for your class (in this example the class will have the same name as the namespace, in this example TaskWorkflow).
- Select the Workflow1.cs file in the solution explorer and press F2 to rename it to match your class name.
Adding an activity
At this point Visual Studio has created a workflow for you, ready to compile and deploy. You can add and modify a CreateTask activity to the workflow before deploying it to the site. With the design canvas open, drag a CreateTask activity from the toolbox and drop it on the canvas between the starting and ending points of the workflow (see Developing Workflows for information on how to add the workflow items to your toolbox).
We now need to add some code to make it possible for the workflow to let the user know what page started the instance. This will also make it possible to see this page when clicking the task.
Add the following code to your class declaration in the code-behind file:
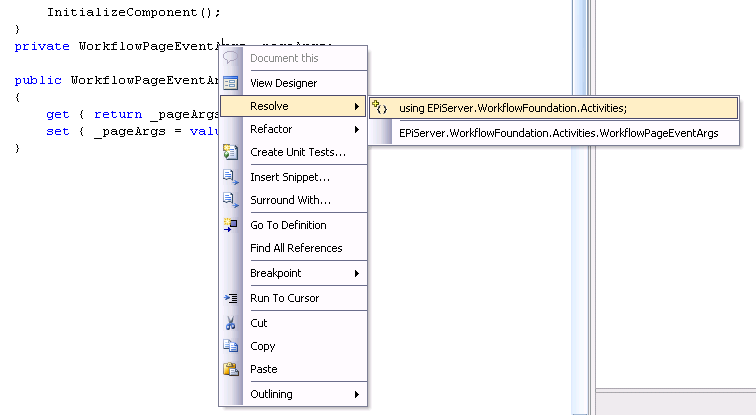
private WorkflowPageEventArgs _pageArgs;

public WorkflowPageEventArgs PageArgs
{
    get { return _pageArgs; }
    set { _pageArgs = value; }
}
The compiler will not recognize the WorkflowPageEventArgs type at first. To add the right using statement, right-click the WorkflowPageEventArgs declaration and select Resolve. In the drop-down menu that appears, select EPiServer.WorkflowFoundation.Activities. The correct using statement will be added to your code and the declaration will become properly highlighted to indicate that the compiler recognizes it.
Adding the correct using statement to the code-behind:
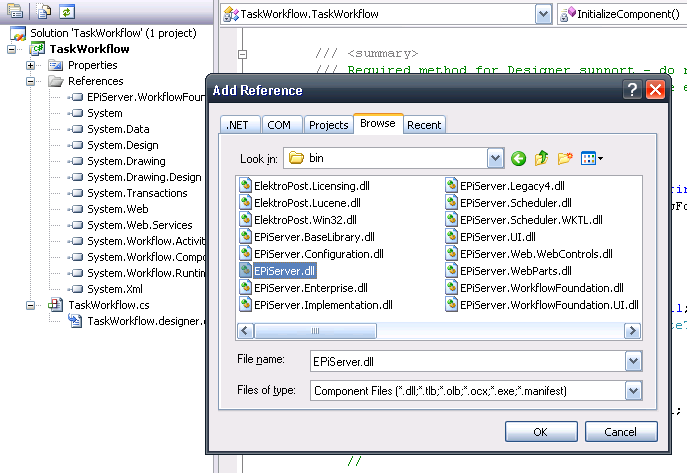
If you try to build the project at this point you will receive a compiler error letting you know that your project is missing a reference. To solve this, right-click the References node in your solution explorer and select Add Reference. Select the Browse tab and locate the EPiServer.dll file in the bin folder of your site. Click OK and build the project. The process should now complete without errors and you will receive the "Build succeeded" message in the status bar.
Before deploying the DLL file to the site you need to connect the CreateTask activity to the page that invoked it (made possible by the code previously added in the code-behind) and to add a TaskSubject for the task to make sense to the receiving user (associate the PageLink property with the invoking page).
- Select the CreateTask activity on the designer canvas.
- On the Properties tab, click the expand button next to the PageLink field (if no properties window is visible, right-click the task and select Properties).
- On the dialog that pops up, expand PageArgs and select PageLink.
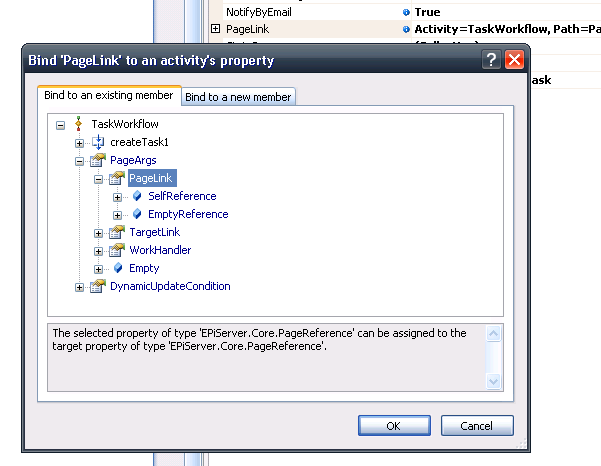
- For the purpose of this example, add the group to receive the task directly in Visual Studio, in a live scenario this would most likely be done in a more dynamic manner. In the AssignTo field, enter "Administrators" to let EPiServer CMS know that all users that are members of the Administrators group should receive this task when the workflow is activated.
- To add a TaskSubject we simply click in the TaskSubject field in the properties dialog and enter an appropriate text. In this example, name it "A workflow created task". Save and build your project.

Adding and enabling the workflow
The process of deploying your workflow to EPiServer CMS is simply copying the recently built DLL file to the bin folder of your site and register it with EPiServer CMS as follows:
- Browse to your website and enter Admin mode.
- On the Admin tab, click Workflows under the Tools section.
- Click the green plus sign on the workflow working area, this will open up the workflow definition section where you can add a workflow to EPiServer CMS.
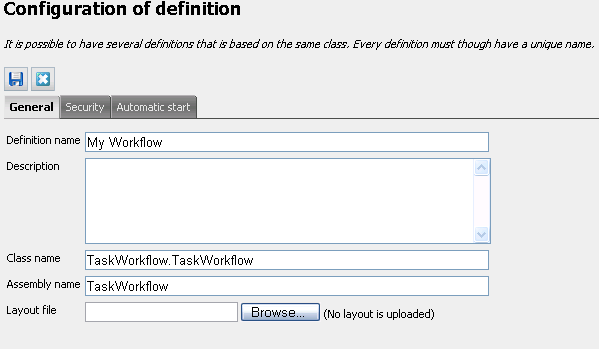
- In Definition name, enter an appropriate name.
Class name consists of the namespace path and name of your class.
Assembly name is the name of the assembly containing your workflow, in this case it will be "TaskWorkflow".
The screen shot below shows a workflow definition in EPiServer CMS.
To make this workflow start automatically every time a page is created:
- Click the Automatic start tab.
- In the Choose events that should start instance list, select CreatedPage.
- On this view there are several other options. You can for instance tell EPiServer CMS that this workflow should only be executed when pages are created under a specific folder by clicking the expand button (...) next to the "Given a pagerelated event, the page root where definition should be applied"-field and selecting the folder in the dialog that opens up.
See also
Last updated: Feb 23, 2015