Deployment Center
Note: This topic has no later version.
Deployment Center was the primary tool to install and upgrade sites up to CMS 7.5. After version 7.5+, installation and upgrading of EPiServer is done using NuGet. Refer to Installing EPiServer and Installing updates for more information.
Introduction
The EPiServer Deployment Center is the user interface of the EPiServer Installation and Deployment System. The EPiServer Deployment Center is used when installing and deploying EPiServer CMS and other EPiServer products.
How it works
Although the Installation and Deployment System is shipped with many of the EPiServer products – such as EPiServer CMS, Relate and Community – it is not a stand-alone product in itself. The system is separated into a common part that is used by all EPiServer products and a product specific part for each product.
The installation through EPiServer Deployment Center is divided into the following parts:
- Websites. The user interface of the EPiServer installation and deployment system can be used to browse and execute the actions that are available for the EPiServer products installed on your machine. You can also customize, extend and modify your EPiServer installations, for example, creating EPiServer CMS / Community / Relate websites, removing EPiServer websites, installing modules to EPiServer websites etc.
- Base components. EPiServer Deployment API is a managed code set that can perform actions to create, delete and manipulate websites, databases, files, folders and much more in a transactional manner. The API also includes reusable wizard controls and classes. For example, it is possible to use the EPiServer Deployment API in order to manipulate the way websites are created/deleted in IIS.
EPiServer Deployment Center is based on Power Shell Scripts, which makes it easy for any third-party company to use the same installer for their products as well.
The following work procedure is used for installing EPiServer products and modules with EPiServer Deployment Center:
- Check the system requirements and follow the installation instructions for the product or module.
- Download, unzip the installation package from EPiServer World (login access required) and run setup.exe.
- Open EPiServer Deployment Center (Start > Programs > EPiServer) to select action.
The common part is installed under the <Program Files>\EPiServer\Shared\Install folder and the product specific parts are installed under <Program Files>\EPiServer\ProductName\ProductVersion\Install. The ProductName is the product name such as CMS or Relate and ProductVersion is the version number of that product.
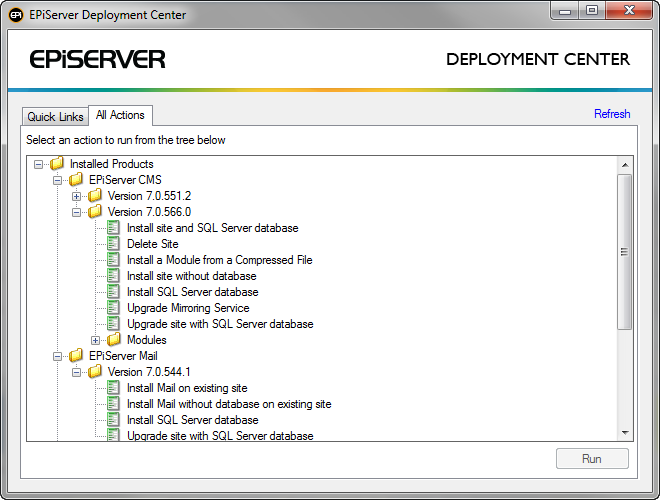
The user interface of EPiServer Deployment Center
All installed EPiServer products that support EPiServer Deployment Center are shown in the tree under All Actions. Under each product node there is a version node for each version of the product installed. The tasks that can be performed for/on the product version are listed under the product version node.
The EPiServer Deployment Center consists of the following tabs:
- Quick Links. Select the site or application to install the product or module on. The available options are shown to the right.
- All Actions. Select product or module. The available options are shown to the right.
Task wizards
Most tasks listed in the Deployment Center have an associated user interface wizard. A wizard is one or more pages where information needed to perform the task is collected from the user. Most wizards show a summary page before execution as final confirmation about what is going to happen. The screen shots below show examples of wizard pages from the EPiServer CMS Install Site and SQL Server wizard.
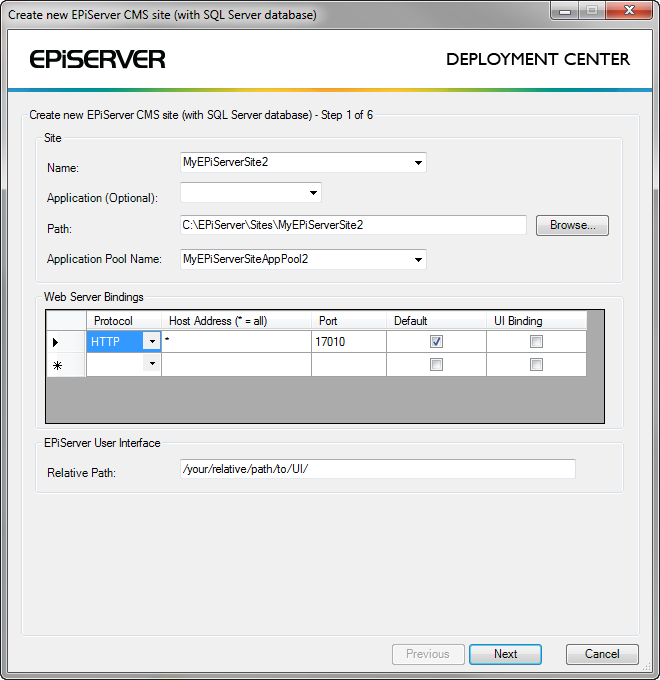
The wizard summary page is shown above which gives details of the website, database and other resources that will be created by the task.
When the task is running, a progress indicator is shown to keep the user informed. The figure above shows the progress when a task is run from the EPiServer Deployment Center. The dialog can be hidden, in this case a message box will be shown when the task has completed.
The tasks that appear in the EPiServer Deployment Center are actually implemented as PowerShell scripts. More information about Windows PowerShell can be found on Microsoft.com.
It is these PowerShell scripts that decide if a user interface wizard should be shown to the user to collect input information and then subsequently carry out the task in hand using a combination of built-in PowerShell functionality and EPiServer’s Deployment API.
Compatible modules for an EPiServer CMS version will be displayed in the Deployment Center installation wizard when installing a new site and on the Quick Links tab when selecting an installed site in Deployment Center. Optionally, the file CompatibilityMatrix.config is used to allow modules packaged with a previous versions of CMS to be installed on a newer CMS version. This file is downloaded from EPiServer and overwritten each time Deployment Center starts.
EPiServer deployment API
The EPiServer Deployment API is a managed code set that can perform actions to create, delete and manipulate websites, databases, files, folders and much more in a transactional manner. The API also includes re-usable wizard controls and classes. As mentioned before in this document, the system is divided into common and product specific parts with the Deployment API being a prime example of this.
How EPiServer Deployment Center works
System flow
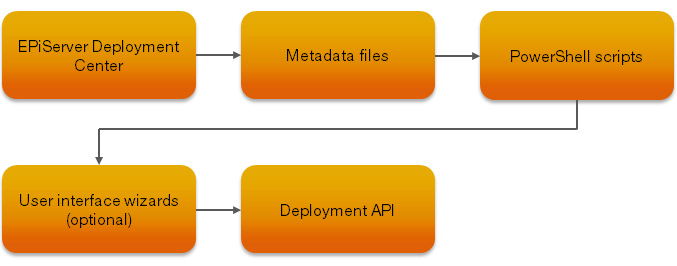
The EPiServer Deployment Center enumerates configurable folders on the system to locate primarily, Metadata files (.metadata) and secondarily, PowerShell files (.ps1). The folders searched are defined in the EPiServerInstall.exe.config file located in the <Program Files>\EPiServer\Shared\Install folder.
If Metadata files are found then these are used to populate the tree with task nodes. Otherwise, if only PowerShell script files are found the PowerShell file names are used to populate the tree with task nodes.
The Metadata files, if present, are XML files that contain information about what tasks are available to the Deployment Center. The XML elements describing each task have an attribute point to the PowerShell script that should be run to carry out the task.
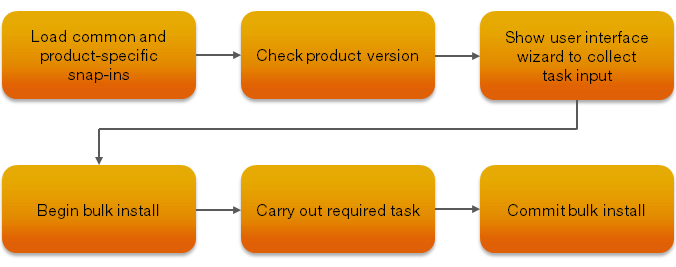
Script flow
The PowerShell scripts developed by EPiServer typically have the same logical flow as shown below:
EPiServer PowerShell snap-ins
More information about the cmdlets available in the EPiServer snap-ins can be found in About PowerShell for EPiServer applications.
User Interface Wizards
The UI Wizards are shown by the PowerShell scripts in order to collect input information for the task from the user. The EPiServer Deployment API contains a base class for wizards, EPiServer.Install.UI.WizardBase. The base class provides the entire wizard infrastructure (modal dialog, next, back, cancel functionality etc) so all the derived class needs to define is the pages to be shown in the wizard. Each page is actually an instance of a class derived from System.Windows.Forms.UserContol. The EPiServer Deployment API contains many predefined “pages” for typical scenarios (website creation, database creation, folder creation etc).
The derived wizard class needs to override the PreShow and PostShow methods of WizardBase. In the PreShow method, the class should initialize its page user controls and then add them to the WizardBase.Pages collection. In the PostShow method, the class should take the opportunity to process the information entered by the user into the page user controls and set its public properties appropriately to enable the PowerShell script to read them and carry out its task.
Deployment API
The EPiServer Deployment API can be sliced both horizontally, in terms of functionality provided, and vertically, in terms of physical implementation layers.
Functionality implemented in the Common Deployment API:
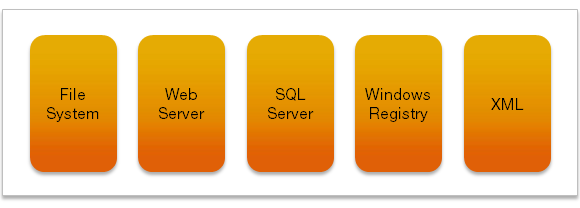
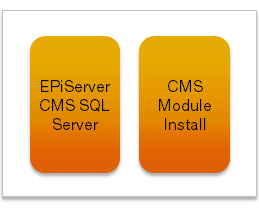
Functionality implemented in the CMS Deployment API:
Each API is made up of a physical 3 tier implementation stack:
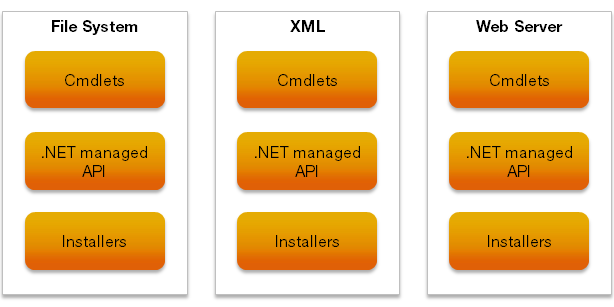
The cmdlets are provided to give the PowerShell scripts easy access to the .NET managed API. In most cases, they do not do much in themselves but rather create an instance of the appropriate .NET managed API class for the task and call the appropriate method.
The .NET Managed API is a collection of classes, one for each of the functionality areas, plus a controller class. These classes create and initialize one or more installers for the task they are asked to do and pass them off to the controller for transacted execution.
The installer classes are the ones that perform the actual implementation for the task in hand. Each class derives from the Microsoft base class System.Configuration.Install.Installer. The installer model was chosen as it naturally lends itself to transactions. The controller ensures that all the installers added as part of a bulk install are executed in a transaction. This means that if anything goes wrong in the install phase then the controller will execute a rollback to restore the system to its previous state.
Last updated: Feb 23, 2015