Installing and Configuring Mirroring
Table of Contents
- Introduction
- Installing Mirroring on a New Website
- Installing Mirroring on an Existing Website
- Configuring the Target Site
- Configuring the Source Site
- Configuring the web.config File
- Synchronizing Mirroring
Introduction
A mirroring job is normally done between two sites. This means that two sites probably have to be installed, one as a source site and one as a target site. Each site can be used as a source site or a target site regardless of the purpose from the beginning.
The installation package for EPiServer contains a setup file (setup.exe) that installs the Deployment Center and EPiServer CMS on the machine. This has to be done to be able to install Mirroring. Alternatively, EPiServerShared.msi and EPiServerCMS.msi can be run instead of the setup file.
Installing Mirroring on a New Website
Install mirroring on a new website as follows:
- Open Deployment Center and select Install site and SQL Server database
or Install site without database, depending on whether you want
to use SQL Server as a database or not.
The mirroring part of the site will be installed as an application under the site/application with a separate application pool. This can be changed manually after the installation if you want to have the mirroring application on a separate site. - In Web server bindings, select the site settings and bindings for the site you
are creating.
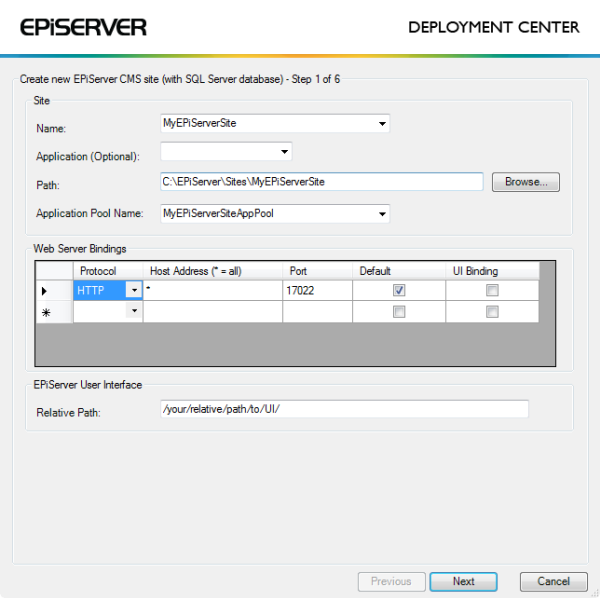
- Creating database. Select settings for the database to be created.
- Virtual Path Provider Folder. Select a folder where files will be stored by the Virtual Path Providers.
- Modules. Select Install Mirroring in the module list.
- License file. Browse to a valid license file. If you do not have any valid license file yet, you can copy the file to the site when received.
- Summary. Check that the port in Bindings under Site Settings is 80.
- Credentials. At the end of the installation, the Mirroring
module will pop up a window where you need to select the credentials that will
be used when a Mirroring job is run. These settings will be editable from the
mirroring configuration file web.config.
- Enter the username of a user that will do the export and import of pages and files when the mirroring job is run.
- Enter the password of the user that will do the export and import of pages and files when the mirroring job is run.
- The domain the user belongs to that will do the export and import of pages and files when the mirroring job is run.
Installing Mirroring on an Existing Website
To be able to install Mirroring on an existing EPiServer CMS site, the site must be running on the same version as the mirroring DLL (EPiServer.MirroringService.dll).
Install mirroring on an existing website as follows:
- Open EPiServer Deployment Center, and select Install Mirroring to start the installation.
- Choose site. Choose which site you want to install the Mirroring application on. Note that only sites installed on port 80 will be visible and selectable.
- Credentials. At the end of the installation, the Mirroring
module will pop up a window where you need to select the credentials that will
be used when a Mirroring job is run. These settings will be editable from the
mirroring configuration file (web.config).
- Enter the username of a user that will do the export and import of pages and files when the mirroring job is run.
- Enter the password of the user that will do the export and import of pages and files when the mirroring job is run.
- The domain the user belongs to that will do the export and import of pages and files when the mirroring job is run. - Summary. Displays the settings. Check all the settings before continuing with the installation.
Configuring the Target Site
Creating a Target Page
Go to EPiServer CMS Edit mode on the target site and create a page that will act as the root page for the mirrored pages. It is also possible to use an existing page as the mirroring root page.
Configuring the Source Site
To create and edit channels for Mirroring, go to the Admin mode on the source site and select the Config tab > Mirroring (under Tool Settings).
Creating a New Channel
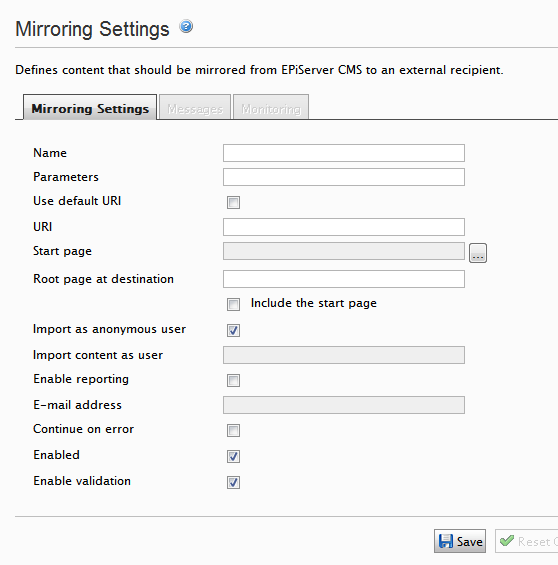
Click the Create button to create a new channel, and enter the following information:
- Name. Type an unique name for the mirroring channel.
- Parameters. Optional field that can be used by providers.
In this version there are one parameter which can be handled by episerver
provider EPiServer.MirroringService.MirroringTransferProtocol.WCF.MirroringTransferClient.TransferAction.
The TransferAction can have two options None and ForceCurrentVersion, by default is None which creates a new version for each published page on the target site.
The ForceCurrentVersion option does not create a new version for each published page, it updates the page on the target site. - Use default URI. Select to use the URI defined in the configuration file (web.config) for the mirroring application.
- URI. Type the URI to the destination mirroring applications target service, for example, http://localhost/R3Mirroring/Mirroring/MirroringTransferServer.svc. The service for the default provider is MirroringTransferServer.svc.
- Start page. The local root page on the source site to be mirrored.
- Root page on destination. The page number on the target site where the pages will be mirrored to.
- Include the start page. Determines if the start page will be mirrored or if only its children will be mirrored.
- Import as anonymous user, determines if an anonymous user will do the export and import of pages and files when the mirroring job is run.
- Import content as user, determines if an identified user will do the export and import of pages and files when the mirroring job is run.
- Enable reporting, enables the reporting for the mirroring job.
- E-mail address, the e-mail address of the specified user for the mirroring job.
- Continue on Error, mirroring continues even there is problem on the importing side.
- Enabled, determines if the channel is active or not. If it�s not enabled, nothing will be mirrored for the channel.
- Enable validation, by default checks all necessary page types and page definitions which is include in the start page and its descendant.
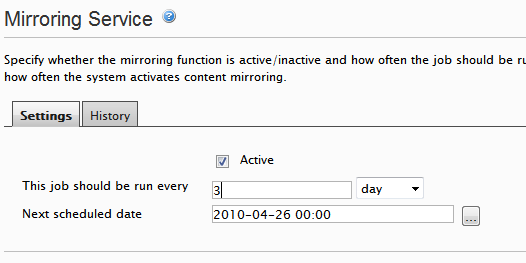
- Automatically run jobs. On the Settings tab in Admin mode, you can set up automatic mirroring of channels by selecting the Active check box and choosing how often to run the job.
- History. On the History tab you can see the result of previous jobs that have been run. If a job has failed, this is the place where you can find out why the job failed.
- Add site in IIS. Open up IIS and delete the Mirroring application under the source and target sites. After the application has been deleted, create a new site and set its root folder to the Mirroring folder that was created as a sub-folder to the source/target site’s root folder. This document does not contain any information about how to use WCF and basicHttpBinding on another port than 80. For details about configuring namespace reservations using a port other than 80 for WCF application hosted in IIS, see Microsoft MSDN.
-
Change service endpoints.
Open the configuration files for both the source and target mirroring sites. The
addresses for both mirroringSourceEndpoint and mirroringTransferEndpoint
must be updated so it points to the correct address.
<endpoint address="http://site1Mirroring/MirroringSourceServer.svc" name="mirroringSourceEndpoint"...
<endpoint address="http://site1Mirroring/MirroringTransferServer.svc" name="mirroringTransferEndpoint"...
| Setting | Description |
|---|---|
| Edit a channel | To edit a channel, click on the name of the channel, update the fields as appropriate and click the Save button. |
| Delete a channel | To delete a channel, click on the name of the channel and click the Delete button. |
| Reset state | It is possible to reset the state of a channel. This will make the Mirroring
application re-mirror everything from the root page of the Mirroring channel to the source site next time it is run. To reset the channel, select the name of the channel and click the Reset State button. |
| Check System | Checks both the source and target site if all necessary parameters are correctly set up. Such as URI, Root page at destination, Mirroring Server binding, Access to DataBase and etc. See Synchronizing Mirroring. |
Mirroring Channels
To start the Mirroring process manually, go to Admin mode > Admin tab > Mirroring Service > click Start manually.
Configuring the web.config File
Changing Security Credentials
To change the security credentials that are used when a Mirroring job is run, open the web.config file for the source mirroring application. Locate the episerverMirroring element in the configuration file and change the credentials in the MirroringTransferServer provider.
<episerverMirroring>
   <mirroringTransfer defaultProvider="MirroringTransferServer">
       <providers>
           <add
               defaultEndpointName="mirroringTargetEndPoint"
               numberOfPagesInPackage="500"
               numberOfFilesInPackage="100"
               destinationPath="c:\temp\mirroring\"
               chunkSize="4194304"
               name="MirroringTransferServer"
               type="EPiServer.MirroringService.MirroringTransferProtocol.WCF.MirroringTransferClient,EPiServer.Enterprise"
               username="XXXX"
               password=""
               domain="ep" />
         </providers>
       </mirroringTransfer>
   <mirroringMonitoring offlineLoggningEnabled="true" offlineLogPath="Path to offline log"/>
</episerverMirroring>| Configuration | Description |
|---|---|
| Changing chunk size | By default, the chunk size of the data sent between the machines is set to 4194304 bytes. This can be changed by changing this value in the provider attributes. |
| Changing temporary folder | When data is sent between the machines, temporary files are stored in a location that can be modified in the configuration file. In the MirroringTransferServer provider, there is an attribute called “destination path” where you can set the temporary path. |
| Changing numberOfPagesinPackage | By default the numberOfPagesInPackage is 500. Indicates the max number of pages in package. |
| Changing numberOfFilesInpackage | By default the numberOfFilesInPackage is 100. Indicates the max number of files in package. |
| Changing communication protocol | When the mirroring application is installed, basicHttpBinding will be used by default when communicating between the machines. To change this, change the bindings in the configuration files for both the source and the target application, see About WCF and Bindings on MSDN. |
| Changing offlineLoggingEnabled and offlineLogPath | By default offline monitoring is disabled and can be enabled by setting the
offlineLoggningEnabled to true. By default the path to offline monitoring log is "C:\Windows\Temp\episerver\cms6\mirroring\monitoring\" and it can be changed to another path by setting the offlineLogPath attribute. |
| Using another mirroring provider | It is possible to use other mirroring providers than the built-in provider. Add the provider in the episerverMirroring section and set the defaultProvider to the provider you want to run. |
<episerverMirroring>
    <mirroringTransfer defaultProvider="myMirroringProvider">
       <providers>
          <add
                 defaultEndpointName="mirroringTargetEndPoint"
                 destinationPath="c:\temp\mirroring\"
                 chunkSize="4194304"
                 name="MirroringTransferServer"
                 type="EPiServer.MirroringService.MirroringTransferProtocol.WCF.MirroringTransferClient,EPiServer.Enterprise"
                 username="XXXX"
                 password=""
                 domain="ep" />
          <add
                 name="myMirroringProvider"
                 type="jobe.MirroringProvider, XXXX.Providers" />
       </providers>
    </mirroringTransfer>
  <mirroringMonitoring offlineLoggningEnabled="true" offlinelogPath="Path to offline log"/>
</episerverMirroring>
Changing the Mirroring Application to a Separate Site
When the Mirroring application is installed by the Deployment Center, it is installed as an application under the EPiServer CMS site chosen. To change the mirroring application to a separate site, you need to do the following:
Synchronizing Mirroring
You need to synchronize the bin folders both under Site root folder and Mirroring Service bin folder. When assemblies in the site bin folder and mirroring service bin folder are not same, you will receive the following error when performing “Check System”:
Parameter name: type ()
It is important to have both bin folders synchronized with each other, since the Mirroring Service runs as a separate application and is having its own application pool. When you add any custom code/property/module under the source site, the affected assembly should be copied over to the Mirroring Service bin folder as well. If you have installed mirroring service on both source and destination sites, then Site and Mirroring Service must have the same assemblies under the bin folders.
Last updated: Mar 25, 2013