
Converting www.activesolution.se to Azure Website
Just before summer we updated our site to EPiServer 7.5 and right now it is hosted on local IIS with standard SQL server on virtual server in Windows Azure. This is good but of course we want it to be an Azure Website and from version 7.5 this is possible. In this blog I am going to take you through the process of converting the site and give some tips on what to think of when doing so.
Step one: Preparation
The first thing to think of is how you want your site to be deployed, what setup you want for the source control and what setup you want for the blobs. For the existing site we are using TFS as our source control system, doing deployment to the server with a manual xcopy deployment and saving our blobs as local file-blobs.
Deployment and source control
For a Azure website there is a possibility to do continuous deployment very easy if you are using Github, local Git repository, Visual Studio Online (TFS-online), Dropbox, Bitbucket, CodePlex or any other external public repository. We choose to use a private repository in Github so the first thing we had to do was to convert our TFS repro to a private Github repro. To do that we used a tool called Git-TF (https://gittf.codeplex.com/) that makes it possible to migrate from TFS to Git with all history. It is very simple to use, do like this:
1: Create your private Github repository
2: Download and install Git-TF
3: Start a command line tool and write like this:
git tf clone http://myserver:8080/tfs/mycollection “$/TeamProjectA/Main” --deep
where myserver:8080/… is the path to the collection in your TFS-server and $/Team… is the path to the project and branch you want to convert and --deep means to include history
4: Then add the repository you want to upload this to by writing like this:
git remote add origin https://github.com/UserName/projectname.se.git
5: And last write like this to push/upload the code to Github
git push -u origin master
Blobs
When using blobs in a Azure website you can save them as Azure blob storage or you can save them in the database as DDS. What you choose depends much on how big your blobs are since there is a big price difference in Azure on size of database and size of blob storage. For example (prices change often so this is a right now price) you get 1 TB of blobs for the same price per month as a 5 GB big database (the cheapest version) so if you have a lot of pictures and other stuff you want to go for Azure blob storage but if you have small blobs you might want to go for the database. One big pro of the database is that when copying from production to test or development you do not need to copy any blob-files, it is all in the database. For www.activesolution.se we chose to go for the database version since we do not have a lot of blobs in our site.
Step two: Setup of Azure environment
Soon we will be coding but first we need to prepare the development and production environment in Windows Azure. EPiServer has a great article on how to do this here: http://bit.ly/WYjKHw. Since we chose to use the database as a host for our blobs we do not need to create the Azure storage part, we only create website, service bus and database. It is important that you always create at least two of every part, one for production and one for development, it is recommended that you also create one for test. The good thing is that it is very easy to create this things and you can stop them when not using them. If you need another testversion you can create all you need in a very short of time. One thing to remember here is that in the article from EPiServer it says that you should create a SQL-database when creating the website, do not do this, we will do that in a different way a little later. What you do need to do is to create a database server in Windows Azure if you not already have one.
Step three: Create the Windows Azure database
You now have a website and a service bus created in Windows Azure and now you have to create the database. You can do this in different ways, from EPiServer Deployment Center, with standard scripting of the database or if you have a newer version (I think it came in 2012) of SQL Server Management Studio you will have a function for deploy to Azure and that is the one we will use. Do like this:
1. Make a backup of the existing database in production (important to remember to click the “Copy-Only” select box when doing the backup, otherwise you might screw up some maintenance job).
2. Restore the database on your local database server (or use a development server). You could do this directly from the production environment but it is not recommended since you have to do some changes in the database.
3. Before we can deploy the database to Azure we have to make a couple of changes to it to make the schema validate. Hopefully EPiServer will include these changes in a update in near feature but for now you have to do like this:
a. Add a clustered index to the table CompleteScope.
Do this by executing this on your restored database:
CREATE CLUSTERED INDEX [IX_CompletedScope_Clustered] ON [dbo].[CompletedScope]
(
[uidInstanceID] ASC
)WITH (PAD_INDEX = OFF, STATISTICS_NORECOMPUTE = OFF, SORT_IN_TEMPDB = OFF, DROP_EXISTING = OFF, ONLINE = OFF, ALLOW_ROW_LOCKS = ON, ALLOW_PAGE_LOCKS = ON)
b. Change the stored procedure InsertCompletedScope so it says
“UPDATE [dbo].[CompletedScope] WITH(ROWLOCK, UPDLOCK)” instead of
“UPDATE [dbo].[CompletedScope] WITH(ROWLOCK UPDLOCK)”
Do it by executing this on your restored database:
ALTER PROCEDURE [dbo].[InsertCompletedScope]
@instanceID uniqueidentifier,
@completedScopeID uniqueidentifier,
@state image
As
SET TRANSACTION ISOLATION LEVEL READ COMMITTED
SET NOCOUNT ON
        UPDATE [dbo].[CompletedScope] WITH(ROWLOCK, UPDLOCK)
            SET state = @state,
            modified = GETUTCDATE()
            WHERE completedScopeID=@completedScopeID
        IF ( @@ROWCOUNT = 0 )
        BEGIN
            --Insert Operation
            INSERT INTO [dbo].[CompletedScope] WITH(ROWLOCK)
            VALUES(@instanceID, @completedScopeID, @state, GETUTCDATE())
        END
        RETURN
RETURN
c. Change the sp aspnet_Membership_GetNumberOfUsersOnline so it is including a WITH for the hints, do it by executing this:
ALTER PROCEDURE [dbo].[aspnet_Membership_GetNumberOfUsersOnline]
    @ApplicationName            nvarchar(256),
    @MinutesSinceLastInActive   int,
    @CurrentTimeUtc             datetime
AS
BEGIN
    DECLARE @DateActive datetime
    SELECT  @DateActive = DATEADD(minute,  -(@MinutesSinceLastInActive), @CurrentTimeUtc)

    DECLARE @NumOnline int
    SELECT  @NumOnline = COUNT(*)
    FROM    dbo.aspnet_Users u WITH(NOLOCK),
            dbo.aspnet_Applications a WITH(NOLOCK),
            dbo.aspnet_Membership m WITH(NOLOCK)
    WHERE   u.ApplicationId = a.ApplicationId                  AND
            LastActivityDate > @DateActive                     AND
            a.LoweredApplicationName = LOWER(@ApplicationName) AND
            u.UserId = m.UserId
    RETURN(@NumOnline)
END
d. Make shore that all users in the database that you do not want in windows Azure are gone and the one you want exists on the server you just created the database on and are not orphan on that server. With orphan it means that the username might exist but the SID for it does not match (will happen if the database is taken from another server). If this is the case it can easy be fixed by running this on the database:
EXEC sp_change_users_login 'Update_One', 'EPiUser', 'EPiUser' This script is working so it takes the username and loginname as parameters, most often this is the.
The most simple way is to delete all users from the database (not the built-in ones) and then to create new one in the SQL Azure database server. To do that, after you have successfully created the database in Azure open a query windows against it from SQL Server Management Studio and run this script in the Master database:
CREATE LOGIN YourLoginName
    WITH PASSWORD = 'PrettyComplexPassword'
GO
Then this against your database:
CREATE USER YourLoginName
    FOR LOGIN YourLoginName
    WITH DEFAULT_SCHEMA = dbo
GO
Add user to the database owner role
EXEC sp_addrolemember N'db_owner', N'YourLoginName'
GO
e. It might be some other errors as well depending on if your database is completely new or an updated one. For me I got these errors (fixed them by setting FillFactor to default (0)) but I did not get those errors another time I did it. Maybe someone at EPiServer can explain that? 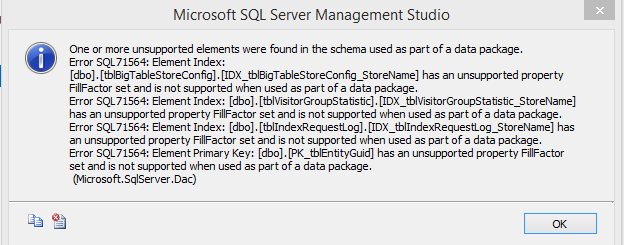
4. After doing these changes you can deploy the database to Windows Azure and to do that right-click on the database, chose Tasks, then chose Deploy Database to SQL Azure. This will give you a dialog where you choose the server connection to the SQL database you just created or already have, a name for the new database in Azure and a path to where the temporary files that is being used during the deployment are saved, the edition of SQL Azure you want (Web edition has a maximum size of 5 GB) and the maximum size of the database. It could look something like this: 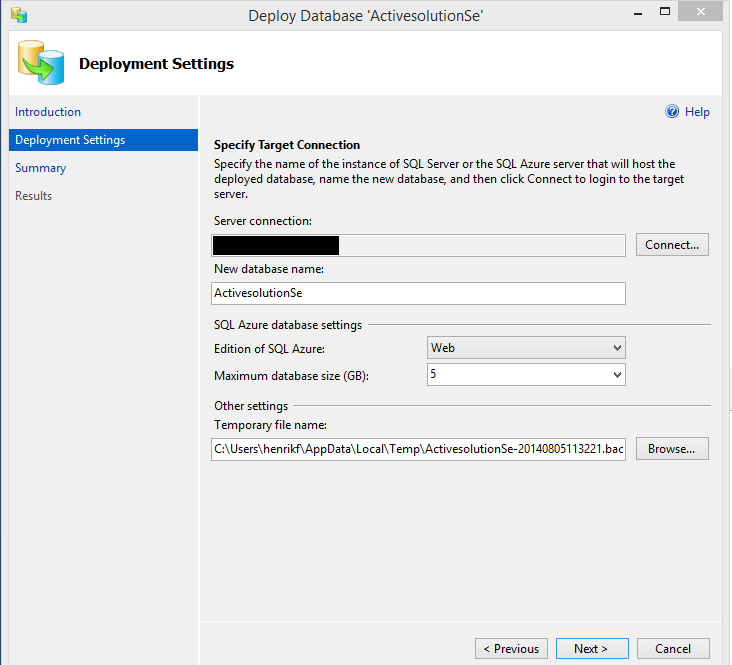
Hopefully everything works fine, otherwise try to fix the errors (without breaking the database!) or post a question here and I will try to answer it.
Step four: Update the solution to support Azure.
Finally it is time to start coding so start by opening the solution from the place you have put it after either creating a branch or clone it or how you set up the source-control. In the article from EPiServer there is good explanation on what to do in code, but I will go through the most important part here anyway.
When you have opened the solution, start by changing the connectionstring so you go against the database in Windows Azure and after that run and verify that it is still working. Very important here is that you do not remove this part from the connectionstring “MultipleActiveResultSets=True”. If you get an error saying that it can’t access the database, you probably has not added that ip-adress to the firewall in Azure. Doing that is very simple, just go to the Azure portal and select the database you have created and click the link “Set up Windows Azure firewall rules for this IP address”.
When you see that all is working, go into admin and create two new security groups called WebEditors and WebAdmins and create sql-users that needs to be created for those who should work with your site. This groups must be called that to get it to work, see “5. Creating an admin/edit user” in EPiServers article for more information. If admin say that you are not allowed to create users and groups you must change the role and membership-providers to have the Multiplex as standard.
Now it is time to update, remove and add some nuget packages. First remove the package called EPiServer Search because it is not working inside Windows Azure, if you want a search inside the editmode and/or on the site you have to change to for example EPiServer Find, see section “Search in Azure” in the article from EPiServer. After removing that package, sadly you have to manually remove the settings from web.config that this package has put there, open web.config and search for “episerver.search”, also remove the location where the webservice was, you do not need it anymore. After that, clean the solution, manually delete all files from the bin-folder that was not deleted when clean solution was selected and rebuild and see that all is working.
After that update all EPiServer packages that needs to be updated and when that is done, run this in the nuget console to update the database to the latest version: update-epidatabase
Now it is time to add some new packages to the solution, first you need to add the package “EPiServer Azure” to be able to use events and blobs. Then add the package EpiCode.BlobConverter to be able to convert your fileblobs to selected blob-provider and if you want to have the blobs in the database also add EpiCode.SqlBlobProvider.
Now you have to update your configuration to set it to use your new blob-provider (sql or Azure) and to use the Service Bus for event notification. This is very good described in the article from EPiServer so open it and look for the “3. Updating configuration” part.
When that is done, and you have recompiled your project all should be working but there should not be any images (from the blob storage) on the site. To fix that, go into admin mode and run the scheduled jobs named Convert File Blobs.
Step five: Deploy to test environment and fix all errors
Now it is time to deploy to Azure and the test environment you hopefully created before. To do that, just connect your source-control to the Azure website (different step for each source control solution so I can’t show pictures) and then commit and push it up to the branch you connected with the site.
This will probably first generate some errors, first in deployment and then when trying to run the site. I cannot tell what will happen to you because it depends a lot on what has been done to the project and how complex it is. This is some things I was struggling with during my upgrade.
1. Deployment failed because it could not find episerver.config and episerverframework.config
Earlier we had put these files below web.config with the settings to copyalways and the deployment in Windows Azure did not like that so we had to place them directly in the root of the project and change to do not copy on them.
2. Azure could not download nuget packages from EPiServer.
The deployment did not find the feed for EPiServer and to fix that update the NuGet.Config file so it looks like this:
<?xml version="1.0" encoding="utf-8"?>
<configuration>
<solution>
<add key="disableSourceControlIntegration" value="true" />
</solution>
<packageSources>
<add key="NuGet official package source" value="https://nuget.org/api/v2/" />
<add key="Episerver" value="http://nuget.episerver.com/feed/packages.svc/" />
</packageSources>
</configuration>
3. Standard logging to file does not work with log4net
Many sites are logging errors to file and since there are no regular hard drive in Azure this can’t be done. I have searched after a good appender to log4net for Windows Azure table storage but the updated once use a later version of log4net than EPiServer do so I had to use standard adonet-appender. The only thing I did was to create a new database in Azure and then create a table from the example here: http://logging.apache.org/log4net/release/config-examples.html and used the appender that they show in the example. After that I had a working log again.
4. AddOns made to the site might not work
We had the beta addon Spellchecker installed on the site and after deploying it to Azure I could not edit any textfield at all because of a javascript error (see this thread for more info: http://world.episerver.com/Modules/Forum/Pages/Thread.aspx?id=89004). The problem was that the dll-files from moduelsbin had been deployed alright but not the files in AppData. I first tried to fix it by manually upload the files in AppData but that did not help so I removed the dll-files from modulesbin (deleted the addon) and then we will have to reinstall it later if we want it. I do not know what EPiServer has planned for the AppData-folder and AddOns in Windows Azure, hopefully there will be a change that will make this easy to use later.
5. Mail does not work
If you were using smtp on your site you have to change it since there are no smtp-server available on your site in Azure. There are some different ways to solve this, if you have an Office 365 subscription, you can use that to send mail or you can use some other solution that people have develop. We usually use a Windows Azure AddOn called SendGrid, here are two good links on how to use it, http://sendgrid.com/windowsazure.html
http://azure.microsoft.com/sv-se/documentation/articles/sendgrid-dotnet-how-to-send-email/
Step six: Deploy to production
When you see that your test works fine you can deploy to the production environment and to do that do like this.
1. Take a new backup of the live VPP and database and copy to your local computer
2. Restore the database to your local computer or a development SQL Server, do not overwrite the database you have used in the earlier steps
3. Copy in the local file blobs from the live copy to your development vpp area
4. Run all those sql changes you did earlier on the new copy of the database (easy way is to run SQL Compare from RedGate or SQL Schema Compare from Visual studio to get a script with all changes)
5. Change your development solution to use the new database and run the site locally (You might have to run the database update from nuget console before the site will work)
6. Create the users needed and run the convert file blobs job from the EPiServer Admin
7. Deploy the database with the help of SQL Server Management Studio to your production SQL Azure Server the same way you did for the test database
8. Fix your web.config transformation so development go to test or development and release points to the production database.
9. Connect your production website to your sourcecontrol to get automatic deployment. To do this you might have to disconnect the testsite or use another branch, it is up to you how you want it.
10. See that all have been deployed to production and then change your DNS to point to this Azure Website, read more about it here: http://azure.microsoft.com/sv-se/documentation/articles/web-sites-custom-domain-name/
Enjoy
Now all you have to do is to enjoy not having to do any windows update, to be able to scale up if the need comes, having a site with automatic deployment and enjoying a simpler coding life for this site. To see a working EPiServer Azure website just visit http://www.activesolution.se.
Good to know is that since we are stuck on the old version of log4net, the connectionstringname-property of adonet-appender does not work.
There is a easy way around that I had to implement, and after that I was able to move the logging to EPiServerLog.config again. Read more here:
http://korneliuk.blogspot.se/2009/12/configuring-log4net-adonetappender-with.html
Great post! Thank you.
Thanks Anders, its 3½ year old though ;-)