Try our conversational search powered by Generative AI!
AI OnAI Off
| Views: | 13178 |
| Number of votes: | 2 |
| Average rating: |
The plan was to write a "How To" on adding dropdown lists to Edit Mode and how to interact with them, but as usual it is hard to stop and I ended up with a page template with a stylesheet picker that I thought might bring some inspiration to beginner developers. The dropdownlist is populated from an XML file with a list of the available stylesheets. The same thing could be done by either hard coding the values (which we don't like) or by reading them from web.config which would make the web site restart each time the list is modified.
›› The Control Class: MyDropDownControl
›› The Markup
›› Adding the Property to the Page Template
For this sample I used Visual Studio 2008 and Visual Studio 2005. The project was initially created in VS 2005 and then imported to VS 2008 since I needed ASP.NET 3.5. The reason for 3.5 is that I used Linq to read the XML document. You also need an EPiServer CMS 5 SDK installation.
I started off by creating a custom property with the Visual Studio UI. Right-click the project root node and select Add -> New Item.
On the dialog that follows, select the EPiServer node directly under the Visual C# node in the Categories view. In the Templates view, select Custom Property, enter a name (in my case I choose the original name: MyDropDown).
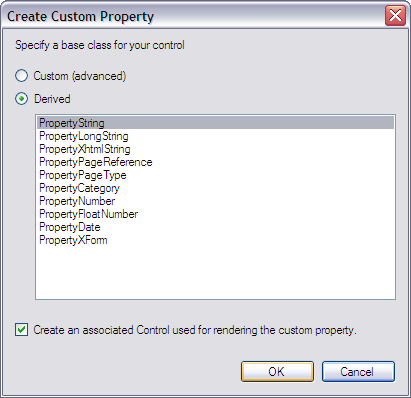
A dialog will pop up on the screen asking you if you want to create the property as Custom or Derived. Check the Derived radio button and select PropertyString as base class (also make sure that the option "Create an associated Control used for rendering the custom property" is checked).
This will create two new classes in your project. The MyDropDown class that uses attributes to make sure it is plugged in to the correct tab in the EPiServer UI, this could be either the Admin or Edit mode. Almost no code is placed in this class. Instead most of the functionality is placed in the Control class, MyDropDownControl. As your classes are generated you will notice that the control class contains some usefull comments on what methods to override in order to get started. In this sample code we will override two methods, ApplyEditChanges() and CreateEditControls().
Add a DropDownList to your class:
protected
System.Web.UI.WebControls.DropDownList _DropDown;
This is the instance we will use for all our manipulation of the control.
After the DropDownList is added we will do the following in the CreateEditControls method:
And here is the complete CreateEditControls method:
public override void CreateEditControls()
{
    _DropDown = new System.Web.UI.WebControls.DropDownList();
    XDocument _document = XDocument.Load(
        HttpContext.Current.Server.MapPath("~/cssFiles.xml"));


    var xElements = from c in _document.Descendants("file")
            select c;
    foreach (var xElement in xElements)
        _DropDown.Items.Add(UriSupport.Combine(
            UriSupport.SiteUrl.ToString(),
            xElement.Value));


    ListItem item = _DropDown.Items.FindByValue(this.ToString());

    if (item != null)
        item.Selected = true;
    else
        _DropDown.Items[0].Selected = true;

    this.ApplyControlAttributes(_DropDown);
    Controls.Add(_DropDown);
}
The last thing we do in the control class is to make sure the correct item is selected in the dropdown when we hit the save button.
public override void ApplyEditChanges()
{
    if (_DropDown.SelectedValue != null)
        SetValue(_DropDown.SelectedValue,
                 CurrentPage.Property["Css"]);
    else SetValue(null);
}
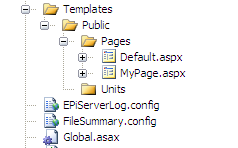
Let's add a new Page Template to our project. I've choosen to have the templates in the folder Templates/Public/Pages :
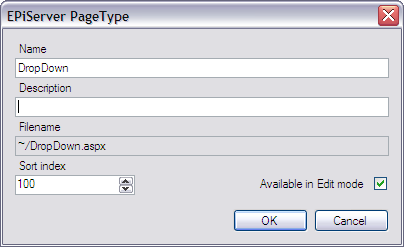
When the EPiServer installation kicks in and asks if you want to register a PageType for your new template, click Yes.
Enter a name for the page to be shown in the EPiServer UI and enter a description:
Now it's time to modify the markup of our template. In this sample I'm going to:
I am also using a masterpage residing in my /MasterPages/ folder.
Markup
<%@ Page language="c#" Inherits="EPiTest.MyPage"
         Codebehind="MyPage.aspx.cs"
         MasterPageFile="~/Masterpages/Masterpage.Master" %>

<asp:Content ContentPlaceHolderID="main" runat="server">
    <link
        href="<%= CurrentPage.Property["Css"] %>"
        type="text/css" rel="stylesheet" />
    <div id="maindiv">
    <asp:label ID="testLabel1"
               CssClass="label"
               runat="server">The page!</asp:label>
<br />
<br />
    <p>
        (Using style set <b><%= CurrentPage.Property["Css"] %></b>)<br />
        <br />
        <EPiServer:Property ID="Property1"
            PropertyName="MainBody"
            runat="server" />
    </p>
    </div>
</asp:Content>
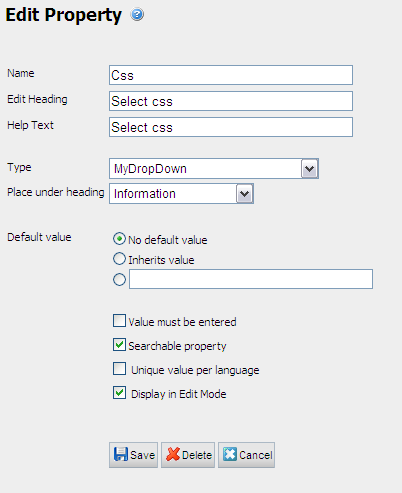
Browse to your site and enter Admin Mode. Click the Page Type tab and click your new template. Click Add Property and enter the values for your property (find the newly created property and select it in the Type dropdown).
While you are in the admin mode, add a MainBody property of the type LongString (>255) to your template.
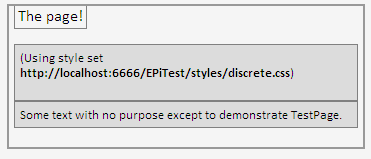
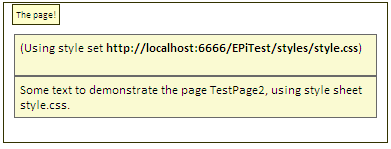
For this samples purposes I've added two style sheets to my project. I named them Style.css and Discrete.css. Both Style sheets contain the same elements but with different styles. After adding them to the project, open up your XML file (which should be named cssFiles.xml if you are using the code from the MyDropDownControl sample) and enter corresponding items for them so that your custom property dropdown can use them. In my case, the XML looks like this:
cssFiles.xml
<?xml version="1.0" encoding="utf-8" ?>
<StyleSheets>
  <file>/styles/style.css</file>
  <file>/styles/discrete.css</file>
</StyleSheets>
And that's it! If you create a few instances of your page template you can now enter Edit Mode and choose what style to use from your newly created control (settings will be unique for each instance). Here is a sample of what it could look like:
Admittedly, my stylesheets aren't very fancy, but since I do like to include everything I'll post them as well:
Discrete.css
body
{
margin: 10px;
background-color: #f5f5f5;
font-family: Calibri;
font-size: medium;
border: #999999 thin solid;
}
.label
{
margin: 5px;
padding: 3px;
border: solid gray 1px;
background-color: #f5f5f5;
}
p
{
margin:5px;
padding: 5px;
font-size: small;
background-color: #dcdcdc;
font-family: Calibri;
border: solid 1px gray;
}
Style.css
body
{
       padding: 5px;
       margin: 5px;
       background-color: #ffffff;
       font-family: Calibri;
       font-size: x-small;
       border: #333300 1px solid;
}

.label
{
       margin: 3px;
       padding: 3px;
       background-color: #ffffcc;
       border: #333300 1px solid;
}

p
{
       margin:5px;
       padding: 5px;
       font-size: small;
       background-color: #fafad2;
       font-family: Calibri;
       border: dimgray 1px solid;
}
