Try our conversational search powered by Generative AI!
AI OnAI Off
| Views: | 13967 |
| Number of votes: | 4 |
| Average rating: |
This article was created upon request from end customers, partners and developer course participants, and provides an introduction to the fundamental classes of the robust order system in EPiServer Commerce.
One of the fundamental tasks of an e-commerce platform is to manage customer orders and persist to the database. With EPiServer Commerce, there are several ways of creating an order through the order system API. Different paths can be taken depending on requirements for why, where and when an order shall be executed. I hope to highlight the various options available through this article. The back-end console Commerce Manager will also be touched upon as it has some appealing features and a few shortcomings in some situations, depending on how the order API is used.
Outside the platform itself, but within what is available for the order system API, the CartHelper class acts as a common helper class for management of carts and orders. The CartHelper class can perform many tasks, such as enabling ease in creating orders. With just a few lines of code, an order can be persisted to the database. The downside of this is less flexibility when it comes to the possibilities available when creating orders and the use of various objects and methods available.
The “easy way” of creating orders using the CartHelper class is most often sufficient for many of the straightforward order placement scenarios of a B2C site. To gain more of an understanding of this, please have a look at the sample site shipped with EPiServer Commerce. One of the advantages of the CartHelper class is that all required objects are automatically created in the background for creating, persisting and viewing a basic order in Commerce Manager.
The following example shows how conveniently an Entry is added to a default cart via CartHelper:
Entry MyEntry = CatalogContext.Current.GetCatalogEntry(entryCode
, new CatalogEntryResponseGroup
(CatalogEntryResponseGroup.ResponseGroup.CatalogEntryFull));
CartHelper MyHelper = new CartHelper(Cart.DefaultName);
MyHelper.AddEntry(MyEntry);
The only additional step required is the transformation of the Cart to a PurchaseOrder. This is visualized further below in this article´s code.
When working with the Cart class and OrderForm class directly, a more granular but manual methodology is used. This way of working gives increased options and added flexibility compared to using CartHelper classes. Nothing gets created automatically in the background and as a result, you may see some unexpected behavior in the back-end console (Commerce manager) at certain points. In this article, we will mainly use the OrderForm, Cart, PurchaseOrder, LineItem and related classes as this adds additional options and features for order creation and exposes the rich functionality of the platform.
You might consider working directly with the PurchaseOrder class and while this is a possibility, it will entail much coding and is outside of the scope of this article.
From database storage and API points of view, the platform is very well designed to support various ways of working. The challenge is to make sure that all components of the system are on the same page, so to speak. For example, if you create an order on the system by creating an empty cart with an owner and turning it into a purchase order, Commerce Manager raises the following error:
Exception Details: System.ArgumentOutOfRangeException: ArgumentOutOfRange_Index
Parameter name: index (editor’s note: index is the OrderForm index)
This because Commerce Manager views this as an incomplete order, while from the API side of things, this is a fully functional order that will be completed in time.
The following example shows how to create an empty PurchaseOrder and store it in the database. The Cart class is used to avoid a lot of additional lines of code. The SaveAsPurchaseOrder() method transforms the cart to a PurchaseOrder.
Cart TheCart = OrderContext.Current.GetCart("MinimalOrder",
    CustomerContext.Current.CurrentContactId);
PurchaseOrder purchaseOrder = TheCart.SaveAsPurchaseOrder();
purchaseOrder.AcceptChanges();
NOTE Both the public class Cart and the public class PurchaseOrder inherits the abstract OrderGroup class. Cart and PurchaseOrder classes have some resemblances, but are for natural reasons, designed to act in different scenarios with distinct inner workings.
NOTE Please refer to our product documentation for details on the schemes of different classes and database tables.
Entities like OrderForms, LineItems, shipments, payments and so forth are still not yet in the order. This is why Commerce Manager says it cannot load the order properly. While using CartHelper class takes care of this automatically, the purpose of this article is to explore other ways of working with the order system.
EPiServer Commerce can utilize several OrderForms in a single order. Most often, a single Order Form will be sufficient, but the platform supports a one-to-many relation for most of the order system entities. The order API is therefore prepared for encountering several OrderForm instances in an order.
The above code creates a more or less empty OrderGroup database entry, with a name and a Customer reference. The status is set to “InProgress” which is correct, however more steps must be taken if the order is to generate revenue and be processed by the Commerce Manager.
Two mandatory steps have to be taken before the Commerce Manager UI can operate in an expected manner: the addition of an OrderForm and the first Shipping so that LineItems can also be added.
The following example opens up the order again and adds an OrderForm. The integer 114 is the OrderGroup primary key. An OrderGroup is like a bucket for a cart or an order.
PurchaseOrder purchaseOrder = OrderContext.Current.GetPurchaseOrderById(114);
OrderForm orderForm = new OrderForm();
purchaseOrder.OrderForms.Add(orderForm);
purchaseOrder.AcceptChanges();
As previously stated, there can be several OrderForms in an OrderGroup and most often a single OrderForm is sufficient. In this case, a customization is required and since Commerce Manager is designed from a generic point of view, it naturally supports most common ways of working.
NOTE The following are basic scenarios that can arise as well as explanations of the different classes involved in order creation.
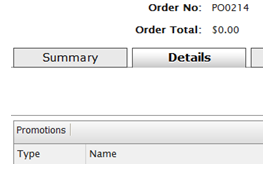
The following image shows that an order can be accessed by the UI after adding an OrderForm. Under the Details tab, there is no way of adding LineItems since Commerce Manager is closely tied to shipments. However, from an API and database point of view, there are no restrictions of any kind.
The following example adds a shipment to the order:
Shipment TheShipment = new Shipment();
OrderForm orderForm = purchaseOrder.OrderForms[0];

ShippingMethodDto.ShippingMethodRow shippingMethodRow = null;
ShippingMethodDto allUsShipping = ShippingManager.GetShippingMethods("en-us");
foreach (ShippingMethodDto.ShippingMethodRow shipRow in allUsShipping.ShippingMethod)
{
if (shipRow.DisplayName == "Ground Shipping")
{
shippingMethodRow = shipRow;
}
}
TheShipment.ShippingMethodId = shippingMethodRow.ShippingMethodId;
TheShipment.ShippingMethodName = shippingMethodRow.DisplayName;
TheShipment.ShippingAddressId =
   CustomerContext.Current.CurrentContact.PreferredShippingAddress.Name;
TheShipment.ShipmentTotal = shippingMethodRow.BasePrice;
TheShipment.SetParent(orderForm);
TheShipment.Status = OrderShipmentStatus.AwaitingInventory.ToString();

orderForm.Shipments.Add(TheShipment);
purchaseOrder.AcceptChanges();
Now the screen in Commerce Manager shows that LineItems can be added to the order.
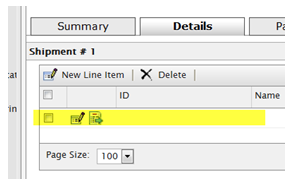
Under the Details tab in Commerce Manager, it now appears that we can add LineItems to the order. However if the line is opened for editing, an exception such as this is thrown: Exception Details: System.NullReferenceException (there is nothing to edit). LineItems can be added via the UI and when this is done, the line gets populated with values.
NOTE Adding another shipment to a second OrderForm in the order does not show up in Commerce Manager, although it is added to the database and can be managed by the API. Also, the cost for additional shipping on additional OrderForms is not aggregated in the UI view by default.
NOTE The Shipment Collection on the OrderForm class exposes methods like Add() and AddNew() which are useful in different situations when adding shipments.
LineItems can easily be added by the CartHelper (cart property) as shown above using the method AddEntry(<Entry>). When adding the Entry by CartHelper, everything else that is required is done in the background, but as we in this article use a PurchaseOrder and not a Cart, this option is not available.
NOTE The simplest and most intuitive way of working with the order system in general is to use the Cart/CartHelper classes as far as possible and then at a certain point convert the Cart to a PurchaseOrder for further coding. As previously stated, this may however constrain the developer to a certain extent. To illustrate some nice features, I will add LineItems in several steps and with some additional code.
To the lineitem class (LineItemEx) in MetaDataPlus, a custom field is added (LineItemExtraInfo) as a plain string field. This is done to be able to differentiate properties between lines in an order, although it’s the same SKU. Though not very commonly used, some of our partners, end customers and participants in training courses have raised this query. This option is not available if the most basic way of creating orders using the CartHelper is used.
// Load what is needed
PurchaseOrder purchaseOrder = OrderContext.Current.GetPurchaseOrderById(114);
OrderForm orderForm = purchaseOrder.OrderForms[0];
Shipment orderFormShipment = orderForm.Shipments[0];

// Get the Entry
Entry myEntry = CatalogContext.Current.GetCatalogEntry("049383208344",
new CatalogEntryResponseGroup(CatalogEntryResponseGroup.ResponseGroup.CatalogEntryFull));
Price price = StoreHelper.GetDiscountPrice(myEntry);

// First LineItem
LineItem MyLineItem = new LineItem();
MyLineItem.DisplayName = myEntry.Name;
MyLineItem.CatalogEntryId = myEntry.ID;
MyLineItem.Quantity = 1;
MyLineItem.PlacedPrice = price.Amount;

// Second LineItem
LineItem MyOtherLineItem = new LineItem();
MyOtherLineItem.CatalogEntryId = myEntry.ID;
MyOtherLineItem.DisplayName = myEntry.Name;
MyOtherLineItem.Quantity = 1;
MyOtherLineItem.PlacedPrice = price.Amount;

orderForm.LineItems.Add(MyLineItem);
// To have two lineItems for the same SKU, set the bool LineItemRollup (second arg.) to false
orderForm.LineItems.Add(MyOtherLineItem, false);
// Set it true and you will have the count of 2, for one single LineItem

// The added custom MetaField (class LineItemEx) filled up
orderForm.LineItems[0]["LineItemExtraInfo"] = "Item 1, nothing special";
orderForm.LineItems[1]["LineItemExtraInfo"] = "Item 2, very special";

// The following lines are needed to make the LineItems show up in Commerce Manager
// The shipping is closely tied to UI, but not related in such a way in the API
PurchaseOrderManager.AddLineItemToShipment(purchaseOrder, orderForm.LineItems[0].LineItemId, orderFormShipment, 1);
PurchaseOrderManager.AddLineItemToShipment(purchaseOrder, orderForm.LineItems[1].LineItemId, orderFormShipment, 1);

purchaseOrder.OrderForms[0].Shipments.AcceptChanges();
orderForm.AcceptChanges();
NOTE The orderForm.LineItems.Add(MyOtherLineItem, false) in the code, as this is nice feature if the same SKU is placed as different LineItems, optionally with different properties.
You can of course add LineItems to an order without adding them to a shipment since often orders are subject to change or not immediately executed. And while Commerce Manager is designed so that only LineItems that are put into a shipment are visible, the platform of course supports more freedom than the back-end console reveals.
Now that the basics of a PurchaseOrder are done, the next step is naturally that some form of payment needs to be entered into the system. Exactly how this is done varies greatly depending on the particular site, integrations with other systems etc. This same reasoning also applies to the logistics and shipping providers used.
Payment can be executed in many ways and for this article, I will simply present some generic code to associate a payment with the order created in previous exercises.
PurchaseOrder purchaseOrder = OrderContext.Current.GetPurchaseOrderById(114);
OrderForm orderForm = purchaseOrder.OrderForms[0]; // using only one here
Payment ThePayment = null; // This is one is abstract, not an instantiable "PaymentMethod"
PaymentMethodDto paymentMethodDto = PaymentManager.GetPaymentMethodBySystemName
("Generic", "en-us");
Decimal amount = 0M;

foreach (LineItem l in orderForm.LineItems)
{
amount += l.PlacedPrice;
}

OtherPayment otherPayment = new OtherPayment(); // the "real" payment-Type in MetaDataPlus
ThePayment = (Payment)otherPayment;
ThePayment.BillingAddressId =
     CustomerContext.Current.CurrentContact.PreferredBillingAddressId.ToString();
ThePayment.PaymentMethodName = paymentMethodDto.PaymentMethod[0].Name;
ThePayment.PaymentMethodId = paymentMethodDto.PaymentMethod[0].PaymentMethodId;
ThePayment.Amount = amount;
ThePayment.TransactionType = TransactionType.Sale.ToString();
ThePayment.Status = PaymentStatus.Pending.ToString();
ThePayment.SetParent(orderForm);
ThePayment.AcceptChanges();

orderForm.Payments.Add(ThePayment);
orderForm.AcceptChanges();
As EPiServer Commerce has a one-to-many relation between most objects in the Order subsystem, a really nice feature is that LineItems of an order shipment can be split to a new shipment introduced in the order. This introduces a message in Commerce Manager that overall totals don’t match if a payment already has been created and managed in the UI. When an additional shipment is added, an extra fee has to naturally be paid. The administrative workflows for Commerce Manager detect that the payments don’t match the total amount and raise the message that they need to be adjusted:
Shipment existingShipment = purchaseOrder.OrderForms[0].Shipments[0]; //single OrderForm
Shipment newShipment = purchaseOrder.OrderForms[0].Shipments.AddNew();

PurchaseOrderManager.MoveLineItemToShipment(purchaseOrder
, purchaseOrder.OrderForms[0].LineItems[1].LineItemId
, existingShipment
, newShipment
, 1);
existingShipment.AcceptChanges();
newShipment.AcceptChanges();
NOTE The above code is intended only as an example and is incomplete; more properties need to be set.
Split payments are supported. Add the payments in the standard way and keep track of totals if payments are added by the API as Commerce Manager read these properties.
Addresses for customers come in various forms in EPiServer Commerce. The Order subsystem relies on MetaDataPlus as the meta data engine and for database storage. On the other hand, the Customers subsystem relies on Business Foundation for meta data, storage and definitions. This leads to differences between the class OrderAddress in MetaDataPlus and the class Address in Business Foundation. The latter has a many-to-one relation in the Contact class (a customer) but no direct relation or link to MetaDataPlus and OrderAddress. Depending on how the platform is used, OrderAddresses could come in handy and therefore may be stored.
A nice method exists at the StoreHelper class (ConvertToOrderAddress) to assist in the transformation of a customer address to an OrderAddress. This method is used in the code below to show the use of OrderAddresses.
OrderAddress orderShipping = StoreHelper.ConvertToOrderAddress(
CustomerContext.Current.CurrentContact.PreferredShippingAddress);
purchaseOrder.OrderAddresses.Add(orderShipping);

OrderAddress orderBilling = StoreHelper.ConvertToOrderAddress(
CustomerContext.Current.CurrentContact.PreferredBillingAddress);
purchaseOrder.OrderAddresses.Add(orderBilling);

purchaseOrder.OrderAddresses.AcceptChanges();
// This is an "extra field" in the OrderGroup table (UI related)
purchaseOrder.CustomerName = CustomerContext.Current.CurrentContactName;

// A name on an orderform could be handy
purchaseOrder.OrderForms[0].Name = "FirstOrderForm";

// This makes Commerce Manager show the right address for Billing
purchaseOrder.OrderForms[0].BillingAddressId = orderBilling.Name;

purchaseOrder.OrderForms.AcceptChanges();
purchaseOrder.AcceptChanges();
For a complete procedure that enters an order into the system, additional properties should be set and additional actions are required. The additional steps that should be addressed are very much dependent on the specific implementation. Integration with other systems governs much of the procedures that have to be taken. What this article aims to show are some basic measures needed for managing a purchase order by the API and the Commerce Manager UI components related to the order system.
The Order subsystem of EPiServer Commerce is a solid ground to build e-commerce sites upon due to the flexibility and absence of assumptions of how e-commerce sites operate.
The Order subsystem also addresses Taxes, Jurisdictions, Payments, Shipments, Currencies and so forth; however these are outside of the scope of this article. Windows Workflow Foundation serves as the groundwork when it comes to business rules for the order system as there is no such logic there by default in the API.
The separation of program logic and business logic is an advantage as this gives developers the control over business rules implemented at an e-commerce site with EPiServer Commerce.

Such a nice post. It's very clear and concrete :)
Regarding CartHelper.AddEntry(MyEntry), we can meet the Null exception here if you have custom metafields which don't allow null value. That's because in CartHelper.CreateLineItem, it won't set the default value for custom metafields. Therefore, if you use custom metafields which don't allow null value, just customize this CartHelper function to initialize default value for it.
My orders are all set to In Progress - How do you set the status to Complete once the Sage Pay process is successful?
Jon
purchaseOrder.Status = OrderStatus.Completed.ToString();
...and then AcceptChanges()
Hi Roger, thank you for the great post. Could you clarify the best place where I can set up meta field (programmatically)? Is it some kind of configuration file? Could you give example for LineItemExtraInfo please?