Post-installation Configurations - EPiServer Commerce 1.0 SP1
|
Product version: |
EPiServer Commerce 1.0 SP1 |
|---|---|
|
Document version: |
1.0 |
|
Document last saved: |
Introduction
This document describes how to configure set up and configure an EPiServer Commerce site after the installation. The configurations described here are important in order for your EPiServer Commerce site to work properly.
You must have created an EPiServer Commerce sample site first in order to continue with the configuration steps described here. The installation procedure is described in detail in the installation instructions for EPiServer Commerce 1.0 SP1.
When the EPiServer Commerce site has been installed, you can continue with the configurations as described in the following.
Table of Contents
- Configuration of Commerce Manager Access Rights
- Configure URL and Product Page Types
- Installing the Display Templates
- The Sample Catalog
- Indexing a Catalog
- EPiServer Commerce License Installation
- Configuring SMTP for Email
- Configuring the DIBS Payment System
- Catalog Integration
- Related Information
Configuration of Commerce Manager Access Rights
After the installation some configuration modifications for Commerce Manager access rights may be needed, in order for the import/export function of Commerce Manager to work properly.
- Go to your Commerce Manager site file structure, select the “App_Data” folder.
- Right-click on the “ImportExport” folder and select “Properties”.
- Select the “Security” tab and make sure that the IUSR and IIS_IUSRS users have necessary permissions.
NOTE you may need to configure the Commerce Manager website host header in the host file on the machine.
Configure URL and Product Page Types
In this section you define the URL to the Commerce Manager site for integration with OnlineCenter, together with the product list and product detail page types.
-
Browse to the EPiServer Commerce site that you have previously created and log in to the site (see installation instructions for EPiServer Commerce 1.0 SP1).
-
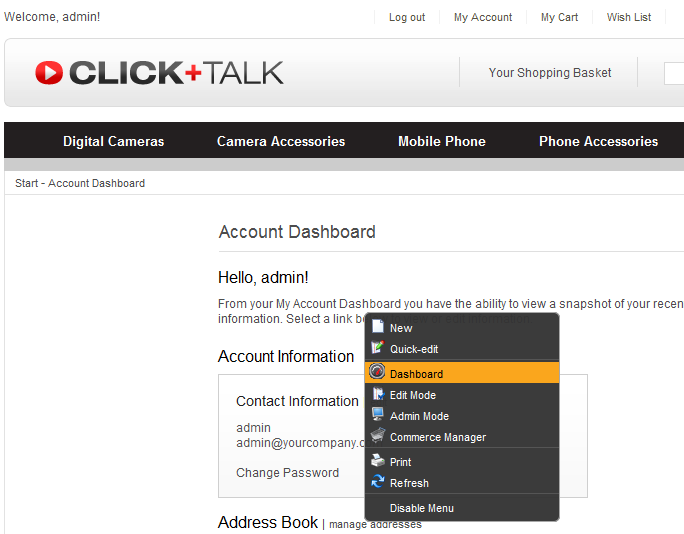
Right-click in the page and the EPiServer context menu will appear. Select the Dashboard option.
-
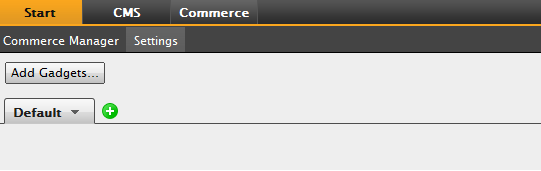
From the Dashboard's very top menu select the Commerce option.
-
Select the Settings option.
-
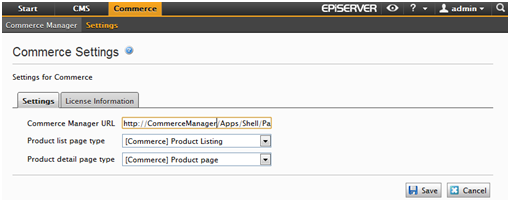
Enter the URL of the Commerce Manager site on this format: http://[sitename]/Apps/Shell/Pages/default.aspx.
-
From the Product list page type drop-down list select [Commerce] Product Listing.
-
From the Product detail page type drop-down list select [Commerce] Product page.
-
Click Save.
-
Select the Commerce Manager option and proceed to Commerce Manager.
Installing the Display Templates
The display templates are used for displaying products from the product catalog, on the EPiServer Commerce website. The display templates are defined from inside Commerce Manager.
Follow the steps below to install the sample display templates:
-
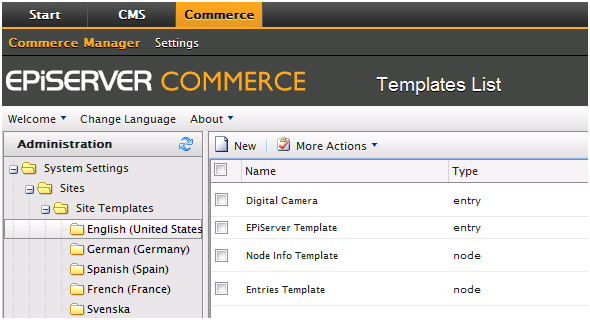
In Commerce Manager, select Administration->System Settings/Sites/Site Templates/English (United States).
-
Create the following display templates (click on New):
a. Digital Camera
i. Name: DigitalCameraTemplate
ii. Friendly Name: Digital Camera
iii. Type: entry
iv. Path: ~/Templates/Everything/BusinessControls/CatalogBrowseControls/EntryTemplates/DigitalCameraTemplate.ascx
b. Node Info Template
i. Name: NodeInfoTemplate
ii. Friendly Name: Node Info Template
iii. Type: node
iv. Path: ~/Templates/Everything/BusinessControls/CatalogBrowseControls/NodeTemplates/NodeInfo.ascx
c. Entries Template
i. Name: EntriesTemplate
ii. Friendly Name: EntriesTemplate
iii. Type: node
iv. Path: ~/Templates/Everything/BusinessControls/CatalogBrowseControls/NodeTemplates/EntriesFiltered.ascx
The Sample Catalog
NOTE The sample catalog is part of the EPiServer Commerce Sample standard installation through the EPiServer Deployment Center. Therefore, the following steps should NOT be necessary if the installation of the EPiServer Commerce Sample was successful.
However, if you need to install the sample catalog afterwards, do the following:
-
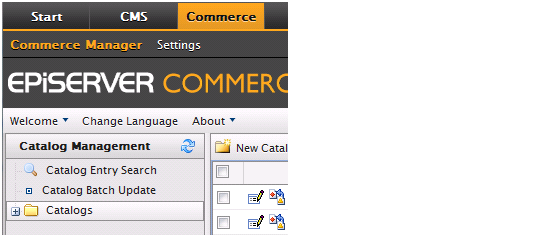
In Commerce Manager, select Catalog Management and Catalogs.
-
Click on Import/Export and then Import Catalog, this will take you to the “Import Catalog” screen.

-
Highlight CatalogExport-BG2C-Everything.zip and click Start Import.
-
When completed, click Close Window.
-
Highlight CatalogExport-B2C-Brands.zip and click Start Import
-
When completed, click Close Window.
Indexing a Catalog
In order for EPiServer Commerce to work properly, and to be able to search for products, the product catalog must be indexed after being imported.
Do the following to index the product sample catalog:
- In Commerce Manager, select Administration->System Settings->Search Index:
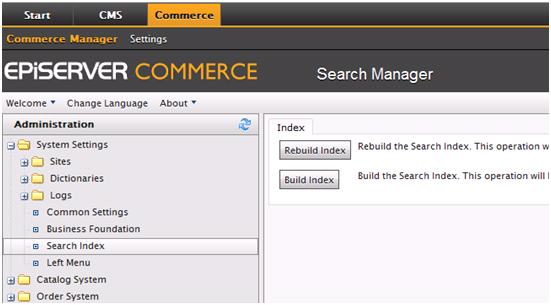
- Select Rebuild Index and wait until the process is finalized.
EPiServer Commerce License Installation
It is recommended to define the EPiServer Commerce License during the installation, but if this was not done it can be added manually afterwards. On completion of the EPiServer Commerce installation, the Commerce Manager web application will be installed (see the EPiServer Commerce 1.0 SP1 installation instructions), although you will not be able access and use Commerce Manager until the license have been correctly installed.
The following license file is required:
-
EPiServerCommerceLicense.config - please refer to the EPiServer License Center for ordering of licenses.
Perform the following steps to manually install the EPiServer Commerce license:
-
Copy the EPiServerCommerceLicense.config file to the root folder of both the EPiServer (CMS) website and the Commerce Manager website (for example C:\EPiServer\Sites\EPiCommerce and C:\commercemanager).
-
The license is now defined for both sites.
Commerce Manager License
NOTE The Commerce Manager license is NOT the same as the EPiServer Commerce License. The Commerce Manager license will be installed by default during installation of the EPiServer Commerce core package. Updating the Commerce Manager license should only be performed after consulting with EPiServer. See the document Updating Commerce Mananger License for further information.
Configuring SMTP for Email
To have the email functionality work properly in EPiServer Commerce, you need to configure the SMTP settings. This is described in the section "How to Configure SMTP Email" in the EPiServer Commerce Developer Guide.
NOTE In the setup of the EPiServer Commerce sample package, you will not get directed to the "Thank you for your Order" page by default, after clicking Place Order. This can be tested by buying a product and proceed to the checkout function.
Do the following to handle this:
- Configure the solution to send a confirmation email as described above.
- Alternatively, comment out the line of code in the sample package which calls the send email notification function - this is done in the control CheckoutWizardModule.ascx, the line:SendEmails(po, email);
Configuring the DIBS Payment System
The EPiServer Commerce sample site comes with an example installation of the DIBS payment method, which needs to be configured. To do this, please refer to the sections "How to Configure the DIBS Payment System" and "DIBS Integration Notes" in the EPiServer Commerce Developer Guide.
Catalog Integration
Please refer to the EPiServer Commerce Developer Guide for information on how to integrate external information into the EPiServer Commerce Catalog System.
Related Information
For information about using the EPiServer Commerce Sample Package see the EPiServer Commerce Users Guide. For developer information see the EPiServer Commerce Developers Guide.