Developer Guide – Google Analytics for Episerver 1 Beta – CMS 6 R2
Introduction
This Developer Guide describes how to develop customized solutions to Episerver Google Analytics for your website. To be able to follow these instructions, download the Sample Package Google Analytics for EPiServer.
- Implementing Google Analytics Metrics
- Querying Google Analytics Programmatically
- Developing Custom Google Analytics Tracking
- Implementing Tracking in EPiServer Commerce
Implementing Google Analytics Metrics
Table of Contents
- Creating a Graph Metric
- Creating an Event Metric
- Creating a List Metric
- Creating a Custom Query
- Creating a Custom Result
Introduction
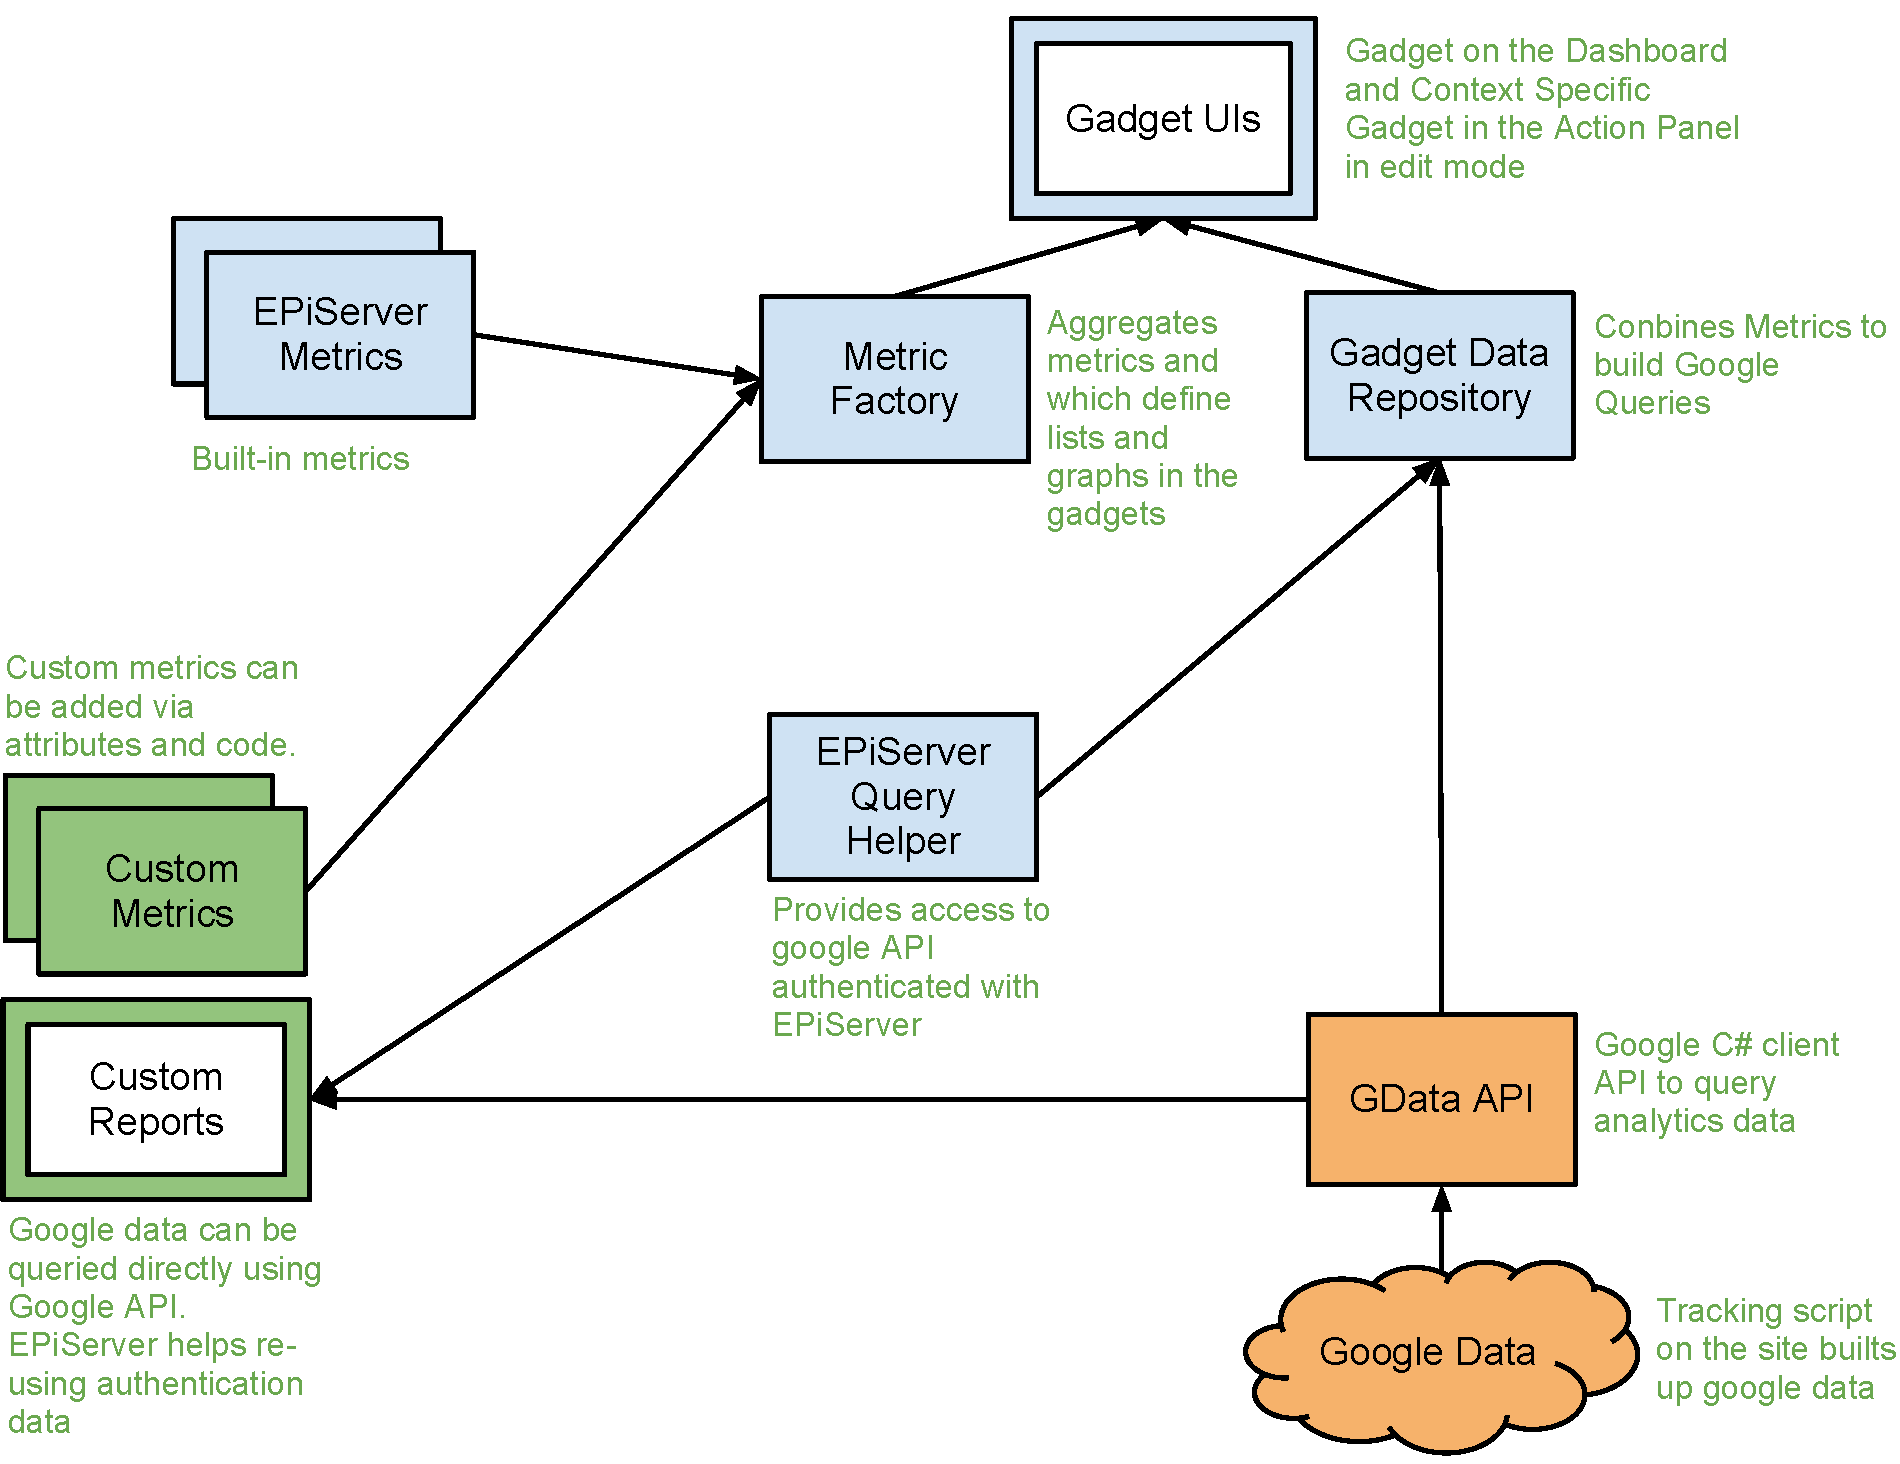
This document describes how to create graphs and lists displayed in the Google Analytics gadget and action window.
Graphs and Lists – Gadget and Action Panel
Google Analytics metrics can be either graphs or lists. The following base classes define the kind of metric:
- GraphMetricBase: a graph
- EventMetricBase: an event graph
- ListMetricBase: a list
These metrics can be registered for the dashboard or the action panel using attributes. Event metrics cannot be displayed in the action panel.
- [GadgetMetric]: dashboard
- [ContextMetric]: action panel
Prerequisites
You can look how the configuration example in AlloyTechConfig.xml is done as a Shell module, see AlloyTechConfig.xml:
- Install EPiServer GoogleAnalytics
- Include reference to assemblies:
- EPiServer.GoogleAnalytics.dll
- Google.GData.Analytics.dll
- Google.GData.Client.dll
Creating a Graph Metric
Graph metrics display a value over time. The dimension (x-axis) is either day, week or month and is selected by the user, other metric (y-axis) is defined by the graph metric code.
Create a graph metric in Visual Studio as follows:
- In the Solution Explorer context menu, select Class..., write a name.
- Add namespace using EPiServer.GoogleAnalytics.Analytics.
- Add attribute [GadgetMetric] to the class.
- Change the inheritance to inherit from GraphMetricBase.
- Override the Metric property and return a Google Analytics metric string. For example pick "ga:visitors".
- Compile.
- Visit the dashboard, the metric should be available to be picked in the gadget.
See the example in Metrics.cs, block1.
Event Metric
A special case of the graph metric is an event metric. This assumes an event is tracked on the site. Refer to the tracking documentation on information on how to track events.
See the example in Metrics.cs, block2.
Creating a List Metric
A list metric displays a list of labels and an associated value. For example most visited pages.
Create a graph metric in Visual Studio as follows:
- In the Solution Explorer context menu, select Class..., write a name.
- Add namespace using EPiServer.GoogleAnalytics.Analytics.
- Add attribute [GadgetMetric] to the class.
- Change the inheritance to inherit from ListMetricBase.
- Override the Dimension property and return a Google Analytics dimension string. For example pick "ga:pageTitle".
- Override the Metric property and return a Google Analytics metric string. For example pick "ga:pageviews".
- Compile.
- Visit the dashboard, the metric should be available to be picked in the gadget.
See the example in Metrics.cs, block3.
Creating a Custom Query
It is possible to create the query object used to query Google for values by implementing the ICustomQueryBuilder interface. This allows to define more complex queries than regular usage (above).
See the example in Metrics.cs, block4, about how to create a custom graph query.
See the example in Metrics.cs, block5, about how to create a custom list query.
Creating a Custom Result
It is possible to completely bypass querying Google for result and instead generating results in code. This allows to return any values for the graphs and lists. To do this implement ICustomResultFactory>TResult< on a metric implementation.
See the example in Metrics.cs, block6, about how to create a custom graph result.
See the example in Metrics.cs, block7, about how to create a custom list result.
Querying Google Analytics Programmatically
Table of Contents
Introduction
The Google Analytics module provides an API for adding graphs and lists to the dashboard. This API uses the Google Query API to retrieve data.
This document describes how to access the login token entered by users or adminsitrator to query Google directly and using outside of the dashboard or action panel.
See Prerequisites above.
Accessing Login Token
To retrieve data from Google a login token and a table ID corresponding to a tracked web site are required. See the example in Querying.cs, block1, how the login token configured by an administrator or user is retrieved.
Also needed for the query is a table ID. The table ID corresponds to a tracking id configured by an administrator. See the example in Querying.cs, block2, how the table ID corresponds to the current site is retrieved.
Querying Google Data
The data tracked for users visiting the site can be tracked using a Google Analytics service proxy. The Google Analytics module provides a wrapper for this class which caches the results for a specific query. See the example in Querying.cs, block3, how the query helper can be used to issue a data query.
See the example in Querying.cs, block4, how the code gets the query results for page views over time ands binds to a grid view.
See the example in Querying.cs, block5, for some more example queries.
Developing Custom Google Analytics Tracking
Table of Contents
- Tracking Events
- Tracking e-Commerce Transactions
- Tracking Client-Side
- Manually Adding a Tracking Script
Introduction
This document describes how to track custom actions and transactions using the Google Analytics module for EPiServer.
The module adds a tracking script which tracks page views and built-in events. The module can be disabled using plug-in settings in admin mode. The script is added using Page.ClientScript. This requires a form runat="server" on the page. If no form exist on the page the script can be added manually.
Tracking Events
Events can be tracked and displayed in the gadgets. To track events execute the following extension method during the page life cycle.
See the example in Tracking.cs, block1.
Prerequisites
- Install Google Analytics for EPiServer.
- Include a reference to assemblies EPiServer.GoogleAnalytics.dll.
Tracking e-Commerce Transactions
Commercial transactions can be tracked by executing an extension method during the page life cycle.
See the example in Tracking.cs, block2.
EPiServer Commerce Tracking
The EPiServer Commerce extension simplifies tracking a purchase order.
See the example in Tracking.cs, block3.
Tracking Client-Side
Sometimes it is more convenient to track events on the client. Example:
 // create a function that uses the event tracking API
 function trackEventWithGoogle(){
  if (_gaq) { _gaq.push(['_trackEvent', 'Example', 'Clicked', 'Tracking example clicked', 1]);
 }
 }
 // execute the function when clicking on "button1" button1.onclick = trackEventWithGoogle;
Manually Adding a Tracking Script
In situations when there is not form runat="server" or when using MVC the tracking script that would be rendered by the Google Analytics module can be generated programmatically.
See the example in Tracking.cs, block4.
ASP.NET MVC
To render the tracking script on ASP.NET MVC, use the following HTML helper:
Html.AnalyticsTrackingScript(currentPage)
Implementing Tracking in EPiServer Commerce
A checkout process typically ends with a thank you page. This is a good place to track purchases with Google Analytics.
- If the checkout is client base, for example, Enoteca, demo the final step can retrieve purchase information via an AJAX call and do the tracking on the client (EXAMPLE A).
- If the checkout ends with a redirect to a thank you page this page can retrieve the order from an order number that can be passed as a query string and register the order to be tracked via an extension method on Context (EXAMPLE B).
Do not forget to enable e-commerce tracking at http://google.com/analytics/ below admin/profiles/profile settings/.
EXAMPLE A:
HOW TO integrate e-commerce tracking on EPiServer Commerce Enoteca sample site:
- Deploy EPiServer.GoogleAnalytics.Commerce.dll to /bin on the website.
- Register Commerce assembly in web.config:
<episerver.shell>
    <publicModules>
      <add name="EPiServer.GoogleAnalytics">
        <assemblies>
          <add assembly="EPiServer.GoogleAnalytics.Commerce" />             </assemblies>
      </add>
    </publicModules>
</episerver.shell> - Register the following http handler in web.config early in the configuration/system.webServer/handlers section:
<handlers>
   <clear />
 <!-- This registers a http handler that provides tracking information about an order identified by tracking number and the user session.  The tracking information can be used by by a client side javascript to track purchaes with google analytics -->
   <add name="orderTracking"
    path="OrderTracking.ashx"
    verb="GET"
type="EPiServer.GoogleAnalytics.Commerce.OrderTrackingHandler, EPiServer.GoogleAnalytics.Commerce" />... - Edit /Templates/Enoteca/Pages/Checkout.aspx, add the following script section to the page template:
<script type="text/javascript">
     jQuery(function ($) {
     // This event is triggered by the checkout scripts, from it we can read a tracking number
    // used to find the appropriate transaction and generate purchase information to track.              $("body").bind("checkout.onSavedData", function (e, data) {
     // OrderTracking.ashx is a http handler configured in web.config
     if (data.data && data.data.isSuccess && data.data.OrderNumber) {
     // Ask the server to generate tracking information from the purchase
  $.getJSON("OrderTracking.ashx?trackingNumber=" + data.data.OrderNumber, function (data) {
 // The result contains an isSuccess which is true when a purchase order was found
     if (!data.isSuccess || typeof _gaq === "undefined") {     return;
     }
 // The result contains a list of tracking arrays that can be pushed directly to the google tracking API     data.transaction.forEach(function (item) {
     _gaq.push(item);
     });
 // Sends the tracking information to google     _gaq.push(['_trackTrans']);
     });
     }
     });
     });
</script>
EXAMPLE B:
HOW TO integrate tracking on a site that redirects to a thank you page after purchase:
- Add a reference to EPiServer.GoogleAnalytics.Commerce.
- Add the following to page load:
// The order number needs to be available on the thank you page, in this case using a query string parameter string trackingNumber = Request["trackingNumber"];
// Finds the purchase order with the given order number var order = Mediachase.Commerce.Orders.OrderContext.Current.GetPurchaseOrders(Mediachase.Commerce.Customers.CustomerContext.Current.CurrentContactId).FirstOrDefault(po => po.TrackingNumber == trackingNumber);
// Registers the order to be tracked by the google analytics tracking script added by the module.Context.AddAnalyticsTransaction(order);
Last updated: July 2, 2012