Liveupdate PollGadget

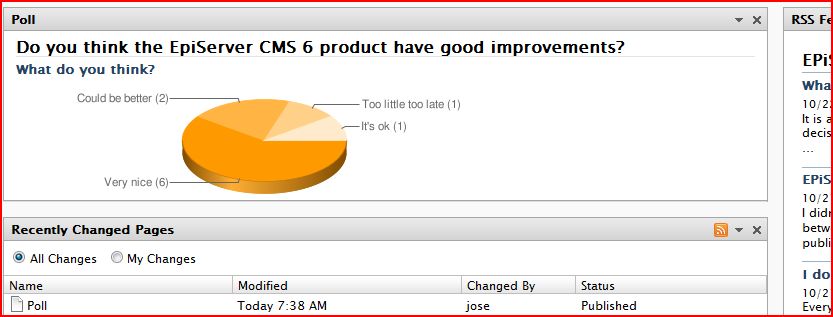
Here come my contribution to the gadgets competition in the "Open gadgets 2009" category. The gadget works with EPiServer XForm to get live results on a poll or question from the site. Meaning as people vote or answer your question on the site you can follow the result live on the dashboard. You can connect the gadget to any XForm and on
the XForm you can use any any field you wish to follow live. You also have the ability to turn off the live update if there is any performance issue or so. (I have tried to keep it pretty optimized so this will hopefully never be a problem). To configure the gadget you just use the edit menu on the gadget (The little arrow in the upper right corner of the gadget) and set its properties. This means you can have many of this gadgettype with different data working at the same time on the dashboard. It also only updates if there is any change in the data and never updates if the gadget is not visible (it is hidden on another tab or such). Since I am very early with this gadget I give the possibility for others to see my code use parts of it to help with their development of the gadget. So I hope I get some competition credits for being early!! =)
Functionality
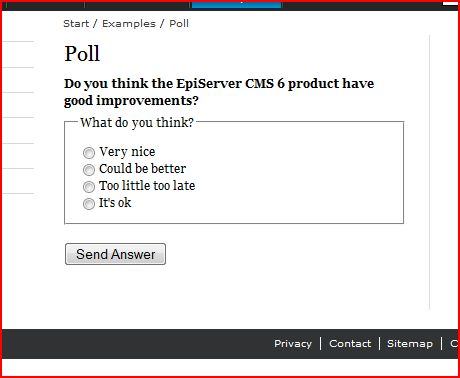
I will try to explain the functionality a little more in detail by explaining on how configure your own poll. Once the gadget is installed (see the installation instructions further down) you are now able to make your own polls. First set up a new page (use the XForm page template or the demo) in the XForm properties create a new XForm and in this make sure you have a heading (and have "heading" as class since I currently search for this to be able to display heading in the gadget). Create a field like a radio or check boxes or what you like and note down what name you give it. Now save everything and view it in view mode. Should look something like this:

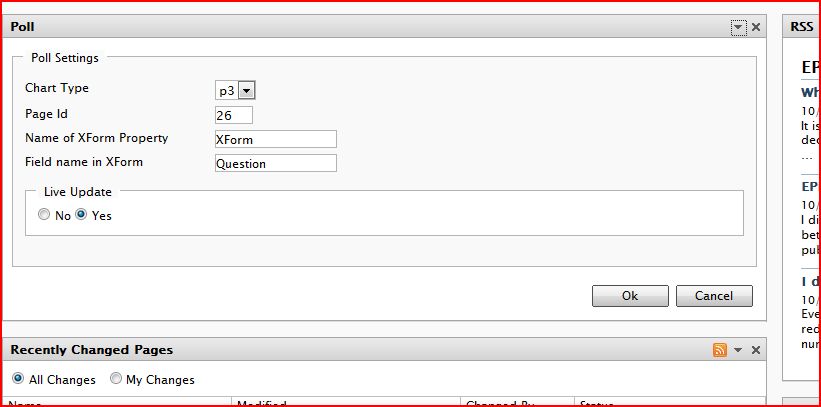
After this you go to the dashboard and add a new poll gadget. Edit the gadget and fill in the information. The pageId of your new page, the property name for the form (probably XForm if you use public templates) and the field name that you noted down earlier. Currently there is only 1 chart type (the pie chart).

Now save your settings and you should have a gadget with no data. So go to the page in view mode and do a few vote to get some data. And watch the magic.

Business Value
I think the business value of this gadget is pretty high. I can see a lot of scenarios where you would like some fast responses to questions be it on an external site or an intranet. This gives the possibility to follow these live and take actions when needed. It also looks pretty cool on the dashboard which might help partners sell EPiServer to customers that like flashy things =)Technical Overview
The Poll gadget uses Google chart API as a graphical representation and renders the result as an image. This is the only external reference that is used in this gadget. The data comes as said from the XForms in EPiServer that uses data store as storage in EPiServer 6. The new data store should make these kinds of requests fast. The settings for the gadget is also stored in the new data store. The gadget also uses Linq to XML to get hold of the questions from the form XML. The ajaxrequest that is sent between the client and server to update the chart only send a small id to the server and gets json object with a link back.Installation Instructions
- Follow the CTP2 installation instructions to install CTP2 CTP2 install instructions. Also install Globalized public template content.
- Open the poll zip file and extract the content of in into the public templates folder for your CTP2 site.
- Convert the project file to MVC project. Info on how to do this you can find here: How to create a gadget - By Ted Nyberg Also do the step with web.config (adding the public template assembly).
- Open the project in Visual Studio and include the 4 folders Content, Controllers, Models and Views to the project by right clicking and choose "Include in Project" on the folders.
- Add reference to EPiServer.Shell, EPiServer.Data (found by browse to bin folder), system.web.mvc and system.runtime.serialization (found on the .NET tab).
- Build the solution, go the the dashboard and you will see your poll gadget. (Even though it has no data yet, since you probably haven't visited the demo page to use the Xform)
Feel free to ask any questions about the installation and I will try to help and update this. (Sorry for not being the ultimate installer guy and making some cool installer).
Download the Code here: Download

Nice to see the first contribution to the contest! And it was early too!
Hehe yes, now I have to try spend some time with the wife for a few evenings instead of coding ;P
Kickass gadget Johan. Let see if someone can knock it up another notch. BAM!
Google chart API, nice move. I like that one.
I can see this being very useful. In general people like to see the result of their polls, surveys, etc represented in a nice form such as graphs. Marketing and management should find this particularly pleasing. Good work!
Looks great but is it possible to get this working for 5.2?
Also,
I can't get into this link as a registered user:
http://world.episerver.com/Documentation/Items/Installation-Instructions/EPiServer-CMS/Version-6/Installation-Instructions---EPiServer-CMS-6-CTP2/
and this link is broken:
http://tednyberg.com/post/How-to-create-gadgets-for-EPiServer-6-using-ASPNET-MVC.aspx
Hi,
When i click on CTP2 Installation instructions it is asking for credentials.i entered my episerver credentials, but it is not accepting. May i know the reason. is there any other way?
Thanks,
@Murali