Try our conversational search powered by Generative AI!
AI OnAI Off
| Views: | 24203 |
| Number of votes: | 1 |
| Average rating: |
The model for installing EPiServer applications and modules has changed quite a bit since the good old EPiServer Manager days, this getting started article outlines how you can add your own modules to your solution via the EPiServer Deployment Center. Please note that this article is based on my previous blog posts on the subject.
The process of installation for EPiServer CMS and its add-ons has become a two phase process where files and components are deployed on the target machine and then copied, transformed, executed for creating a specific site or a site modification. The first step is preferably done using Window Installer and the second step must be done using Windows PowerShell to integrate with EPiServer Deployment Center (known as EPiServer Installation Manager in the EPiServer CMS 5 R2 release). This process gives a lot more power and freedom compared to the old module installation feature in EPiServer Manager but it also adds some complexity that we have tried to address with a tool that I will present below.
In the first part of this article I will present the original tool designed for EPiServer CMS R2 and then in the second part I will outline the changes that we made to the tool in parallel with the EPiServer CMS R2 SP1 and SP2 releases.
We have created a new Visual Studio project template that builds upon Windows Installer Xml (WiX) that helps you put together a module installation package almost as easy as before. This project type will put together all necessary pieces required for installing modules with the most common characteristics. The installer for the project template can be downloaded here and will require Windows Installer Xml v3.0 to be installed. We use v3.0.4109.0 of WiX here at EPiServer. But you could try later drops from the official WiX site on SourceForce.
Let us assume that you have your module/add-in/template code in a Visual Studio-solution. You start by adding a new project to that solution. In the project browser select the "WiX"-node and you will find "Module Installer Project" with the well known EPiServer-icon. Select this project type and give the project a name and select "OK".
Now a wizard pops up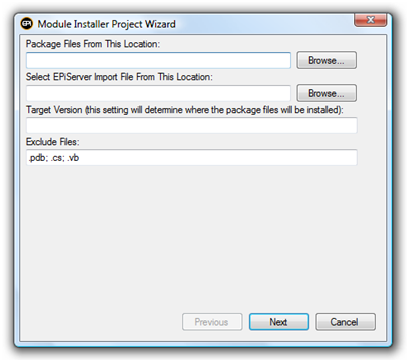
In this wizard you first select the source directory for the files that you want to include in your module. Type in the path or select "Browse". After providing the path the wizard will automatically look for EPiServer.dll to find out the target version for your module and populate the "Target Version" textbox. If the source folder (or any subfolder) contains an episerverdata file it will be entered in the "Select EPiServer Import File..." text box. By having those fields entered the resulting installer will install to the correct EPiServer CMS version and also handle content import automatically from the generated PowerShell script. If you want you can modify the "Exclude Files" textbox to exclude certain file types. Select Next and you will get the following dialog.
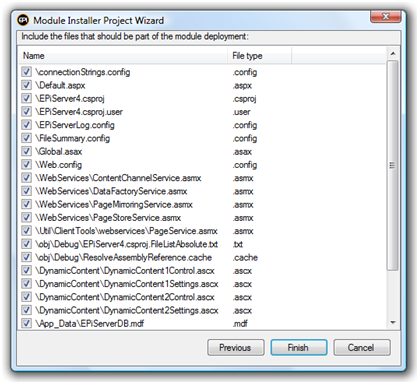
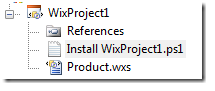
Here you fine tune which files you want to include in the module and when done complete the wizard by selecting "Finish". Now a new WiX project will be added to your solution with a script that will compile a MSI file of your module files. If you look at the project in the solution explorer you will see that a PowerShell script is added ("Install <NameOfMyProduct>.ps1").
The Product.wxs file in the project is the WiX script that will produce the Windows Installer package for your module. The only thing you need to do is hit Ctrl+Shift+B to build it as you normally do. The output MSI will typically be found in bin/Debug/<ProjectName>.msi.
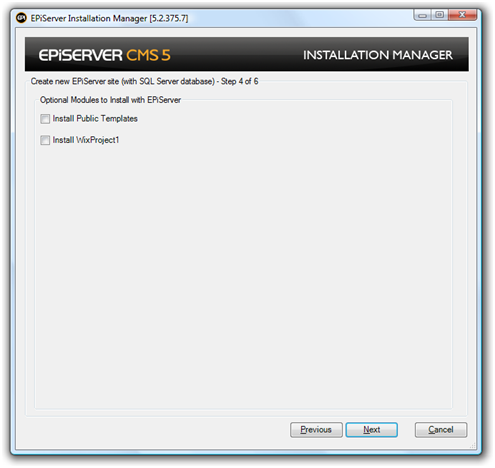
Locate to the project output folder (bin\debug) and launch the MSI file and the windows installer will do its thing. After completion, you can open up EPiServer Installation Manager (named EPiServer Deployment Center in R2 SP1 ) and find that your module is possible to install (from the version node that you addressed). You can select the "Install <NameOfMyProject>" in the tree and select "Run". You will now be presented with a list of available applications to install your module into (those having the correct version of EPiServer CMS). Select one of them and then select "Install". If everything goes well (which it will) your module has now been applied to the selected application. Now when the module is installed it will be shown in the "Install additional modules" step when creating a new EPiServer CMS site as shown below.
That's it! Not a single line of WiX and not a single line of PowerShell... that you had to write yourself. This can be summarized in just a few steps:
If you are creating modules for EPiServer CMS and been adopting your module for R2 SP1 you have probably noticed that there has been a few changes in terms of deployment in the latest release.
The most significant change is that most PowerShell CmdLets have moved to a new assembly (EPiServerInstall.Common.1.dll). The location of the CmdLets may not have been that obvious before since the EPiServer Installation Manager was responsible for adding the necessary snapin to the powershell environment. In SP1 this has changed (or actually as part of the installation of the Relate+ package that was released just before Christmas) in the way that the individual PowerShell scripts now are responsible for loading the snapins that is used by the script.
Another change is that we have added the notion of “features” in the installation wizards that handles module installation, i.e. the Install New Site Wizard and the Install Module Wizard. This feature thingy makes it possible to tune what parts of a module to install.
Features are defined in a metadata file which is a XML file that you can provide with your module to decorates installation scripts with additional information that is shown in EPiServer Deployment Center. You get the idea by looking at the metadata file for the PublicTemplates module. Found in
%ProgramFilesx86%\EPiServer\CMS\5.2.375.133\Install\Modules\PublicTemplates\Public Templates.metadata.
All changes have been incorporated in a new version of the Module Installer Project type. The new module installer project type is backward compatible in the sense that it can produce module installers for EPiServer 5 CMS R2 and R2 SP1 - simply by providing different PowerShell scripts depending on the desired target version.
In the first version of the Module Installer project (the one created for R2) the script that was included in a project was not signed. This lead to one of two things:
In the latest version we have refactored the script in a way that it does not have to be adopted for each module to support the most common scenarios (copy files, modify web.config, install content) and therefore the included script can be signed out of the box (*). But, if you need to do more advanced operations from your script then you need to resign them yourself.
(*) In such a case the recently reintroduced Zip installation feature might be something to consider.
We have changed the Windows Installer UI to show a minimal wizard. The first step of that wizard displays a license text. You can modify this text by updating License.rtf that is part of the created project.
Another new convenient thing that is added to you installation project is a web.config.xmlupdate file. If your module installation will need changes to web.config you can define such changes in this file.
Of course your module project will include a metadata file that defines display names and descriptions for you installation script and it also defines a number of features by default.
Download the installation package (EPiServer.PowerTools.msi)

Is it possible to run the include/exclude file wizard after the WiX project is created?