Installation Instructions - Live Monitor
|
Product version: |
Live Monitor 2.0 |
|---|---|
|
Document version: |
1.0 |
|
Document last saved: |
Introduction
This document provides installation instructions and troubleshooting information regarding the Live Monitor module. For further configuration and system description refer to the document Configuration - Live Monitor.
Prerequisites for Live Monitor
- This installation of Live Monitor requires EPiServer CMS 6.
- Live Monitor System requirements are the same as for EPiServer CMS 6.
NOTE: If you plan to use Live Monitor on an EPiServer CMS 6 Demo Site, it is recommended to install the demo site first, before installing Live Monitor. The installation order for the modules are described below.
Table of Contents
- Usage on sites with multiple site bindings
- Usage on sites with code blocks
- Live Monitor Troubleshooting
- Usage on sites running ORACLE database
- Using Live Monitor with the EPiServer CMS 6 Demo Site
- Usage on sites using HTTPS scheme
Installing Live Monitor
Download and unzip the Live Monitor.zip file onto your computer and run the Live Monitor.msi file.
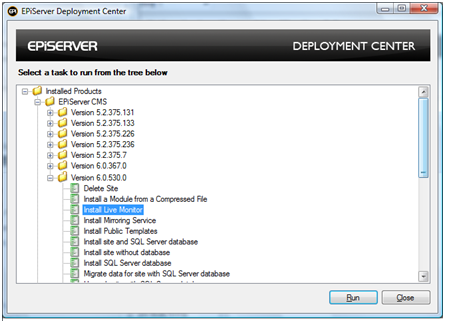
Sart the EPiServer Deployment Center. The EPiServer Deployment Center can be found in the EPiServer folder on the start menu
-
Expand the EPiServer CMS version for which the Live Monitor module belongs to (6.0.xxx.xxx) and select “Install Live Monitor” and then click “Run”.
-
Select the items you want to include in the installation, Import content (example content)and/or Application files.
Note if using an Oracle database do not select the Database item, please refer to the section Usage on sites running ORACLE database in this document.
Click "Next" to continue: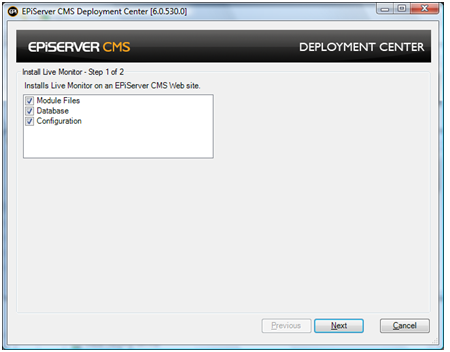
-
Select the Web site where you want to install Live Monitor, click "Install" to continue

Usage on sites with multiple site bindings
Live Monitor relies on WCF services for communication between the silverlight client and the server. This in turn adds some configuration requirements when using multiple site bindings (e.g. http://mysite.com & https://mysite.com). The most stright-forward option for fixing this is configuring "base address prefix filters":
<configuration>
  <system.serviceModel>
   <serviceHostingEnvironment ...>
     <baseAddressPrefixFilters>
    <!-- this is the address from which I want to run the live
         monitor client -->
    <add prefix="http://mysite.com"/>
     </baseAddressPrefixFilters>
   </serviceHostingEnvironment>
  </system.serviceModel>
</configuration>
Usage on sites with code blocks (<% %>) immediatly inside the form tag ==
The symptom for this problem is that no trace information is logged, and no visitors are shown in the client. Code blocks prevents the live monitor tracking web control from beeing added at the end of the form tag. The most stright-forward option for fixing this is manually adding the epitrace tracking web control to the master page:
<%@ Register TagPrefix="epitrace"
  Namespace="EPiServer.Trace.CMS.Web.WebControls"
  Assembly="EPiServer.Trace.CMS" %>
 <html><body>
   <form runat="server">
     <% // My nasty code block and other markup %>
   </form>
   <epitrace:VisitTracker TrackingHandlerUrl="~/TrackerHandler.ashx" runat="server"/>
</body></html>
Also disable the page plugin in admin mode: Admin > Config > Plug-in Manager > Live Monitor > Overview.
Live Monitor Troubleshooting
- Some machines may need registering a MIME type for extension .xap as application/x-silverlight-app. IIS7, update web.config: IIS5-IIS6: Go to IIS Manager > Server > Properties > Mime Types... > New...: Extension: .XAP MIME type: application/x-silverilght
- The browser used to access the site will need Silverlight 3 or 4 installed in order to run Live Monitor. http://www.microsoft.com/silverlight/get-started/install/default.aspx
Usage on sites running ORACLE database
When installing with Deployment Center uncheck "Database tables" and manually run [Program Files]\EPiServer\CMS\[Version]\Modules\EPiTrace\epitraceHits.ora with SQLPlus.exe connected to your existing <EPiServer Oracle User>.
Using Live Monitor with the EPiServer CMS 6 Demo Site
When installing Live Monitor on an EPiServer CMS 6 demo site, it is recommended to install the modules in the following order:
- Install EPiServer CMS 6 (6.0.530.0) according to installation instructions for EPiServer CMS 6.
- Install the public templates when prompted during the installation procedure for EPiServer CMS 6.
- Install the EPiServer CMS 6 Demo Site according to the installation instructions.
- Install Live Monitor according to the installation instructions.
Usage on sites using HTTPS scheme
Open web.config set bindingConfiguration of the TraceService endpoint to a binding with the security mode set to "transport", e.g.:
   <system.serviceModel>
        <services>
            <service behaviorConfiguration="EPiServer.Trace.Services.TraceServiceBehavior" name="EPiServer.Trace.CMS.Services.TraceService">
                <endpoint bindingConfiguration="basicHttpBinding" .../>
            </service>
        </services>
		<bindings>
            <basicHttpBinding>
                <binding name="basicHttpBinding">
                    <security mode="Transport" />
                </binding>
            </basicHttpBinding>
        </bindings>