EPiServer Connect 2.4 for Microsoft SharePoint 2007 and 2010 – Security and Delegation
|
Product version: |
EPiServer Connect for Sharepoint version 2.4 |
|---|---|
|
Document last saved: |
Introduction
This document describes steps needed to enable delegation between EPiServer CMS Virtual Path Provider for Microsoft SharePoint 2007 and 2010, and Microsoft SharePoint Server. The main purpose of delegation is to enable access for EPiServer CMS users to the SharePoint server libraries with SharePoint credentials. For information about delegation in Windows Server 2003 and protocol transition, see the Microsoft tech note.
Prerequisites
The following conditions must be met to enable delegation:
Make sure that Microsoft SharePoint server and EPiServer CMS server belong to the same Windows domain.
Raise the domain functional level to Windows Server 2003 in the following way:
Note! This operation is irreversible.
- Log on to the PDC of the forest root domain with a user account that is a member of the Enterprise Administrators group.
- Open Active Directory Domains and Trusts, click Start, point to All Programs, point to Administrative Tools, and click Active Directory Domains and Trusts.
- In the console tree, right-click Active Directory Domains and Trusts and click Raise Forest Functional Level.
- Under Select an available forest functional level, click Windows Server 2003 and Raise.
Configuring the Servers
There are two solutions to configure delegation between EPiServer CMS and Microsoft SharePoint servers. Which to use depends on what account you use to run EPiServer CMS web application pool. For both solutions you have to complete by Setting Account Permissions.
Solution 1
This procedure assumes that you are running your EPiServer CMS web application under the Network Service machine account.
- Create an SPN for your custom domain account as follows (as Kerberos requires an SPN to support mutual authentication):
a) Install the Windows Server 2003 Tools from the Windows Server 2003 CD on the Active Directory domain controller.
b) From a command prompt, run the setspn tool twice from the C:\Program Files\Support Tools directory as shown here.setspn -A HTTP/EPiServerWebServerName:Port EPiServerWebServerName
setspn -A HTTP/EPiServerWebServerName.FullyQualifiedDomainName:Port EPiServerWebServerName
Note! EPiServerWebServerName is the server name where the EPiServer website is installed.
Note! You can only have a single SPN associated with any HTTP service (DNS) name, which means you cannot create SPNs for different service accounts mapped to the same HTTP server unless they are on different ports. The SPN can include a port number.
Example: If you have domain named TESTDOMAIN.EP.SE, EPiServer CMS site installed on server with the name CMSSERVER on port 17000, the setspn commands will look as follows:setspn -A HTTP/CMSSERVER:17000 CMSSERVER
setspn -A HTTP/CMSSERVER.TESTDOMAIN.EP.SE:17000 CMSSERVER - Login to your domain controller server.
- Start the Microsoft Management Console (MMC) > Active Directory Users and Computers snap-in.
- Click the Computers node on the left.
- Double-click your EPiServer CMS web server computer to the right to display the properties.
Note! If Properties does not have a Delegation tab and there is a single checkbox called Trust Computer for Delegation on the General tab, your domain is operating as a Windows 2000 mixed domain. You must raise the domain functional level to Windows Server 2003 as described in Prerequisites in this document. - On the Delegation tab of the Properties window for the EPiServer CMS Web server computer, Do not trust the computer for delegation is selected by default. To use delegation, select Trust this computer for delegation to specified services only. Specify which services that can be accessed in the bottom pane.
- Beneath Trust this computer for delegation to specified services only, select Use any authentication protocol.
- Click Add.
- In Add Services, click the Users or computers button.
- In the Select Users or Computers dialog, type the name of your Microsoft SharePoint server computer if you are running Microsoft SharePoint application pool as System or Network Service. Alternatively, if you are running Microsoft SharePoint application pool by using a custom domain account, enter that account name instead and click OK.
- You will see all the service principal names configured for the selected user or computer account. To restrict access to Microsoft SharePoint, select the http service, and then click OK.
- Click OK and restart IIS by using the iisreset command.
Solution 2
This procedure assumes that you are running your EPiServer CMS Web application under a custom domain account.
- Create an SPN for your custom domain account as follows (as Kerberos requires an SPN to support mutual authentication):
a) Install the Windows Server 2003 Tools from the Windows Server 2003 CD on the Active Directory domain controller.
b) From a command prompt, run the setspn tool twice from the C:\Program Files\Support Tools directory as shown here.setspn -A HTTP/EPiServerWebServerName:Port domain\customAccountName
setspn -A HTTP/EPiServerWebServerName.FullyQualifiedDomainName:Port domain\customAccountName
Note! EPiServerWebServerName is the server name where the EPiServer website is installed.
Note! You can only have a single SPN associated with any HTTP service (DNS) name, which means you cannot create SPNs for different service accounts mapped to the same HTTP server unless they are on different ports. The SPN can include a port number.
Example: If you have domain named TESTDOMAIN.EP.SE, EPiServer CMS site installed on server with the name CMSSERVER on port 17000 and CMS application pool is running under custom account TESTDOMAIN\EPiAPP, the setspn commands will look as follows:setspn -A HTTP/CMSSERVER:17000 TESTDOMAIN\EPiApp
setspn -A HTTP/CMSSERVER.TESTDOMAIN.EP.SE:17000 TESTDOMAIN\EPiApp - Start the Microsoft Management Console (MMC) Active Directory Users and Computers snap-in.
- In the left pane of the MMC snap in, click the Users node.
- In the right pane, double-click the user account you are using to run the ASP.NET application. This displays the user account properties.
Note! If the Properties dialog box for your account does not have a Delegation tab, this indicates that a service principal name (SPN) does not exist for the user. Create an SPN as explained in step 1, above. - On the Delegation tab of the Properties window for your Web server computer, Do not trust the computer for delegation is selected by default. To use constrained delegation, select Trust this user for delegation to specified services only > Use any authentication protocol. Specify which services that can be accessed in the bottom pane.
- Click Add.
- In Add Services, click the Users or computers button.
- In the Select Users or Computers dialog, type the name of your database server and click OK.
- You will now see all the available services on your Microsoft SharePoint server. To restrict access to Microsoft SharePoint Web application, select the http service and click OK.
Setting Account Permissions
Grant your account used to run EPiServer CMS web application pool permissions to act as a part of operating system on the EPiServer web server. Go to Administrative Tools > Local Security Policy > Local Policies > User Rights Assignment > Act as part of the operating system policy, click Add User or Group button and select user account used to run EPiServer CMS web application pool.
Note! This places your process within the trusted computing base (TCB) of the web server, which makes your web server process very highly privileged. Where possible, you should avoid this approach because an attacker who manages to inject code and compromise your web application will have unrestricted capabilities on the local computer.
Configuring Microsoft SharePoint
To enable delegation in Microsoft SharePoint, you need check web application settings on Central Administration > Security > Specify authentication providers > Default in the following way:
- Keep Authentication Type > Windows selected for web application (default for Microsoft SharePoint).
- In IIS Authentication Settings, select Integrated Windows Authentication > Negotiate (Kerberos).
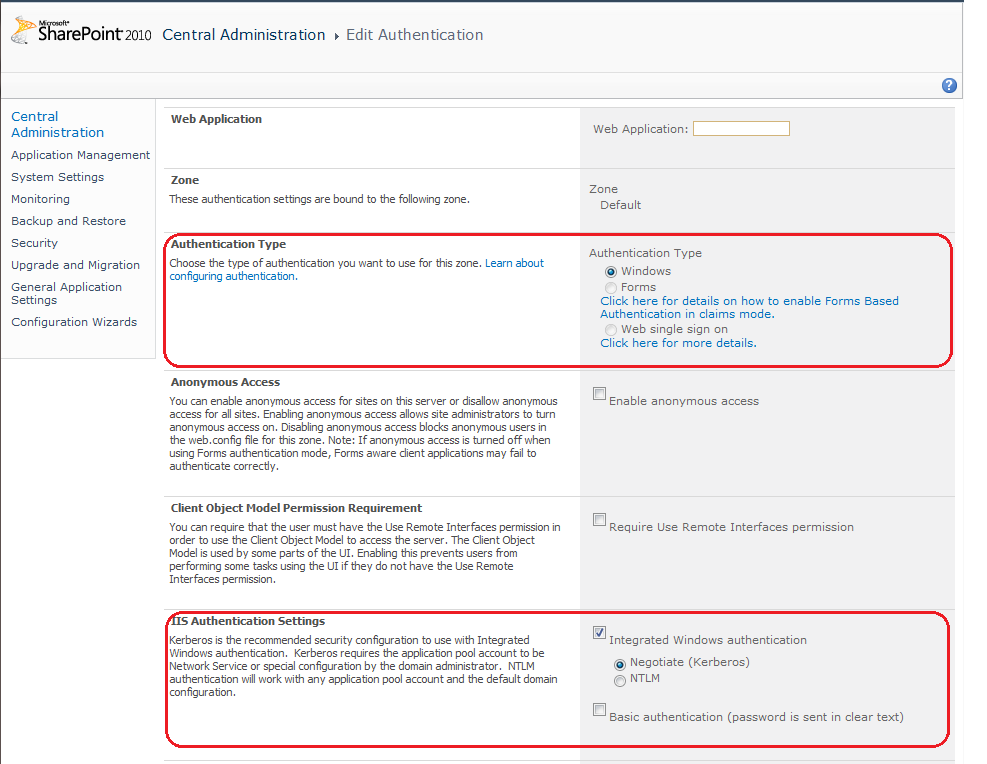
- Restart IIS.
Configuring VPP in EPiServer Connect
To enable delegation usage in virtual path provider for SharePoint, add the following attributes in VPP configuration section in web.config:
- bypassAccessCheck="True"
- useImpersonation=”True”
- wssDomainName = “YourDomainName”
<add showInFileManager="true"Important: SharePoint server is responsible for checking user access permissions when bypassAccessCheck="True" in delegation mode. It is is highly NOT recommended to set bypassAccessCheck option to True if delegation is disabled.
name="SharePointFiles"
virtualName="SharePoint"
virtualPath="~/SharePoint/"
bypassAccessCheck="True"
type="EPiServer.SharePointWssProvider.SharePointWssProvider,EPiServer.VirtualPathWssProvider"
wssSiteUrl="http://[SharePointSiteUrl]/"
wssLogin="Admin"
wssPassword="[password]"
wssDomainName="[testdomain.ep.se]"
useImpersonation="True"
useCache="True"
cacheExpirationTime="60"
cachedFilesTempFolder="C:\Temp" />