Developing gadgets
Introduction
Developing gadgets for the EPiServer dashboard mostly adheres to the ASP.NET MVC style of development, the main difference being that the workspace is shared with other gadgets. This means certain ways of developing are preferred over others. The information in this document applies to version 6 and 7 of EPiServer CMS.
The gadget API is a thin layer around standard concepts in ASP.NET MVC. Features on top of this include virtual folder guidance, support for registering routes with mapping to this structure, registration of the controller into the dashboard, support for AJAX server interaction and a client model.
The dashboard is one of the features of EPiServer which is also a plug-in area. Usages include presenting high-level information or provide quick access to common tasks. This document is a tutorial for the creation of gadgets for the dashboard.
Related references:
- The Dynamic Data Store section of the EPiServer Framework SDK
OnlineCenter overview
The main purpose of EPiServer OnlineCenter is to allow easier navigation and integration of different products – EPiServer or third-party. EPiServer OnlineCenter is made up of two main components:
- Global navigation.
The global navigation helps users navigate different integrated products such as
EPiServer CMS, EPiServer Community, and EPiServer Mail but also third party
products or integrated modules which would like to expose their interfaces to
the logged on user. The global navigation can be customized, and it is
possible to insert the menu into both (custom) web forms and MVC views.
The menu is designed to be oriented on products and modules, so that each top
menu item represents a product while the sub-level menu contains the actual
views/functions/parts of the product.

- Dashboard.
The main purposes of the dashboard are to aggregate site information and expose
important functions to the user. For example showing a list of recently changed
pages so that the editor quickly can get back to work where they left off.
The dashboard is made up of tabs, zones and gadgets. Gadgets can easily be
created (ASP.NET MVC) and plugged into the dashboard so that the user can use
them (add to dashboard). A gadget is a self-contained item and is responsible
for its own rendering and behavior. A gadget can either contain functionality
that can be used within the gadget interface or simple link away to other
products integrated in the framework (for example, a direct link to CMS /
Pages where you can use the classic editing mode features).
Configuring your project for gadget development
Gadgets are not enabled by default. Instead the project in which they reside must be registered in web.config. This means that the assembly where they reside is associated with a base path on disk and investigated for certain attributes, a route is created and a few other things.
To make this easier you can download a ZIP installer module that enables gadget development in the public templates project. You can read more about this in the Shell Modules section.
Using gadget controller options
To define and extend the behavior of gadgets there are some attributes and interfaces that can be used on the controller class.
[Gadget]
To make an ASP.NET MVC controller into a gadget you need decorate it with an attribute (and register its assembly as a shell module). This attribute lives in the Shell.Gadgets namespace.
Example:
[Gadget]
     public class ElementsController : Controller
       {
         public ActionResult Index()
           {
             return View();
           }
       }
The [Gadget] attribute has a few options for those looking for localization or changing title and default actions.
[ScriptResource("Path/To/Script.js")]
Optionally, you can associate scripts to a gadget. This means that the referenced script is added to the dashboard header. This is usually combined with a gadget client script init method. The path is relative to the shell module in which the gadget exists but can also be app relative (~/) or site relative (/). This attribute lives in the Shell.Web namespace.
Example:
[Gadget(ClientScriptInitMethod = "playground.events.init")]
[ScriptResource("Content/Events.js")]
public class EventsController : Controller
The attribute also supports some additional properties to control the sort index of this particular script and whether the script is located in another module. Multiple attributes are allowed.
[CssResource("Path/To/Style.css")]
You can associate a style to a gadget. This means the CSS reference is added to the dashboard’s header. The path is relative to the shell module in which the gadget exists but can also be app relative (~/) or site relative (/). This attribute lives in the EPiServer.Shell.Web namespace.
Example:
 [Gadget]<br />[CssResource("Content/Elements.css")]
public class ElementsController : Controller
The attribute also supports some additional properties to control the sort index of this particular style and whether the style is located in another module. Multiple attributes are allowed.
IGadgetNotify
When creating gadgets you are free to use whatever storage you like. This means that you also might need to clean up your data when a gadget is deleted.
Example:
[Gadget]
     public class CleanupController : Controller, IGadgetNotify
         {
      // actions
         public void OnDeleted(Guid gadgetId)
        {
      // clean here
         }
       }
[Authorize(Roles = "CmsEditors, CmsAdmins")]
To restrict who may add and use a certain type of gadget you should use the [Authorize] attribute and specify which roles are authorized. This attribute lives in the System.Web.Mvc namespace.
Example:
[Gadget]
[Authorize(Roles = "NoOne")]
public class SecuredGadgetController : Controller
[VerifyGadgetOwner]
In addition to verifying that a user may use a certain type of gadget, it is also important to check that the gadget actually belongs to the user’s dashboard. This is what the [VerifyGadgetOwner] does.
Example:
[Gadget]
[VerifyGadgetOwner]
public class SecuredGadgetController : Controller
Using gadget view HTML helpers
The episerver shell framework contains a number of HTML helper extension methods that are useful to creating the built-in gadgets available on the dashboard.
Html.GetGadgetId()
Gets the current gadget’s id and returns it as a string.
Example:
Html.BeginGadgetForm()
When saving data on the dashboard it is better to use AJAX than posting and re-creating the whole dashboard. Setting up AJAX is not very hard, but it is even easier with the BeginGadgetForm HTML helper.
Example (this extension has gained some overloads after 6RC):
<% Html.BeginGadgetForm("accept"); %>
 <input type="text" name="text" />
 <input type="submit" />
            <% Html.EndForm(); %>
Html.AcceptButton()
This simply renders a localized submit input button.
Example:
<% Html.BeginGadgetForm("accept"); %>
 <div class="epi-buttonContainer-simple">
   <input type="text" name="text" />
     <%= Html.AcceptButton() %>
 </div>
<% Html.EndForm(); %>
Html.CancelButton()
The Cancel button renders an input button that calls the specified action to restore the view.
Example:
<div class="epi-buttonContainer-simple">
  <%= Html.CancelButton(null, new { action="someview"})%>
</div>
Html.ViewInputButton()
Creates an input button that, when clicked, loads the specified view in the gadget content area using AJAX.
Example (this extension has gained some overloads since 6RC):
<%= Html.ViewInputButton("View input button", "title", "someview",
 string.Empty, null, new { test = 2, test2 = Guid.NewGuid() })%>
Appearance:

Html.ViewLink()
Creates an anchor that, when clicked, loads the specified view in the gadget content area using AJAX. This is useful in master-details scenarios.
Example (this extension has gained some overloads since 6RC):
<%= Html.ViewLink("View link", "title", "someview",
 string.Empty, null, new { test = 3, test2 = Guid.NewGuid() })%>
Appearance:

Html.ViewLinkButton()
Creates an anchor with the appearance of a button that, when clicked, loads the specified view in the gadget content area using AJAX.
Example (this extension has gained some overloads since 6RC):
<%= Html.ViewLinkButton("View link button", "title", "someview",
 string.Empty, null, new { test = 4, test2 = Guid.NewGuid() })%>
Appearance:

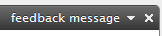
Html.SetGadgetFeedback()
You can add text to the gadget title bar area with an extension method. The extension overload allows options for AJAX loader, fadeout and disappear after.
Example:
Appearance:
Html.AutoUpdate()
To refresh a view periodically you can use this extension method.
Example:
Using labeled inputs for gadgets
Since inputs used in gadgets can have multiple instances present at the same time one cannot use static values for IDs. One of the important usages for ids on inputs are to connect them with a label using the “for” attribute. To assist with generating this there is a collection of HTML helpers:
- LabeledCheckBox
- LabeledDropDownList
- LabeledPassword
- LabeledRadioButton
- LabeledTextArea
- LabeledTextBox
Example:
Will generate an output like this:
<input name="inputName" class="epi-size15" id="id545" type="text" value="input value" />
Using gadget client API
Client script init methods
The recommended approach for gadget interaction in the browser client is a [ScriptResource] attribute in combination with a ClientScriptInitMethod in the [Gadget] attribute. The gadget controller references a script to be added to the dashboard and a method in this script to call for each gadget on a tab. The init method is used to manipulate the gadget’s HTML and/or subscribe to client events.
Example (server):
[Gadget(ClientScriptInitMethod = "playground.init")]
            [ScriptResource("Content/Events.js")]
            public class EventsController : Controller
Example continued (client):
(function($) {
     playground = {
        init: function(e, gadget) {
        // do stuff and attach to events here
           }
          };
    })(epiJQuery);
Using the gadget instance
A class we call gadget instance is passed to the init method. From this class you can access the gadget HTML DOM element, load views, show feedback messages and subscribe to events.
gadget.id
The identifier for this gadget (a GUID).
gadget.element
HTML DOM element accessor for the gadget in question.
gadget.getActionPath(routeParams)
Gets the server URL for a certain action.
Example:
(function($) {
            playground = {
                init: function(e, gadget) {
                    var actionPath =
            gadget.getActionPath({
            action: "ImportantPersons",
            maxCount: 2
          });
       }
    };
            })(epiJQuery);
gadget.loadView (routeParams)
Loads a new view into the gadget based on routeParams. Passing null or empty routeParams means that the current action is re-loaded from the server. A benefit of using the gadget’s methods for doing AJAX is that the gadgetId is appended to the request and an AJAX loader is displayed while waiting for a result.
Example:
Result:

gadget.ajax(epiAjaxOptions)
Sends an AJAX request using jQuery AJAX functionality. Sets an error
message in the gadget heading area if something goes wrong during the request.
o epiAjaxOptions extends jQuery AJAX options object with message property that
is used to display AJAX loader messages.
Example (custom AJAX loader):
gadget.ajax({
   type: "POST",
   url: gadget.getActionPath({ action: "Save" }),
   data: data,
   feedbackMessage: "Saving..." // adds message to AJAX loader});
Example (overriding default success handler):
gadget.ajax({
   type: "POST",
   <a href="url:%20gadget.getActionPath({%20action:%20%22Save%22%20}">url: gadget.getActionPath({ action: "Save" }</a>),
   data: data,
   feedbackMessage: "Saving",
   success: function(data){
   gadget.setFeedbackMessage("Success");
   }
});
gadget.isVisible()
Get the gadget’s current visibility (true/false).
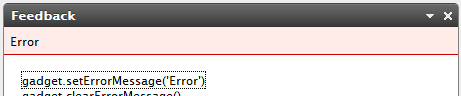
gadget.setErrorMessage(message, options)
Sets an error message in the gadget heading area.
- message – string: Message to display
- options – Object
- details. Detailed text displayed when showing detailed error messages.
- status. A status value (HTTP status).
- errorThrown. This status applies whether this error was the result of an unhandled exception.
Output:
gadget.clearErrorMessage()
Clear the current error message from the gadget heading area.
Output:
![]()
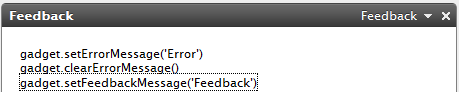
gadget.setFeedbackMessage(message, options)
Display a feedback message in the gadget title bar.
- message – string: Message to display
- options – Object
- ajaxLoader. Boolean whether to display the AJAX loader image
- feedbackTitle. A text string that will be shown as tooltip to the loading image
- feedbackHideDelay. Number of milliseconds before the message is removed, 0 means shown indefinitely
- feedbackFadeOut. Boolean whether to fade rather than just hide the message after the delay
Output:
gadget.clearFeedbackMessage(options)
Clears the feedback message and removes the AJAX loader if visible
- options – Object (optional)
- feedbackFadeOut. Boolean whether to fade rather than just hide the message after the delay.
Output:
![]()
Event: epigadgetloaded(e, gadget)
This event is raised:
- After gadget initialization
- After gadget form submits
- When gadget has been restored after previous deletion
- When gadget has been restored after previous tab deletion
Example:
});
Event: epigadgetvisibilitychanged (e, gadget)
This event is called when gadget visibility changes.
Example:
var isVisible = gadget.isVisible();
});
Example (how to listen to visibility changed)
[Gadget(ClientScriptInitMethod = "epi.exampleGadget.init")]
[ScriptResource("ClientResources/ExampleGadget/ExampleGadget.js")]
public class ExampleGadgetController : Controller
{
...
}
Example GadgetController.js:
(function($, epi) {
  epi.exampleGadget = function() {
        // object returned by function.
        // Exposes public methods and variables.
        var pub = {};
        pub.init = function(e, gadget) {
            $(this).bind("epigadgetvisibilitychanged",
            gadgetVisibilityChanged);
       };
        var gadgetVisibilityChanged = function(e,
            gadget)
        {
            alert(gadget.isVisible());
        };
        return pub;
    } ();
            } (epiJQuery, epi));
Event: epigadgetmove(e, gadget)
This event is raised after successful gadget movement.
Example:
});
Event: epigadgetsubmit(e, gadget)
This event is called just before a gadget form gets submitted.
Example:
});
Event: epigadgetunload(e, gadget)
Raised when a gadget is about to be unloaded:
- After tab settings has been changed
- After tab has been deleted
- When gadget is going to be deleted
});
Event: epigadgetremove(e, gadget)
This event is raised when the gadget is deleted, either from the delete gadget button or the gadget context menu.
Example:
$(gadget.element).bind("epigadgetremove", function(e, gadget){

            });
Using gadget styling
The CSS styles used on the Dashboard resets many of the default styling of elements added by the browser and in some cases adds its own default style. However, this styling may not be enough and some additional classes come to the rescue.
- epi-contentArea and epi-formArea, set on any containing <div> elements.
Registering styles on the dashboard
The best way to get your style sheets on the dashboard is by defining them for your gadgets with the [CssResource] attribute.
Example:
[EPiServer.Shell.Web.CssResource("Content/QuickChat.css")]
public class QuickChatController : Controller
epi-contentArea
This CSS class gives you a “Dashboard default” look on tables, lists, headings and link colors.
Example:
 <div>
    <h2>Two handy CSS classes</h2>
    <ul>
        <li>epi-contentArea</li>
        <li>epi-contentForm</li>
    </ul>
     <table>
        <caption>Table caption</caption>
        <thead>
            <tr>
            <th scope="col">Heading One</th>
            <th scope="col">Heading Two</th>
            <th scope="col">Heading Three</th>
            </tr>
        </thead>
        <tbody>
            <tr>
            <td>Data A</td>
            <td>Lorem ipsum</td>
            <td>Dolor sit amet</td>
            </tr>
            <tr>
            <td>Data B</td>
            <td>Lorem Ipsum</td>
            <td>Dolor sit amet</td>
            </tr>
        </tbody>
    </table>
</div>
The above code would look like this without the use of epi-contentArea class:
Result (no epi-contentArea):
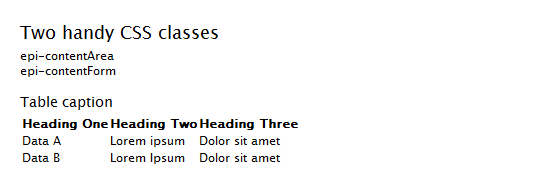
Adding the epi-contentArea class to the containing <div> will change the appearance.
Example:
Result (with epi-contentArea):
In most cases epi-contentArea will work fine, but in some scenarios you might want one table to look like the above without affecting any other child elements. In this case, you could use epi-default or epi-simple (no borders or margins) classes directly to the <table> tag.
Example:
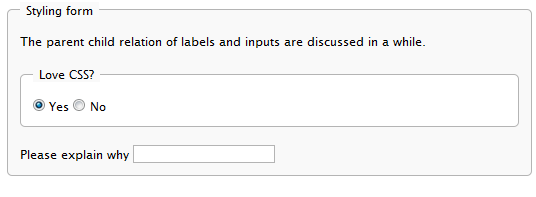
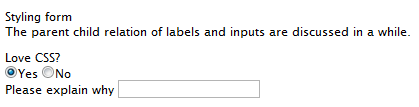
epi-formArea
Form elements like fieldset, legend, input, textarea, etc will have very minimalistic styling by default.
<form action="#" onsubmit="return false;">
<fieldset>
<legend>Styling forms</legend>
<p>
The parent child relation
of labels and inputs
is discussed below.
</p>
<fieldset>
<legend>Love CSS?</legend>
<input id="radio1"
type="radio"
name="radio1" 
checked="checked"
value="1" />
<label for="radio1">Yes</label>
<input id="radio2"
type="radio"
name="radio2"
value="2" />
<label for="radio2">No</label>
</fieldset>
<div>
<label for="text1">Please explain why</label>
<input id="text2"
type="text" value="" />
</div>
</fieldset>
</form>Result (no epi-formArea):
Setting the epi-formArea class on the <form> element gives it a more stylized look.
Example:
Result (with epi-formArea):
There are also some sizing classes that could be used individually on inputs, selects, labels or containers for labels.
- epi-size3 (Not on labels or containers for labels)
- epi-size10
- epi-size15
- epi-size20
- epi-size25
- epi-size30 (Not on labels or containers for labels)
By setting an input element inside a label, the label will automatically be
associated with the input without having to set the “id” attribute on the input
(and the “for” attribute on the label). This is perfectly valid HTML and we
easily avoid having the same id twice in a page, which the use of two gadgets of
the same kind in a page would result in.
The parent child relation also results in some nifty alignment possibilities of
labels and form fields:
<form action="#" onsubmit="return false;" class="epi-formArea">
    <fieldset>
        <legend>Styling form</legend>
        <div class="epi-size10">
            <label for="label1">Label one</label>
            <input id="label1"
            class="epi-size3" type="text" />
        </div>
        <div class="epi-size10">
            <label for="label2">Label
            two</label>
            <input id="label2"
            type="text" class="epi-size15" />
        </div>
        <div class="epi-size10">
            <label for="label3">A
            really long label which will break row</label>
            <select id="label3"
            class="epi-size15">
            <option>Option One</option>
            <option>Option Two</option>
            </select>
        </div>
        <div class="epi-size10">
            <label for="label4">Label
            four</label>
            <input id="label4"
            type="text" class="epi-size30" />
        </div>
    </fieldset>
</form>
Configuring Shell modules
Configure modules in the web.config file to allow EPIServer to associate a virtual path to an assembly containing gadgets and other plug-ins.
Example:
<episerver.shell>
  <publicModules rootPath="~/modules/" autoDiscovery="Minimal">
    <add name="QuickChat">
      <assemblies>
        <add assembly="QuickChat" />
      </assemblies>
    </add>
  </publicModules>
</episerver.shell>
The example above defines a module of the assembly QuickChat.dll and associates it with the virtual path /public/QuickChat.
Example (relocated resource path):
<episerver.shell>
   <publicModules rootPath="~/modules/" autoDiscovery="Minimal">
      <add name="PublicTemplates" resourcePath="~/">
          <assemblies>
             <add assembly="EPiServer.Templates.Public" />
         </assemblies>
      </add>
   </publicModules>
</episerver.shell>
The example above configures a module called “PublicTemplates”. The module’s location on disk is the root of the application (~/). This means that relative references to client resources and menu items will be based on this URL. Furthermore, the module is mapped to an assembly, EPiServer.Templates.Public. This means that controllers in this assembly are routed through the path format “/modules/PublicTemplates/{controller}/{action}”. This route is set up by the shell initialization module.
protectedModules and publicModules
These elements contain collections of shell modules. protectedModules are mapped to a path protected by ASP.NET authorized rules. publicModules’ path is open to everyone.
Attributes:
- rootPath. The root path where modules will be located and routed. Required.
- autoDiscovery. Option for probing the module folder and loading of module assemblies automatically on start-up. The default is “Minimal”. Changing this to “Modules” will result in folders below the root path to be added as modules automatically.
Module (add element)
The publicModules and protectedModules elements themselves in web.config contain a collection of registered modules. These modules define assemblies and virtual paths. By default a module is expected to be found in a folder with the same name as the module itself. This folder should be located in the configured rootPath (as configured per public and protected modules).
Attributes:
- name. The name of the module used to find the module directory. Required.
- resourcePath. The path of the module to override the default location of the module. Optional
- clientResourcePath. An alternative location for client resources. By default this path is the same as resourcePath. Optional
Elements:
- assemblies. Assemblies to load and associate with the module. This value may be combined with assemblies defined by the module depending on the auto discovery option.
Example (web.config):
<add name="ShellExtras"
resourcePath="~/Somewhere/Else/Extras" clientResourcePath="~/Somewhere/Else/Entirely/Extras">
<assemblies>
<add assembly=" EPiServer.Shell.Extras" />
</assemblies>
</add>Module manifest
Each module also has a manifest file (module.config) in the root directory of the module where further module specific settings can be specified. Please see the documentation section for module.config.
Versioning client resources
The relative path to client resources in the module folder can be specified using the optional attribute clientResourceRelativePath of the module node in the module manifest file (module.config). The module client resource path is equal to the resource base path when clientResourceRelativePath attribute is not defined or the value is an empty string. Otherwise the system combines the module resource base path and the relative path specified in clientResourceRelativePath attribute. The resulting value is used as the module client resource path if it is a valid absolute path.
Usage example
This feature can be used to implement versioning to avoid client side caching issues without having to change all references to the resource files individually.
Example module directory structure

Example module.config
<?xml version="1.0" encoding="utf-8"?>
<module clientResourceRelativePath="1.5.0" >
  <!-- ... -->
  <clientResources>
    <add location="myScript" path="ClientResources/script.js" resourceType="Script" />
    <add location="myStyles" path="ClientResources/styles.css" resourceType="Style" />
  </clientResources>
  <!-- ... -->
</module>
Resource base path: ~/modules/SampleModule/
Client resource path: ~/modules/SampleModule/1.5.0/
Setting up the environment
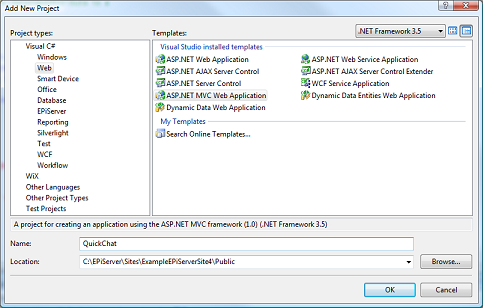
Start by installing an EPiServer CMS website using the standard installer. Using the default options you will end up with a website in c:\EPiServer\Sites\[MySiteName]. In the example below this site was installed in c:\EPiServer\Sites\ExampleEPiServerSite4. While it is not required for normal operation this tutorial assumes you have installed ASP.NET MVC.
Develop gadgets in separate project
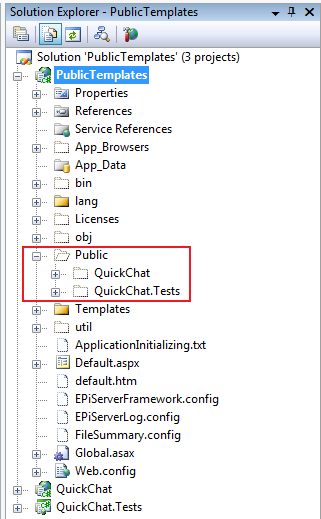
The module is created as a separate project below the “public” folder of the EPiServer site. As an alternative to creating a separate project you can add you gadget to the existing PublicTemplatest project.
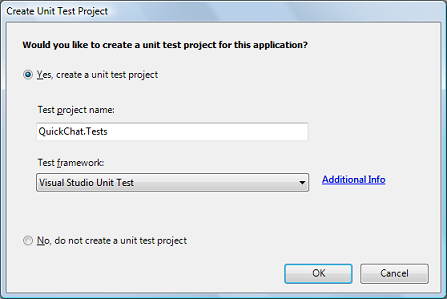
Add a unit test project if you want. This tutorial will not cover unit testing.
When enabling Show all files, the quick chat module is placed below the development site.
Modifications to default
Some modifications are recommended to the default MVC application.
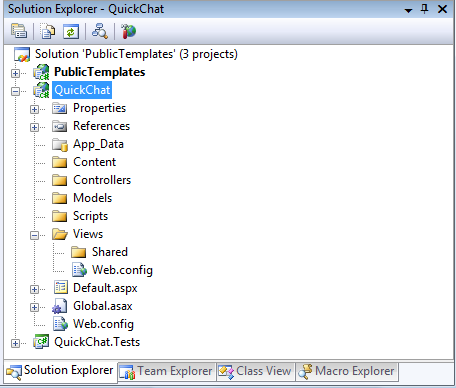
1. Remove default controllers and views
Remove the default controllers, views and scripts (HomeController.cs, /Views/Home, etc.) according to the image below. You can always use another project to play with ASP.NET MVC. Note that if you have added a unit test project you also have to remove all the related test functions from the QuickChat.Test project.
2. Clean up web.config
The web configuration is inherited from the public templates site but if you leave some settings in the module’s web.config you will kepp intellisense enabled. Copy the root web.config file (not the one in the Views folder) from the QuickChat example zip to your project.
3. Change output path
Open the QuickChat project’s properties and change the default build output path of the quick chat project to "..\..\bin\".

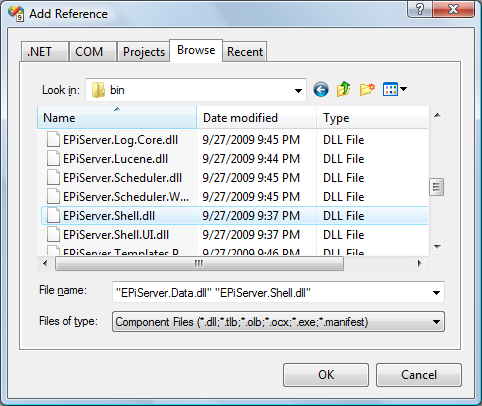
4. Add references
Add references to EPiServer.Shell and EPiServer.Data (you will need these later on). You can find a copy of these in the public template’s bin folder.
5. Register module in web.config
Open the public templates’ web.config file and find the episerver.shell configuration section. Add the quick chat module to the /configuration/episerver.shell/modules/ path. This is an excerpt of the added configuration:
<episerver.shell>
  <publicModules rootPath="~/modules/" autoDiscovery="Minimal">
  <!-- QuickChat is assumed to be located in ~/modules/QuickChat -->
     <add name="QuickChat">
       <assemblies>
           <add assembly="QuickChat"/>
       </assemblies>
    </add>
  </publicModules>
Develop gadgets in public templates project
While creating gadgets in a separate project as previously described, it is also possible create gadgets in the PublicTemplates.csproj project by doing some modifications to configuration and the csproj file.
1. Configuration
The Public Templates needs to be registered in the configuration/episerver.shell/publicModules configuration section. The resourcePath attribute tells the system to look for views (which are described later in this document) in the folder /Views/[ControllerName]/[ActionName].ascx instead of the default location below the modules folder. Also update the add assembly section to any new name chosen for the public templates application.
<episerver.shell>
    <publicModules rootPath="~/modules/" autoDiscovery="Minimal">
       <add name="Public" resourcePath="~/">
          <assemblies>
             <add assembly="EPiServer.Templates.Public" />
          </assemblies>
       </add>
2. References
Add references to System.Web.Mvc, EPiServer.Shell and EPiServer.Data.
3. Create Folders
The ASP.NET MVC framework suggests that you organize the code in the following folders, add these to your project:
- Controllers
- Models
- Views
4. Visual Studio Integration
ASP.NET MVC includes some wizards to help out in the task of creating controllers and views. These are not enabled in the PublicTemplates.csproj installed with EPiServer CMS but they can be with some manual tweaking of the file. Right-click the project > Unload > Edit. Add {603c0e0b-db56-11dc-be95-000d561079b0}; to the list of existing project type guids. Save, right-click and select Reload Project.
<Project>
    <PropertyGroup>
       <ProjectTypeGuids>{603c0e0b-db56-11dc-be95-000d561079b0};{349c5851-65df-11da-9384-00065b846f21};{fae04ec0-301f-11d3-bf4b-00c04f79efbc}
</ProjectTypeGuids>
Starting out with gadgets
Create a gadget. Head to the QuickChat project, right-click the Controllers directory > Add Controller. Name the controller and click Add.
Add the gadget attribute to the controller template created for you. To reduce time-to-dashboard change the return statement to return HTML content directly (you will change this soon).
using System.Web.Mvc;
           using EPiServer.Shell.Gadgets;
           namespace QuickChat.Controllers
           {
                [Gadget]
                public class QuickChatController : Controller
                {
                     public ActionResult Index()
                {
                  return
            Content("<strong>Some</strong>thing!");
                }
              }
            }
Now compile and switch over to the dashboard. Click the (+) symbol of QuickChat in Add Gadgets to add this new gadget. Now “something” is out on the dashboard that you can continue to work with.
A tiny bit of background
Dashboard gadgets are developed using the MVC model. From the point of view of processing a server request this model can be described like this:
Incoming Request > Dasboard Controller Action > Dasboard View > Outgoing Response
The “Controller Action” and “View” represents code that is developed to provide functionality. The arrows (») represent pluggable points provided by the ASP.NET MVC framework.
In a typical ASP.NET MVC application the flow spans over a complete page request. However, in the case of the dashboard gadgets this is slightly different:
Incoming Request  Dashboard Controller Action  Dashboard View
    foreach (gadget on userDashboard)
     {
     Partial Request  Controller Action  View
      }  Outgoing Response
Dashboard gadgets uses the same principles as a typical MVC application but only renders a portion of the dashboard.
Gadget development, step 1: Showing information
With something now presented on the dashboard and a little background behind us we can let the coding begin.
Models
Add a class Message to the Models directory of the quick chat project.
using System;
                namespace QuickChat.Models
                {
                   public class Message
                     {
                       public string Text { get; set; }
                       public string From { get; set; }
                       public DateTime Sent { get; set; }
                    }
}Controller
Going back to the QuickChatController and use EPiServer.Data to retrieve messages from the database (take a look at the EPiServer Framework Reference SDK for in-depth information about the Dynamic Data Store):
[Gadget]
          public class QuickChatController : Controller
          {
               // since the controller is created for each request
               // we can assign a store as a variable
               static QuickChatController()
               {
                    DynamicDataStoreFactory.Instance.CreateStore(typeof(Message));
                         }
                    DynamicDataStore store =
            DynamicDataStoreFactory.Instance.GetStore(typeof(Message));
                public ActionResult Index()
                {
                 // select all messages for the last 5 minutes
                    var fiveMinutesAgo = DateTime.Now.AddMinutes(-5);
                    var messages = from m in store.Items<Message>()
                        where m.Sent > fiveMinutesAgo
                        select m;
                 // pass the messages to the view
                  return View(messages.ToList());
            }}
The code will select all recent messages and pass them to the “Index” view for display.
Views
Create an MVC partial view in the quick chat project.
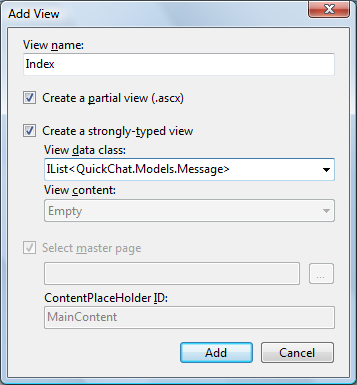
The wizard can be conjured by right-clicking in the controller action and choosing “Add view” (requires ASP.NET MVC to be installed).
When the view is located in Views/QuickChat/Index.ascx in the quick chat project it will be automatically selected to show the messages.
<%@ Control Language="C#"
       Inherits="System.Web.Mvc.ViewUserControl<IList<QuickChat.Models.Message>>" %>
          <%@ Import Namespace="QuickChat.Models" %>
             <div class="epi-defaultPadding">
                <ul>
                   <% foreach (Message m in Model) { %>
                     <li><%= m.From %>: <%= m.Text %></li>
                         <% } %>
                </ul>
                Number of messages: <%= Model.Count %>
           </div>
The view shows messages passed to it by the controller which is just about enough when adhering to the MVC pattern.
Gadget development, step 2: Interacting with server
So far we have created a gadget that shows messages in the database but there is no way to put the messages in. That is precisely what is going to be fixed.
Posting messages to the controller
The most convenient option for posting information from the dashboard is using AJAX. This release includes an extension method that helps out doing this:
<%@ Import Namespace="EPiServer.Shell.Web.Mvc.Html" %>
      <div class="epi-defaultPadding">...</div>
      <hr />
       <% Html.BeginGadgetForm("Save"); %>
           <input name="text" />
           <%= Html.AcceptButton() %>
       <% Html.EndForm(); %>
The new improvement of the view renders a form with a text input field and a submit button. Since we used a “gadget form” the form will be serialized and posted using jQuery.ajax. The results of the “Save” action will replace any existing content in the gadget.
Taking care of posted messages in the controller
The controller accepts the posted message and stores it in the store. The view that is returned will take the place of the existing view in the gadget area. The mapping of the posted message string to input parameters is a feature of ASP.NET MVC. Refer to the blogosphere for documentation on form posting scenarios.
public ActionResult Save(string text)
          {
            // store the posted message
              Message message = new Message();
              message.Text = text;
              message.From = User.Identity.Name;
              message.Sent = DateTime.Now;
              store.Save(message);
              var messages = GetRecentMessages();
              return View("Index", messages);
                   }
                IList<Message> GetRecentMessages()
               {
          return (from m in store.Items<Message>()
             where m.Sent > DateTime.Now.AddMinutes(-1)
               orderby m.Sent
                   select m).ToList();
         }
Gadget development, step 3: Developing the client side
While server development is great it is what you do on the client that makes your projects shine. You may have noticed that the chat gadget at this point still is not very interactive. While you get updates when refreshing the page, or posting messages it is just sits there in between.
Defining resources
First of all is getting out on the dashboard with all the other gadgets. The recommended way of doing this is using an attribute on the controller as shown below:
[Gadget]
[EPiServer.Shell.Web.ScriptResource("Content/QuickChat.js")]
public class QuickChatController : Controller
{
}While the script is executed each time the dashboard loads the way to associate with a gadget instance are client script init methods:
[Gadget(ClientScriptInitMethod = "quickchat.init")]
[EPiServer.Shell.Web.ScriptResource("Scripts/QuickChat.js")]
public class QuickChatController : Controller
Client scripts
The script resource attribute assumes a JavaScript method “quickchat.init” is present on the client. Take a look on this method in the quickchat.js file.
(function($) {
        // using this pattern helps keeping your privates private
            quickchat = {};
            quickchat.init = function(e, gadget) {
                setInterval(function() {
          // reload on an interval unless typing
            var typedText = $("input[type='text']", gadget.element).attr("value");
            if (!typedText) {
            gadget.loadView("Index");
              }
         }, 5000);
    };
 })(epiJQuery);
The init method is invoked by the dashboard and starts updating the gadget every five seconds. While this represents an easy way to update the gadget regularly it is not particularly suited for a chat since it will steal focus from the text box.
Gadget development, step 4: Applying styles and CSS
The best way to get your own style sheets out on the dashboard is defining them for your gadget as in this snippet:
[Gadget(ClientScriptInitMethod = "quickchat.init")]
[EPiServer.Shell.Web.CssResource("Content/QuickChat.css")]
public class QuickChatController : Controller
By using the attribute on the gadget controller and creating a CSS file in the Styles folder of your gadget project you can define styles specific to your gadget. There are also shared styles you can use to get a consistent look and feel. This is described in a later section of this document.
See also
Downloading tutorial
Download the Quick Chat Gadget code sample in ZIP format.
Styling
The CSS styles used on the Dashboard resets many of the default styling of elements added by the browser and in some cases adds an own default style. This styling may however not be enough (it is rather non-styled) so to the rescue comes some additional convenient classes. Documentation about styling...
Checklist: Playing nice on the dashboard
Making a gadget means sharing a common workspace with others. Take a moment to review this list before publishing your gadget to a wider audience:
- “Namespace” your CSS classes
- Namespace and encapsulate your JavaScript methods to avoid polluting global namespace
- Do not override other gadget’s styles
- Do not assume other gadgets will stay the same
- Never assume there is only one gadget of your kind (affects element IDs)
- Prefer documented CSS classes for a consistent look and feel over time
- Avoid long-running operation (such as reports or RSS operations) from your default action
Last updated: Jul 09, 2014