
Episerver Commerce A Developer View (Part 2)
In this blog post I’ll be following up with the second part in my developer focused series on the Episerver Commerce platform.
- Introduction to Episerver Commerce - https://world.episerver.com/blogs/scott-reed/dates/2019/2/episerver-commerce-a-developer-view/
- Core Features
- Developers Tips
- Experience Driven Commerce
A note I’m making this as generic as possible but I’ve primarily been working with Commerce 11.8.2
For this part I’ll be covering the core features out of the box that you get with Episerver Commerce for anyone not experienced with the platform. These features are primarily configured in the Commerce Manager application rather than the main CMS view like the catalogue and marketing areas.
Markets
Markets allow for grouping the of languages, currencies, payment methods and shipping methods in to unique combinations. These can then be used against to products, pricing and campaigns to show different content to different markets.
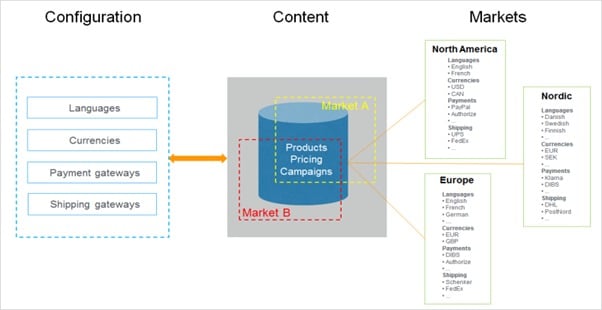
As you can see from the above the core point of markets is to allow your commerce content to be segmented based upon these combination of configuration options. In the above diagram we have used markets to represent regional areas (a common scenario) but these are flexible and can be used for anything where you need to group these options together.
Warehouses
Allow for the configuration of locations that will store inventory. Can be physical, pickup points or online warehouses.
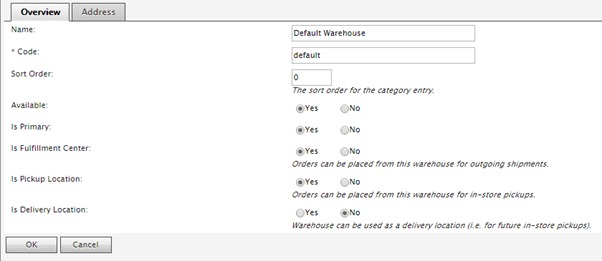
As you see in the above screenshot of the warehouse configuration there are a few key areas that need to be configured.
- Address – If this is a physical location you can configure the address for this warehouse. This would for example allow you to show the users the distance from the nearest fulfilment center so they can see more personalized and localize search results.
- Is Fulfilment Center – This essentially marks this warehouse as being able to fulfil and order and ship it to a user.
- Is Pickup Location – If this location support users physically collecting an item from this location.
- Is Delivery Location – If this area is a place that packages can be shipped to for pickup. For example, a local store, post office or drop off point.
Shipping
The shipping configuration allows you to configure everything that is required to present the correct shipping options to an end user. These are broken down in to the following core areas.
Jurisdictions and Jurisdiction Groups
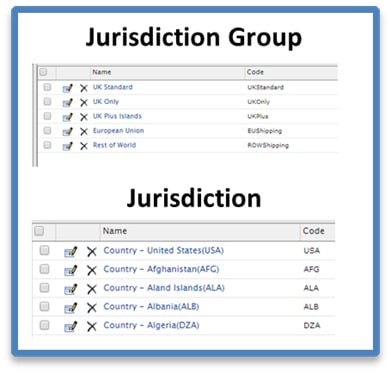
Jurisdictions are regional areas to which shipping methods could be restricted or limited. Only certain out of the box methods are restricted to a specific jurisdiction group such as the Weight/Jurisdiction gateway method but these can be implemented in custom shipping methods when you want to restrict specific shopping methods down to specific regions/locations.
Here is an example of some configuration for jurisdictions and groups.
Shipping Methods
Shipping methods are the core options that an end user would see when selecting what shipping they want. Shipping methods support multilanguage configuration as the text will usually be displayed to the front-end users. Below is an example of the configuration for a custom provider
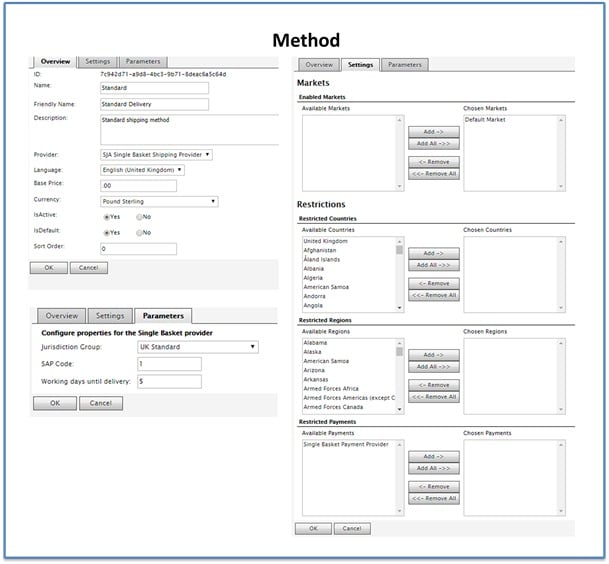
As you can see methods have a lot of complex properties that can be set up on them including the following key properties
- Friendly Name – Used for presentation on the front end of a website
- Provider – The underlying shipping gateway/provider that this method will be loaded through (Setting the provider and refreshing will show any custom properties in the parameters area).
- Base Price, Currency – The pricing options for this provider and what currency is supported.
- Markets & Restrictions – The market this provider supports and any location/region restrictions.
Developer Tip: Make sure any non-used methods are deleted rather than not configured on your selected provider as sometimes they still come through.
Shipping Providers
Shipping providers/gateways are the core services that carry out the logic which returns the correct shipping rate for a shipping method and IShipment. Out of the box Episerver comes with 2 providers/gateways
- Generic Gateway. Flat shipping rate.
- Weight/Jurisdiction Gateway. Base price + additional fee depending on weight and shipping location.
To easily create your own provider, you need to inherit from 2 interfaces and implement their methods
public class SingleBasketShippingProvider : IShippingPlugin, IShippingGateway
{
   public ShippingRate GetRate(Guid methodId, IShipment shipment, ref string message)
   {
   }
}
After the code has been compiled and the site restarted this shipping provider should appear in the dropdown list of providers when configuring a shipping method.
As mentioned custom properties in the parameters tab for a shipping method can be configured as well. These appear once the provider has been selected within the shipping method area. Documentation for this can be found here https://world.episerver.com/documentation/developer-guides/commerce/shipping/Shipping-gateways-and-providers/?AspxAutoDetectCookieSupport=1 but essentially there’s a few steps
- Within the episerver commerce project under Apps -> Order -> Shipping create a folder with the name of the shipping provider without any suffixes. Such as SingleBasket for the example above
- As a user control to the folder that inherits OrderBaseUserControl, IGatewayControl
- Implement the methods for loading an saving the data for this control.
This allows each method using this provider to save/load specific properties for this method.
Developer Tip: Although Episerver comes wit a default shipping manager to get all the shipping methods for when displaying in a basket there is no logic that takes in to account adjusted promotion prices so build a provider that can load these and apply the shipping level discounts.
Payments
Episerver comes with a set of pre-build payment providers out of the box that allow you to interact with third party payment systems.
- Credit Card
- Phone
- Cash on Delivery
- Paypal
- DIBS
- DataCash
However, if you need to create a payment provider for handling a payment for another provider it’s simple to create your own provider.
- If you need to store custom data on the payment create your own Payment object by inheriting from the Payment class and marking the class as serializable. In here you can work with any custom meta fields as required.
- Create a payment gateway by creating a class that implements AbstractPaymentGateway, IPaymentPlugin then register it in the DI framework.
Once created and the app pool restarted you can create a payment provider in the admin using the classes created. Below is an example for a custom payment gateway we created that works with Smartpay and Pay On Account across multiple different catalogues. You can also restrict what shipping method are support for a gateway as shown below.
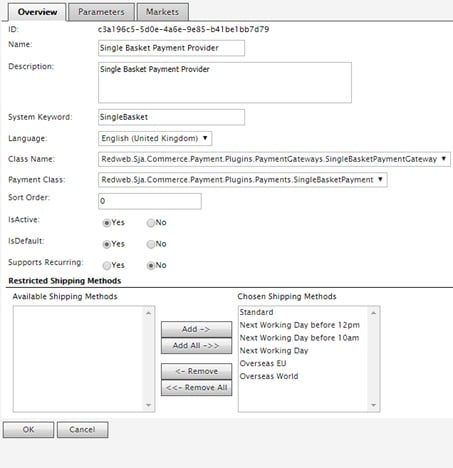
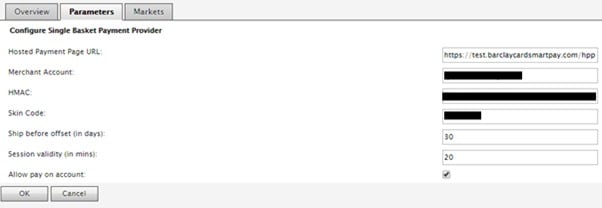
As per the shipping area you can also create custom properties that can be saved against the provider in the same way.
- Within the episerver commerce project under Apps -> Order -> Payment -> Plugins create a folder with the name of the shipping provider without any suffixes. Such as SingleBasket for the example above
- As a user control to the folder that inherits UserControl, IGatewayControl
- Implement the methods for loading an saving the data for this control.
The most important class in the above code is the payment gateway, this needs to implement a method with the following signature.
public PaymentProcessingResult ProcessPayment(IOrderGroup orderGroup, IPayment payment)
{
}
This class handles all of the payment configuration and the saving of any custom data. This could include interactions with 3rd party payment providers if processing in house or could simple be about setting up the correct data and marking the order as complete.
For more information configuring a provider such as Paypal read here https://world.episerver.com/documentation/developer-guides/commerce/payments/Payment-providers/paypal-installation-and-configuration/
For more examples of implementation of gateways the core Episerver ones are on Github here https://github.com/episerver/CommercePaymentGateways and will work with Quicksilver.
Developer Tip: Make sure when creating your ICart instance when working with a basket to explicitly set your payment provider object to your own instance.
Tax
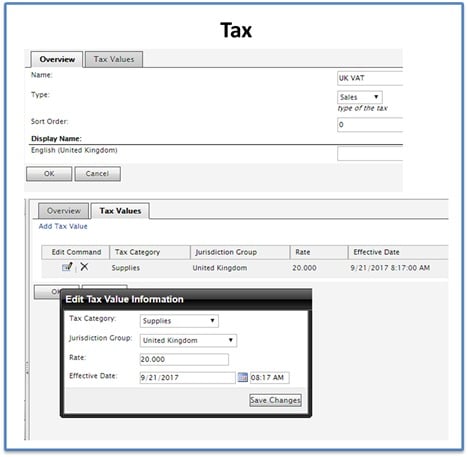
Episerver commerce comes with some standard in build tax calculators. These tax calculators are called by the cart and purchase order code when working with them automatically and handle all of the calculation of the tax.
Out of the box commerce comes with the ability to define sales and shipping taxes which are broken down in to jurisdictions and jurisdiction groups. This allows taxes to be broken down by regional location.

When calculating Tax, you may need to override the calculations if you want to implement a specific rounding mechanism or in our case if you want to handle different types of product differently. For the recent project we built we need to sell courses and products, which required tax to be calculated different depending on the line item.
To implement your own provider you must create a class that implements the ITaxCalculator interface in the EPiServer.Commerce.Order namespace and register it in DI as your tax calculator. This will allow the standard out of the box order processing code in Episerver commerce to handle the orders using the custom calculator.
namespace EPiServer.Commerce.Order
{
  /// <summary>Tax calculator calculates tax totals</summary>
  /// <example>
  /// <code source="../CodeSamples/EPiServer.Commerce/Orders/TaxCalculatorSample.cs" region="TaxCalculatorSample" lang="cs" />
  /// <code source="../CodeSamples/EPiServer.Commerce/Orders/TaxCalculatorSample.cs" region="TaxCalculatorOverridingDefault" lang="cs" />
  /// </example>
  public interface ITaxCalculator
  {
    /// <summary>Gets the shipping tax total.</summary>
    /// <param name="shipment">The shipment.</param>
    /// <param name="market">The market to be used in the calculation.</param>
    /// <param name="currency">The currency to be used in the calculations</param>
    /// <example>
    /// <code source="../CodeSamples/EPiServer.Commerce/Orders/OrderCalculatorsSample.cs" region="GetShippingTaxTotalForShipment" lang="cs" />
    /// </example>
    /// <returns>The shipping tax amount for the shipment</returns>
    Money GetShippingTaxTotal(IShipment shipment, IMarket market, Currency currency);

    /// <summary>Gets the tax total.</summary>
    /// <param name="orderGroup">The order group.</param>
    /// <param name="market">The market to be used in the calculation.</param>
    /// <param name="currency">The currency to be used in the calculations</param>
    /// <example>
    /// <code source="../CodeSamples/EPiServer.Commerce/Orders/OrderCalculatorsSample.cs" region="GetTaxTotalForOrderGroup" lang="cs" />
    /// </example>
    /// <returns>The total tax amount for the order</returns>
    Money GetTaxTotal(IOrderGroup orderGroup, IMarket market, Currency currency);

    /// <summary>Gets the tax total for the order form.</summary>
    /// <param name="orderForm">The order form.</param>
    /// <param name="market">The market to be used in the calculation.</param>
    /// <param name="currency">The currency to be used in the calculations</param>
    /// <example>
    /// <code source="../CodeSamples/EPiServer.Commerce/Orders/OrderCalculatorsSample.cs" region="GetTaxTotalForOrderForm" lang="cs" />
    /// </example>
    /// <returns>The total tax amount for the order form</returns>
    Money GetTaxTotal(IOrderForm orderForm, IMarket market, Currency currency);

    /// <summary>
    /// Gets the tax total for a return shipment that contains <see cref="T:EPiServer.Commerce.Order.IReturnLineItem" />.
    /// </summary>
    /// <param name="shipment">The return shipment.</param>
    /// <param name="market">The market to be used in the calculation.</param>
    /// <param name="currency">The currency to be used in the calculations.</param>
    /// <returns>The shipping tax amount for the return shipment.</returns>
    Money GetShippingReturnTaxTotal(IShipment shipment, IMarket market, Currency currency);

    /// <summary>
    /// Gets the tax total for an <see cref="T:EPiServer.Commerce.Order.IReturnOrderForm" />.
    /// </summary>
    /// <param name="returnOrderForm">The return order form.</param>
    /// <param name="market">The market to be used in the calculation.</param>
    /// <param name="currency">The currency to be used in the calculations.</param>
    /// <returns>The total tax amount for the return order form.</returns>
    Money GetReturnTaxTotal(
      IReturnOrderForm returnOrderForm,
      IMarket market,
      Currency currency);
  }
}
Essentially these methods are fairly simple and are for returning back a money object for tax/shipping. Therefore, all that is required is to process the order group and lineitems and handle the tax however way you want.
Orders
Out of the box carts are managed using the serializable cart system and purchase orders are still saved using the old system of dynamic tables based around meta fields.
The order management area allows you to view all of these areas to find carts and purchase orders.
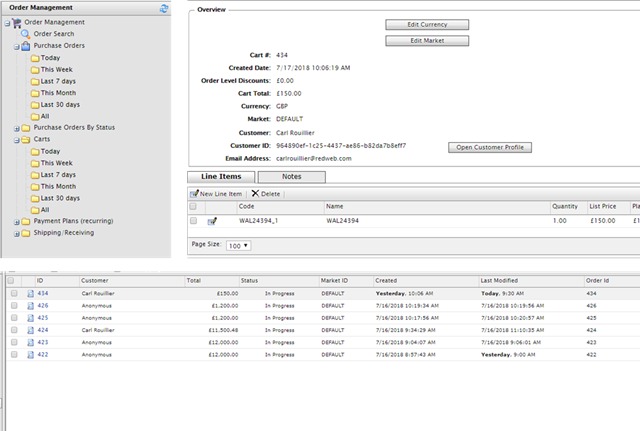
- Lots of views/reports that provide complex data and views of the carts and purchase order. Allows editing and conversion of cart to purchase order using the interface.
- Functionary often a little hidden / hard to find. There’s often links and icons next to the links which offer different functionality/ screens.
- Difficult to customize easily.
- Migrating to the CSR
Conclusion
There are lots of great out of the box features in commerce manager and although the UI is a little clunky it’s great just how many features can be extended and overridden with custom code easily.
In the next part I’ll be covering my top developer tips for working with these sections.
Comments