Don't miss out Virtual Happy Hour this Friday (April 26).
Try our conversational search powered by Generative AI!
AI OnAI Off
Don't miss out Virtual Happy Hour this Friday (April 26).
This document describes how to develop your own add-ons as well as how add-ons are handled on the site. The add-ons feature is shipped with EPiServer Framework to be used from EPiServer Online Center by site administrators.
An add-on can contain components that extend the functionality of the EPiServer website, like initializable modules, gadgets, visitor group criteria, virtual path providers, page and search providers, various plug-ins like dynamic content, GUI plug-ins, scheduled jobs and so on. Add-ons are deployed as Shell modules.
A lot of the power in the EPiServer platform lies in the pluggability – and therefore the many plug-ins and extensions to the platform. The add-ons system makes for an easy way to install ready-to-use extensions to the system, which makes it possible both for EPiServer and third parties to create add-on packages that extend and improve the functionality independently of full product releases.
The add-on feature works as follows:
For instructions on how to work with packages and upgrades, see the administrator section of the EPiServer CMS User Documentation (web help).
Consider the following when developing an add-on:
An add-on package is a NuGet package containing all add-on resources and assemblies, see NuGet Docs.
Download the nuget.exe command line tool at NuGet Codeplex.
It is possible to create package from assembly, project or convention-based working directory. Please refer to NuGet Docs for more details.
Run the following command to create a NuGet manifest (nuspec) file for your add-on package:
Edit the nuspec file you just have created and specify the information appropriate for your add-on package.
If you are going to create your package from project, you can use replacement tokens for add-on package ID, version, author and description. The following nuspec file example is for the Google Maps add-on:
<?xml version="1.0"?>
<package xmlns="http://schemas.microsoft.com/packaging/2010/07/nuspec.xsd">
    <metadata>
    <id>$id$</id>
    <version>$version$</version>
    <title>Google Maps dynamic content</title>
    <authors>$author$</authors>
    <owners />
    <iconUrl>http://world.episerver.com/PageFiles/3/Icons/Nuget.png</iconUrl>
    <requireLicenseAcceptance>false</requireLicenseAcceptance>
    <description>Allows to add Google Maps as dynamic content on pages.</description>
    <tags>EPiServerPublicModulePackage Google Maps Dynamic</tags>
    <dependencies>
        <dependency id="EPiServer.Samples.SampleFoundation" version="1.2" />
        <dependency id="EPiServer" version="7.0" />
    </dependencies>
    </metadata>
</package>The difference between public and protected add-ons is in the user access rights required to access the add-on files/routes.
Protected add-on files/routes, can be accessed only by the authorized users within WebEditors or WebAdmins roles by default. Always consider to make your add-on protected, since it is a more secure approach.
Public add-on files/routes can be accessed by any site user including anonymous users. You should make your add-on public if it provides content for the site’s visitors, for example: page templates, dynamic content rendering controls, public MVC views or client resources. If the size of the public content is relatively small, you can consider including it as an embedded resource in one of the add-ons binaries and make the add-on protected instead.
Public and protected add-ons have the following file locations and virtual paths:
If your add-on requires other add-ons to be installed on the site, you can add these other add-ons to the list of dependencies in the nuspec file. Doing so will ensure that if these other add-ons are not already installed when a user chooses to install yours, the other add-ons will also be installed if possible. If the other add-ons are not possible to install into the environment the installation will abort.
Add-on packages must follow the Semantic Versioning (SemVer) scheme for versioning for the package itself so that there is a common understanding of which versions will be compatible and which can introduce breaking changes.
In short, SemVer means having version numbers in the format Major.Minor.Patch, where the different segments correspond to: Major: Breaking changes. Minor: New features, but backwards compatible. Patch: Backwards compatible bug fixes only.
With these rules in place it is easy to predict which versions are going to be compatible.
If we for example require the feature set from version 1.3 of a dependency we can simply set "[1.3,2)" as the version range. This will accept all versions that are known to be compatible. When version 2.0 is released it may or may not turn out to be compatible for our purposes. If it is compatible, the version range can be changed to "[1.3,3)" in the next update. Otherwise the version range, once our codebase has been changed to run with version 2.0 of this dependency, will be changed to something like "[2.0,3)".
For more information about version ranges in NuGet, see NuGet Docs.
Prerequisites are dependencies to installed products that are not installed as actual add-on packages. These dependencies serve to limit the possibility to install packages that require specific products to ensure compatibility. For this purpose, assemblies installed in the application are represented in the NuGet environment as virtual packages that one can add dependencies to. The names and version numbers of these packages are based on the assembly names and assembly versions.
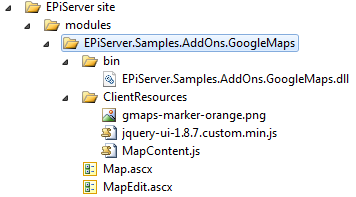
Package directory structure should follow NuGet conventions.
All assemblies should be located in the package lib folder. During add-on installation assemblies are deployed to the site probing path folder and to the bin subfolder of corresponding module directory. For public add-ons it is typically ~/modules/<package ID>/bin/ folder.
All other package files like Web Forms pages and controls, MVC views, client scripts, CSS files and other resources should be located in content directory. These files are copied to package module directory during installation. For public add-ons it is typically ~/modules/<package ID>/ folder.
Add-ons can support several .NET Framework runtime versions. For more information about how to add assemblies compiled for different runtime version to folder, see NuGet Docs.
There is a known issue when installing add-on packages that are built for .NET Framework 4.5 and contain assemblies in subfolders specific to .NET 4.5, like net45 or 45. Assemblies in these subfolders are skipped as incompatible because current .NET version is detected as 4.0 for all websites that run both .NET Framework 4.0 and .NET Framework 4.5.
The reason is that the Add-on system uses assembly version to detect the current .NET Framework. The version of .NET Framework 4.5 assemblies is still 4.0.0.0 since .NET 4.5 is an in-place update for .NET 4.0.
There are 2 options to avoid this issue:
Add-on resource assemblies should be located inside lib folder of your package. By default NuGet does not add resource assemblies to folder, you can include it explicitly for each supported runtime version in nuspec file:
<?xml version="1.0"?>
<package xmlns="http://schemas.microsoft.com/packaging/2010/07/nuspec.xsd">
  <files>
    <file src="bin\**\*.resources.dll" target="lib\net40\" />
  </files>
</package>Once you have prepared NuGet manifest (nuspec) file, you can create the add-on package. If you are going to create package from Visual Studio project, run the following:
Please refer to NuGet Docs for information how to make sure that package is created from Release build configuration.
Alternatively if you have prepared a NuGet manifest (nuspec) file and convention based directory structure for the actual package contents, you can create the package as follows:
Another option is to use the NuGet Package Explorer GUI tool to view metadata and create new packages.
Below shows an example of the Sample Google Maps add-on package opened in NuGet Package Explorer.

As an add-on developer you can execute a custom code at the following extension points, when certain actions are performed for your add-on:
If your add-on just requires to execute some custom code on every web application start up and does not require to be notified about installation, update or delete – please consider to use IInitializableModule.
In order to get custom code executed when the status of the add-on package changes it should include a class inherited from the abstract class EPiServer.Packaging.PackageInitializer in EPiServer.Packaging assembly:
public abstract class PackageInitializer : IInitializableModule, IPackageNotification
{
        #region Implementation of IInitializableModule

        public virtual void ConfigureContainer(ServiceConfigurationContext context);
        public virtual void Initialize(InitializationEngine context);
        public virtual void Uninitialize(InitializationEngine context);
        public virtual void Preload(string[] parameters);

        #endregion

        #region Implementation of IPackageNotification

        public abstract void AfterInstall();
        public abstract void AfterUpdate();
        public abstract void BeforeUninstall();

        #endregion
}
The PackageInitializer class combines the IInitializableModule and IPackageNotification interfaces. Inheritors of this class are instantiated and executed by the EPiServer Framework initialization system in the same manner as regular IInitializableModule.
The Initialize method in PackageInitializer checks if the add-on (package id) containing the assembly with the inheriting class is newly installed and calls the AfterInstall method as necessary or if the add-on is newly updated and calls AfterUpdate as necessary.
When overriding the Initialize method you should call the base implementation before proceeding with initialization to ensure that AfterInstall and AfterUpdate methods are executed before initialization.
The BeforeUninstall method is called before the package contents are removed when the user clicks the Uninstall button in the add-on management system.
Contains the code to be executed after the add-on installation is complete. This method is called only the first time the application starts after add-on installation, as opposed to the Initialize method which is called each time the application starts.
To get custom code executed after add-on installation you need to do the following:
The process of add-on installation and point in a lifecycle where the AfterInstall method is called:
Code executed after the add-on update is complete. This method is called only the first time the application starts after updating an add-on.
To execute a custom code after add-on update you need to do the following:
The process of add-on update and point in a lifecycle where the AfterUpdate method is called:
This method is executed immediately after the user clicks the Uninstall button in the add-on management user interface but before the actual uninstallation happens. If an exception is thrown in the BeforeUninstall method uninstallation will be aborted.
To execute a custom code before add-on unistallation you need to do the following:
The process of add-on uninstallation:
If an add-on is dependent on other systems or add-ons it needs to indicate these dependencies using ModuleDependency attributes. This way the initialization methods will be called after those of all of the listed dependencies.
EPiServer add-ons are installed from the site’s web interface, which enables add-on management without having direct access to the server machine.
EPiServer Framework is using NuGet for handling add-ons and as a standard package format. To install add-on packages, the user needs to be a member in the PackagingAdmins user group and to have access to protected EPiServer UI path.
Go to EPiServer OnlineCenter > Go to EPiServer OnlineCenter > add-ons > Gallery tab. Here you can select any available add-on to install on the website.
The system will validate the package, try to resolve package dependents and dependencies and install it on the site if it is possible.
Go to EPiServer OnlineCenter > add-ons > Upload tab. Here you can select one or more package files to upload anThe installation process goes through the following steps:
Once a package has been installed to the repository it can be instantiated to any number of applications.
Uploaded files and selected add-ons are validated. That should be valid NuGet packages marked with proper module tag: EPiServerModulePackage or EPiServerPublicModulePackage.
The new uploaded packages are added to a temporary repository, by default located in the temporary directory designated by the operating system. If you want to use a different directory for this purpose, you can change the value of the packagesTemporaryFolder attribute in the episerver.packaging element:
<episerver.packaging packagesTemporaryFolder="...">The temporary repository is used in conjunction with the virtual packages representing assemblies available on the site as well as the local repository to ensure that all dependencies can be resolved before installation. Provided that dependencies can be resolved from the package source repositories, the packages are installed to the current site.
The package source repositories are the following:
You can also add additional repositories in the configuration, as shown in the following example:
<episerver.packaging>
  <packageRepositories>
     <add name="Gallery" url="C:\Your\Packages\Folder" />
  </packageRepositories>
</episerver.packaging>
All installed add-ons are registered in the packages.xml file in the site root. The system copies all supported files to the corresponding add-on folder in the ~/modules/ directory.
See information about the episerver.packaging element in this SDK documentation.
Successfully installed packages are added to the site local repository. The default repository is located in site VPP directory C:\EPiServer\VPP\<SiteName>\ModulesRepository. This directory is automatically set up with the correct access rights when EPiServer Framework is installed via EPiServer Deployment Center.
If you want you can configure a site to use a repository at another location by changing the value of the repositoryPath attribute on the episerver.packaging element:
Make sure that web application has write access right for that directory.
Add-on assemblies compatible with the current framework version are copied to the probing path directory. The probing path default directory is the modulesbin directory in the site root.
The probing path directory must be under the site root and can be defined in the probingPath attribute in the configuration/episerver.framework/scanAssembly element. The same path should be configured in the privatePath attribute of probing element as well:
| File | Configuration |
|---|---|
| EPiServerFramework.config |
|
| Web.config |
|
After installation of the selected add-on packages the user can see the results of the installation for each package and is informed that they need to restart the site if it was not restarted automatically by ASP.NET.
Installed add-ons that have updates available are displayed in EPiServer OnlineCenter > Add-ons > Updates tab. Here you can update installed add-ons.
When upgrading an add-on the old version will be uninstalled and the new version installed. Any related add-ons (dependencies as well as dependents) that need to be upgraded will also be upgraded.
The process for updating installed add-ons works much the same as for the regular installation and uninstallation. For detailed information see the installation and uninstallation sections.
Installed add-ons are displayed in EPiServer OnlineCenter > Add-ons > Installed tab. Here you can uninstall add-ons.
An exception to the possibility to uninstall add-ons are system addons (for example, the add-on management system itself). These add-ons cannot be uninstalled, only upgraded.
During uninstallation add-on files and corresponding Shell module folder are removed and assemblies are deleted from the probing path directory.
Last updated: Mar 21, 2013