Configuring TinyMCE
Introduction
This document describes the changes for the upgraded version of the TinyMCE editor for EPiServer CMS.
Changes Between EPiServer CMS 6 R2 and EPiServer CMS 7
TinyMCE upgraded
In EPiServer CMS 7 the TinyMCE editor is upgraded from version 3.3.6 to X.X.X. Some major changes in the new version are:
- New text formatting engine.
- Table plug-in now includes cell selection logic.
- Advanced list plug-in (enables the user to define list type of list elements).
- New paste plug-in logic that enables the user to retain style information from Microsoft Office.
- The content inside the editor now renders in standards mode by default.
- Performance enhancements.
- The Safari plug-in is removed since the logic is replaced by the new text formatting engine.
- Numerous bug fixes.
CSS Handling
The upgrade to 3.3 version in conjunction with a new CSS parser in EPiServer.Framework made it possible to enhance the logic for populating Styles (CSS) drop downs in TinyMCE. See the EPiServer CSS Attributes section below for more details.
Format drop-down removed
Since the above CSS handling provides a way to make the Styles drop-down behave like the Format drop-down, and many users might be confused by the difference between the two, the Format drop down is no longer added in default configuration. It is still possible to add and make use of the Format drop-down and if you have an upgraded site and have customized the TinyMCE settings the drop-down might still be there.
New Window Manager Plug-In
In the earlier version of EPiServer CMS 6 some of the EPiServer dialogs where opened as modal dialogs (using EPiServer dialog functionality) but all dialogs built in to TinyMCE where opened as non-modal. This allowed the user to open several of the same kind and possibly causing errors. Now all dialogs are opened using the EPiServer dialog functionality creating a more consistent user experience.
Image Editor Plug-In
The new image editor plug-in makes it possible to open the image editor to edit an image directly from the TinyMCE editor. The plug-in is activated by default but may not be available if you have an upgraded site and have customized the TinyMCE settings for the current editor. The image editor contains tools for cropping, resizing and transforming images, the modified image can then be saved as a new image or replace the original image. Configuration settings, including size presets for the resize tool, can be found in the document <imageEditor> element in the Configuring <episerver> Section.
Configuration of CSS Files Used in TinyMCE
Like the EPiServer CMS 5 editor the TinyMCE editor in EPiServer CMS 6 reads in external CSS files and there are three ways to configure which CSS files TinyMCE should use. Listed in the order of importance these are:
- Content CSS path in settings of PropertyXHTMLStringControl.
- Dynamic property on page UIEditorCSSPaths (could be inherited from parent page).
- Site settings attribute uiEditorCssPaths.
All configuration settings accept a comma separated list of URLs to CSS files where each URL starts with / or ~.
The latter two are the same as in EPiServer CMS 5 and in EPiServer CMS 6 these are shared with the old editor, this means that if you are using both the old editor (CMS 5) and new TinyMCE editor, they both read in the same CSS files (if using site settings configuration or using/reading from the same dynamic property).
The first option, setting Content CSS path in PropertyXHTMLStringControl, provides the possibility to specify different CSS files for different editors in the same page as well as specifying global settings. This is also a way to avoid conflicts when using both the old editor and the TinyMCE editor on the same website.
EPiServer CSS Attributes
You can use EPiServer CMS specific attributes to your CSS files to define which styles should be available in the editor’s Styles and how element specific classes should be handled.
EditMenuName and EditMenuTitle Attributes
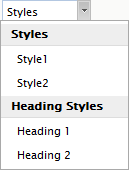
The styles in the CSS file will appear in the Styles tool in the order they are defined in the CSS file. When an EditMenuTitle attribute is discovered, a new heading will be added in the drop-down. All subseqent styles marked with the EditMenuName will added under the latest discovered heading until a new EditMenuTitle attribute is found. If the CSS used by the editor it looks as shown in the following example:
.style1
        {
           EditMenuName: Style1;
        }
        .style2
        {
           EditMenuName: Style2;
        }
        h1
        {
           EditMenuTitle: Heading Styles;
           EditMenuName: Heading 1;
        }
        h2
        {
           EditMenuName: Heading 2;
        }
The resulting drop-down in the Styles tool will look like this:
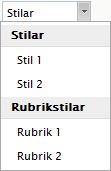
You can localize the values of your EditMenuName and EditMenuTitle attributes by adding translations to an XML file in the lang folder. Create a new element at language_root/editorstyleoptions and add the translation strings as children of the new element. Whitespaces in EditMenuName and EditMenuTitle values should be replaced by underscore characters. Example for the CSS above:
<language name="svenska" id="sv">
<editorstyleoptions>
   <style1>Stil 1</style1>
   <style2>Stil 2</style2>
   <heading_styles>Rubrikstilar</heading_styles>
   <heading_1>Rubrik 1</heading_1>
   <heading_2>Rubrik 2</heading_2>
</editorstyleoptions>
...
 </language>
The resulting drop-down when the editor has selected the Swedish style sheet:
ChangeElementType Attribute
The standard behaviour when applying element specific classes (like p.myClass) is that they can only be applied to elements that already are of the correct type. In other words, nothing will happen if you try to apply p.myClass to a h1 element. By using the ChangeElementType attribute you have the option to apply the class and change the element type in one action.
Example:
h2.italic
{
   ChangeElementType: true;
   EditMenuName: Heading 2 Italic;
   font-style: italic;
}
Enabling the TinyMCE XHTML Editor for Non-authenticated Users
When installing an EPiServer CMS 6 site the XHTML editor cannot be used on template pages unless the current user is logged in and has access to the EPiServer user interface. The reason for this is that the editor is reliant on resources located in EPiServer Shell, which reside under the configurable “secret” path and are not publicly available in the default configuration.
To make these resources available publicly a few configuration changes need to be carried out, see below:
- Configure the EPiServer Shell module to deliver its client resources in a publicly available location on the site.
In the web.config file locate the module named Shell in the episerver.shell/protectedModules configuration section and configure the clientResourcePath attribute:
<protectedModules rootPath=" ... ">
<add name="Shell" clientResourcePath="~/public/Shell/" />
<add name="CMS" />
</protectedModules>
- Map EPiServer Shell client resources to this location with a virtual path configuration directive.
Locate the /configuration/episerver.framework/virtualPathProviders section in EPiServerFramework.config. There you will find a virtual path mapping named EPiServerShell that maps the episerver framework UI files into the application. This typically looks like the directive below:
<add virtualPath="~/EPiServer/Shell"
physicalPath="C:\Program Files\EPiServer\Framework\<version>\Application\UI"
name="EPiServerShell"
type="EPiServer.Web.Hosting.VirtualPathNonUnifiedProvider, EPiServer.Framework" />
Add a similar directive that exposes the clientresources folder publically, which should look similar to the one below:
<add virtualPath="~/public/Shell/ClientResources"
physicalPath="C:\Program Files\EPiServer\Framework\<version>\Application\UI\ClientResources"
name="EPiServerShell"
type="EPiServer.Web.Hosting.VirtualPathNonUnifiedProvider, EPiServer.Framework" />
- Add a location directive for the public location, required to register the static file handler for the public location. The static file handler must be registered for the resource files mapped with the virtual path provider to be delivered to the client.
<location path="public">
<system.webServer>
<handlers>
<clear />
<add name="webresources" path="WebResource.axd" verb="GET" type="System.Web.Handlers.AssemblyResourceLoader" />
<add name="PageHandlerFactory-Integrated" path="*.aspx" verb="GET,HEAD,POST,DEBUG" type="System.Web.UI.PageHandlerFactory" modules="ManagedPipelineHandler" scriptProcessor="" resourceType="Unspecified" requireAccess="Script" allowPathInfo="false" preCondition="integratedMode" responseBufferLimit="4194304" />
<add name="wildcard" path="*" verb="*" type="EPiServer.Web.StaticFileHandler, EPiServer.Framework" />
</handlers>
</system.webServer>
See Also
- Refer to Configuration Overview for an introduction to the EPiServer CMS configuration files.
- Refer to Configuration Syntax for a description of the syntax used when explaining the various configuration elements.
Last updated: Mar 25, 2013