Try our conversational search powered by Generative AI!
AI OnAI Off
| Views: | 24020 |
| Number of votes: | 2 |
| Average rating: |
This article describes the workroom functionality of the EPiServer CMS 5 R2 SP1 demo templates. Some basic functions that have been enhanced in this release, are described both in terms of usage as well as from a set up and customization point.
The workroom overview displays the available workroom functions in the left column, and an information area in the middle.
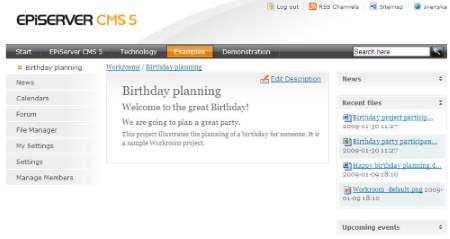
The right column shows the latest news, recently uploaded files and upcoming events. These sections are expanded by clicking on each title.
The workroom templates have a Rich Text Editor making it possible to do simple content formatting from EPiServer CMS View Mode.
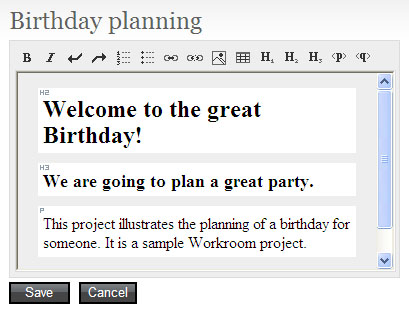
The Rich Text Editor implemented here is WYMeditor, find out more about WYMeditor.
WYMeditor is wrapped in a custom web control in the demo templates module.
Example:
<%@ Register TagPrefix="wym" Namespace="EPiServer.Templates.Demo.RichTextEditor" Assembly="EPiServer.Templates.Demo" %>
…
<wym:RichTextEditor runat="server" ID="Body" Simplified="True" JQueryScriptUrl="~/templates/demo/scripts/jquery/jquery.js" WYMEditorScriptUrl="~/templates/demo/scripts/wymeditor/jquery.wymeditor.pack.js" SubmitButtonID="ReplyButton" />
…
<asp:Button runat="server" Text="Reply" CssClass="button" ID="ReplyButton" OnClick="Reply_Click" ValidationGroup="reply" />
The Rich Text Editor controls the following properties:
The list of safe HTML tags is defined in uiSafeHtmlTags attribute of the episerver/sites/site/siteSettings in the web.config file.
Members of a workroom can be invited through the sending of an invitation e-mail. This is done by the workroom administrator from the "Manage Members" page.
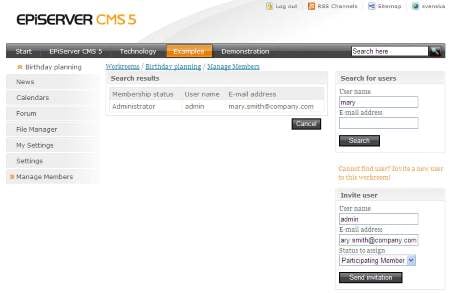
Members are added by clicking the "Add members" buttons. You can either search for a user that is already registered on the Web site, or add an external member that is not registered as a user on the Web site.
There are two types of e-mails, invitation and notification. If the invited members is not a registered user, an invitation e-mail will be sent. If the invited member is already a registered user, a notification e-mail will be sent instead.
When adding an external member, the workroom administrator will enter a user name and an e-mail address , and set the level of membership (Read-Only, Participating or Administrator). Pressing the "Send Invitation" button will send the e-mail invitation or notification.
NOTE: You must use a writeable membership provider in order to be able to add existing Web site users as workroom members, and set their level of membership.
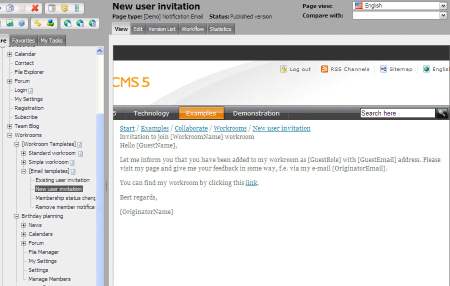
The demo template package contains two invitation e-mail templates with body and subject areas which can easily be modified. You will find one template for the invitation e-mail (New user invitation), and one for the notification e-mail (Existing user invitation). These are accessible from the EPiServer CMS 5 Edit Mode under Start->Examples->Collaborate->Workrooms->[Workroom templates]->[Email templates].
The path and page names for the notification and invitation e-mail are important since these are used in the workroom functionality. If you add a new page for an e-mail template, you will need to find and change the appropriate sources using this page name.
Each e-mail template page contains two properties: MailSubject and MailBody. MailSubject contains a subject text and MailBody contains a body text for the e-mail.
You can customize the subject and/or body texts by using words formatted in a specific way. You will need to create a special class inherited from EPiServer.Templates.Demo.Workroom.Core.Email.EmailVariableSet, and add public properties to the new class. The property values can then be used in texts using the special format: [PropertyName]. For example: Dear [GuestName]!.
When the email is generated this string will be converted to something like: Dear John Smith!. The property GuestName is set in the present implementation of EPiServer.Templates.Demo.Workroom.Core.Email.EmailVariableSet class. Also, you need to change the source in workroom sources and change the use of EPiServer.Templates.Demo.Workroom.Core.Email.EmailVariableSet to a new class.
The User Profile page is based on the usual EPiServer CMS user profile management. For workrooms, the User Profile page is used when inviting internal and external users (existing or not existing in EPiServer CMS), to create necessary user information for workroom membership.
This page appears in three cases:
Both types of workrooms have a My Settings section. The functionality here is exactly the same as for the My Settings page in the demo template package.
The workroom file manager has an updated layout, making it easier to work with folders and files, and version management functionality has been added. You can check in/out of files in the file manager, and you can view the version history for each file.
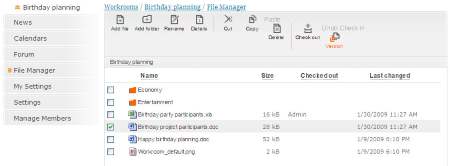
Just as in the EPiServer CMS file manager, a workroom user can check a file out for editing, and check the file back in again. A check out can also be cancelled. The check out status for file is displayed together with the name of the user who has performed the checkout. When the file is checked in again, a new version must be pointed out, and check in comments can be added.
NOTE: Any user with administration rights can check out or cancel a check out, as well as delete a file that was previously checked out by another user.
A workroom user can view the version history of a selected file by clicking on the ”Version” button, the version list will then be displayed for the selected file. A user can also delete specific versions if there are more than one version. A version can be recovered if it is not the latest version of the file.
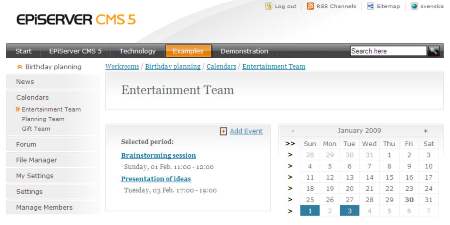
For each workroom you can create multiple calendars, this way you can group calendar events into different subjects such as meetings, events etc. The selection of calendar event date has also been simplified with improved layout. The latest calendar events will be listed on the workroom start page.
The root calendars section template CalendarList.aspx and page type [Demo] Workroom Calendar root are created. The calendar pages (Calendar.aspx template ‘[Demo] Workroom Calendar’ page type) are created as subpages to the CalendarList.aspx. A calendar section can be created from the CalendarList.aspx page by clicking the "Add" button. The Calendar.aspx page contains controls to edit the calendar section name, as well as the delete calendar section button.
Just as for calendars, it is possible in each workroom to create multiple news sections or "newsrooms", in order to group news items into different subjects. The latest news items will be listed on the workroom start page.
The root news sections template NewsRoot.aspx and page type [Demo] Workroom news root are created. The news list pages (NewsListPage.aspx template, [Demo] Workroom news list page type) are created as subpages to the NewsRoot.aspx. A news room can be created from the NewsRoot.aspx page by clicking the "Add" button. The NewsListPage.aspx page contains controls to edit the news room name, as well as the delete news room button.
Forum functionality has been added to the standard workroom type. The functionality is the same as for the demo template forums.
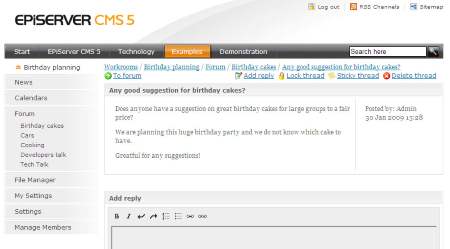
Sub-forums can be created, and forums and sub-forums of the first level will be displayed in the left menu of the workroom.
EP CMS 5 R2 SP1 Demo Templates - Release Notes
EP CMS 5 R2 SP1 Demo Templates Installation Instructions
System Requirements - EPiServer CMS 5 R2 SP1
