PayPal Express Checkout Payment Module - Installation and User Guide
|
Product version: |
EPiServer Commerce 1.0 SP1 |
|---|---|
|
Document last saved: |
Introduction
This document describes how to install and use the PayPal Express Checkout Payment Module. The module is available for EPiServer Commerce 1.0 SP1, and integrates the PayPal checkout payment provider for EPiServer Commerce.
- To upgrade from EPiServer Commerce 1.0 to 1.0 SP1, please see the upgrading instructions.
- Download the PayPal Express Checkout module
Table of Contents
Files in the PayPal Express Checkout Payment Project
The following files are included in the project package:
- PayPal_EN.xml
- Paypal_base.dll
- CanadianOrUSstates.txt
- ISOCodes.txt
- ConfigurePayment.ascx
- ConfigurePayment.ascx.cs
- ConfigurePayment.ascx.designer.cs
- PaymentMethod.ascx
- PaymentMethod.ascx.cs
- PaymentMethod.ascx.designer.cs
- PayPay.aspx
- PayPay.aspx.cs
- PayPay.aspx.designer.cs
- CartViewModule.ascx.cs
- CheckoutThankyouModule.ascx
- CheckoutThankyouModule.ascx.cs
- CheckoutThankyouModule.ascx.designer.cs
- CheckoutWizardModule.ascx.cs
Deploying Files and Rebuilding the EPiServer Commerce Sample Project
Use this method to deploy and rebuild a site with the EPiServer Commerce sample templates.
- Deploy the PayPal_EN.xml to the “lang” folder of your website
- Deploy the Paypal_base.dll to the "bin" folder of your website and add a reference to it to your commerce sample project.
- Deploy the files ConfigurePayment.ascx, ConfigurePayment.ascx.cs, ConfigurePayment.ascx.designer.cs, PaymentMethod.ascx, PaymentMethod.ascx.cs, PaymentMethod.ascx.designer.cs, PayPay.aspx, PayPay.aspx.cs, PayPay.aspx.designer.cs, and PayPalPaymentGateway.cs to a folder "PayPal" under the root of your website. Then add the files to your commerce sample project.
- Deploy the file CartViewModule.ascx.cs to the folder “~/Templates/Commerce/Units/Placeable/” and overwrite the existing file.
- Deploy the files CheckoutThankyouModule.ascx, CheckoutThankyouModule.ascx.cs, CheckoutThankyouModule.ascx.designer.cs, CheckoutWizardModule.ascx.cs to the folder “~/Templates/Everything/BusinessControls/CheckoutControls/” and overwrite existing files.
- Rebuild your commerce sample project.
- Deploy the newly built EPiServer.Business.Commerce.Sample.dll file to the bin folder of your website, and deploy it to the bin folder of the Commerce Manager back-end site.
- Deploy ConfigurePayment.ascx to the "PayPal" folder under the plugins folder for payments, which is under the shared folder of the back-end site. Normally this folder will be “C:\Program Files\Mediachase\eCommerceFramework\Shared\Apps\Order\Payments\Plugins\PayPal”. Create the "PayPal" folder if it does not exist.
- Deploy the files PaymentMethod.ascx, ISOCodes.txt, CanadianOrUSstates.txt to the folder “~/Templates/Everything/BusinessControls/CheckoutControls/plugins/payment/PayPal” of your website, create the "PayPal" folder if it does not exist, but do not include them in the EPiServer Commerce sample project.
Deploying Files when Downloading PayPal Express as a Separate Package
Use this method if you download the PayPal Express Checkout Payment module as a separate package. If you downloaded the PayPal Express Checkout Payment module as a separate package, you can build the downloaded project into a separate DLL and deploy this DLL instead of the “EPiServer.Business.Commerce.Sample.dll”, to the bin folder of your website and to the bin folder of your back-end website.
- Deploy the file Paypal_base.dll to the "bin" folder of your commerce manager website.
- Deploy the file PayPal_EN.xml to the “lang” folder of your website.
- Deploy the file Paypal_base.dll to the "bin" folder of your website
- Deploy the file CartViewModule.ascx.cs to folder “~/Templates/Commerce/Units/Placeable/” and overwrite the existing file.
- Deploy the files CheckoutThankyouModule.ascx, CheckoutThankyouModule.ascx.cs, CheckoutThankyouModule.ascx.designer.cs, CheckoutWizardModule.ascx.cs to the folder “~/Templates/Everything/BusinessControls/CheckoutControls/” and overwrite existing files.
- Deploy the file ConfigurePayment.ascx to the "PayPal" folder under the "plugins" folder for payments, which is under the shared folder of the Commerce Manager back-end site. Normally this folder will be “C:\Program Files\Mediachase\eCommerceFramework\Shared\Apps\Order\Payments\Plugins\PayPal”. Create the "PayPal" folder if it does not exist.
- Deploy the files PaymentMethod.ascx, ISOCodes.txt, CanadianOrUSstates.txt to the folder “~/Templates/Everything/BusinessControls/CheckoutControls/plugins/payment/PayPal” of your website. Create the "PayPal" folder if it does not exist, but do not include them in the EPiServer Commerce sample project.
- Deploy the file PayPal.aspx to the folders “~/Templates/Commerce/Pages/”, but do not include them in EPiServer Commerce sample project.
Configuring the IPN Service for the Commerce Sample Project
This step is needed in order for the PayPal Express Payment module to work properly. When the buyer approves the payment with PayPal, the IPN service will update the status of the order. If “Authorization” payment action is selected, the order will change status from “New Order” to “Processing” if authorized properly.
If the payment is under review for risk or has some other pending hold reason from PayPal, it will change status to “Submitted”. If the “Sale” payment action is selected, the order will change to “Shipped” if the payment was successful. Otherwise it will change to “Submitted”. The IPN service uses log4net to log various messages from PayPal for administrators to be able to update the status of an order.
After deploying the project files according to either of the methods above, do the following to set up the IPN service:
- Create a page type for the IPN service, for example [Commerce] PayPal. This page type points to the PayPal.aspx template which you deployed to your website earlier. This page type does not need any property.
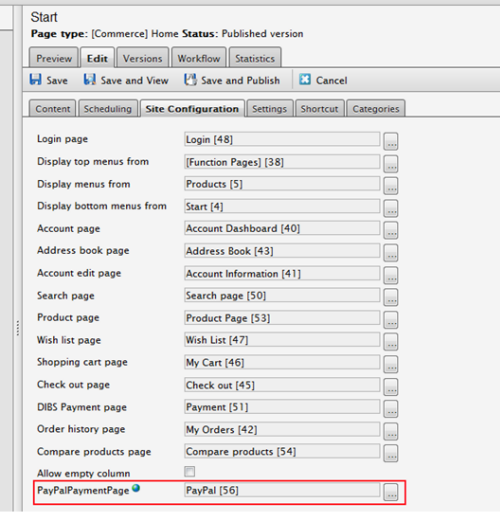
- Add a property named PayPalPaymentPage of type page to the Start page page type. Create an EPiServer CMS page from the PayPal page type, and edit the properties for the Start page. Set the page link of the created page to the value of the PayPalPaymentPage property.

Configuring PayPal in Commerce Manager
After deploying all necessary files, open the EPiServer Commerce Manager back-end site and do the following:
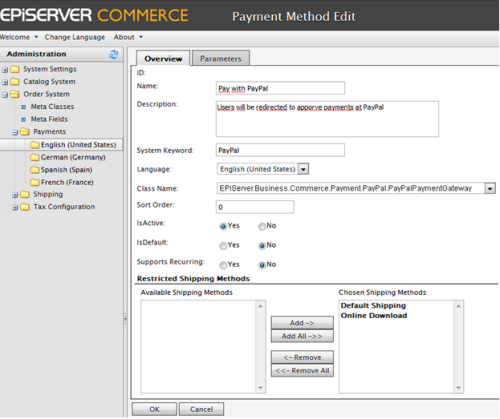
- Go to Administration/Order System/Payments/English (United States), the last option is the language in which you chose to make the PayPal payment to be available in.
- Select Create new payment method. The System keyword option must be “PayPal” (the name of the folder of created during deployment). Class name must be “EPiServer.Business.Commerce.Payment.PayPal.PayPalPaymentGateway”.

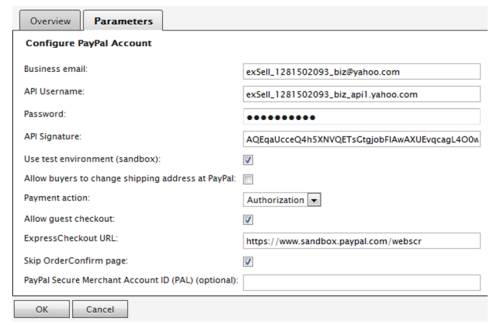
- When you click OK, the new payment method will be saved with a specific ID. Open the payment method for editing again, go to the Parameters tab and enter the following:
- Business email:
The main email that you registered with PayPal.
- API Username:
The API user name PayPal will give you when the use registers to use PayPal’s API calls.
- Password:
Your PayPal’s API user password.
- API Signature:
Your PayPal’s API signature.
- Use test environment (sandbox):
Specify here if this is a testing settings or not (sandbox environment or live environment).
- Allow buyers to change shipping address at PayPal:
Defines whether to allow buyers to change their shipping address when reviewing their PayPal payment.
- Payment action:
The payment action buyers will perform at PayPal. Default is Authorization where a payment is authorized only, not yet captured. With the Sale option, the payment will be immediately transferred from buyer’s account to merchant’s account.
- Allow guest checkout:
Allows buyers who doesn’t have a PayPal account to perform a payment. If allowed, buyers will see a billing page from which they can pay using a credit card without having to login to PayPal. If not allowed, the buyer will see a login page when redirected to PayPal.
- ExpressCheckout URL:
The URL to redirect a user to PayPal when the SetExpressCheckout API call is successful. NOTE this URL should change according to the Use test environment option.
- Skip Order Confirm page:
Lets buyers go directly to PayPal after selecting PayPal as payment method. Otherwise buyers will see an order confirmation page before being redirected to the PayPal. By default the buyers will not see the order confirmation page.
- PayPal Secure Merchant Account ID (PAL) (optional):
Used to create the dynamic PayPal mark image on the payment selection page. If nothing is entered here, an API call will be made to PayPal to get it.

The communication with PayPal uses a private hash key to ensure security in the communication. This private hash key will be used to cfreate secure hash keys, which appends to an accept URL and a cancel URL. The information about accept URL and cancel URL is sent to PayPal using HTTPS, so these keys will not be exposed.
When PayPal redirects a user to those URLs, the keys are used to verify that the request comes from PayPal only, since only PayPal knows about the keys. The user can configure this hash key in the application configuration section under “PayPalHashKey”.
Using the PayPal Express Payment Module
When you have deployed the files and configured the PayPal Express Payment Module on your EPiServer Commerce website, you should have the following option in your checkout procedure:
- Select PayPal payment method on the Payment Options page during check out.
- When you click the Place Order button on the order confirmation page, you will be redirected to PayPal to approve the payment.
- You can see the shipping and billing addresses entered during the checkout procedure, during which these addresses can be changed.
- When you have finalized the approval process, you will be redirected to the “Thank You” page of the EPiServer Commerce sample site.
