Installation Instructions – Episerver 7 CMO
Table of Contents
Introduction
This document describes a first time installation of the EPiServer platform and EPiServer CMO. EPiServer CMO is included with the CMS license. The EPiServer platform package is downloaded to the EPiServer Deployment Center, from where you can configure and install EPiServer CMO.
Prerequisites
The following prerequisites exist for EPiServer CMO:
-
Site templates should render required client resources. Otherwise you will have to update templates manually as it is described in this document to have CMO and Live Monitor injections on the pages. Please refer to the section "Managing Client Resources when working with EPiServer CMS" in EPiServer CMS SDK for more details about best practice when developing templates.
- Please see also Configuring Live Monitor for Websites with Multiple Bindings in the Developer Guide in the EPiServer CMS SDK.
Installing EPiServer 7 CMO
Step 1: Select Services
Campaign Monitor and Optimization Core containing the core files of the module (database, pages, logic etc) is mandatory and will be installed automatically.
- Select the optional services you want to install. All are selected by default.
- Campaign Monitor and Optimization UI is the user interface of the module. Optional, clear it if you do not want to provide CMO user interface (for example, a public site).
- Live Monitor integration is an option to integrate CMO with Live Monitor in order to be able to see real-time user activity for selected campaign. This option can't be installed without the Campaign Monitor and Optimization UI
- Statistics Handler is a HTTP web handler which is used to gather statistics. You can clear it if you want to install it manually afterwards.
- Aggregation Service is a windows system service which will be used to aggregate gathered statistics. You can clear it if you want to install it afterwards or just want to control all features on your operation system.
- Thumbnail Service is a windows service which will be used for creating thumbnail images of CMS pages. If not selected, no thumbnails will be generated. It can be installed manually on a separate server.
- Click Next.
Note! The aggregation service can write logs during the aggregation process. To activate this feature, you must grant permission to modify the aggregation service folder for the user who will run aggregation service (by default local service). See default installation folder in the "EPiServer CMO" configuration section in the Developer Guide of the EPiServer CMS SDK.
Step 2: Selecting Website
Select the EPiServer website in EPiServer Deployment Center on which you want to install EPiServer CMO and click Next.
Step 3: Defining Database Settings
Define the database settings in EPiServer CMO as follows:
- In Select SQL Server Instance, name the database instance. You have the following options:
- Select an existing database instance from the list, if you want it to contain the CMO database scheme, for example, using EPiServer in a web farm or load balanced hosting environment.
- Create a new database by typing the name, if you want to install EPiServer CMO separately.
- Select Windows Authentication or SQL Server Authentication for the database instance. Also type the login credentials.
- In Enter the name of the database... you have the following options to specify connection to the database server:
- Type the name of the new database you have created
- Select an existing database from the list
- Select Windows Authentication or SQL Server Authentication for the database. Also type the login credentials.
- Click Next.
Step 4: Setting up the EPiServer CMO User Interface
Set up the user interface of EPiServer CMO as follows:
- In Relative Path, type the relative path to the CMO folder.
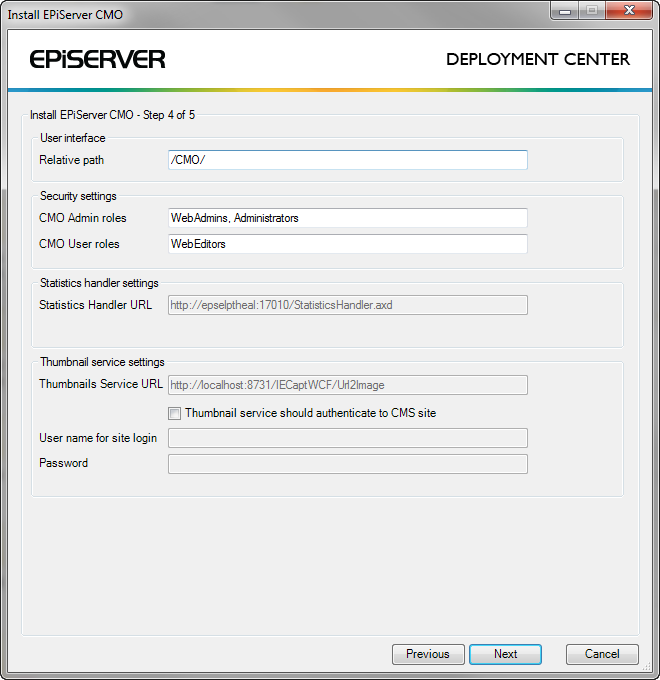
- In CMO Admin Roles, type which EPiServer CMS user groups (roles) can create, edit and delete campaigns and landing page optimization tests and edit CMO settings.
- In CMO User Roles, type which EPiServer CMS user groups (roles) can create, edit and delete campaigns and view landing page optimization tests.
- In Statistics Handler URL, type the URL to the HTTP web handler to be used to gather statistics if it is installed separately (this field is enabled if you have cleared the Statistics Handler feature in step 1, otherwise it will be filled with default value and disabled). You can click Test to check if the connection to the service works (the button is conditional, and will only show if you enter an URL manually).
- In Thumbnail Service URL is the URL to web-based service which will be used to create thumbnails of EPiServer CMS pages included in campaigns and/or landing pages optimization tests. You can click Test to check if the connection to the service is working (the button is conditional, and will only show if you enter a URL). Select Thumbnail service should authenticate to CMS site to create thumbnails of LPO test variations and other pages that are not visible for the anonymous user. Provide the name and password of the user with corresponding access rights in CMS. Also the user credentials can be specified later in CMO settings that you can find in this menu: CMO - Settings - Page Thumbnails.
- Click Next.
Step 5: Finishing Installation
Click Close to complete the installation.
A manual step is required if the site templates do not render required client resources for the default areas Header and Footer. You need to add special placeholders for the tracking scripts to the site's master page. One placeholder should be placed inside the <head> tag and another one before the closing </body> tag. If EPiServer CMO is installed on ASP.NET MVC site, use the following HTML helpers:
<%@ Master Language="C#" Inherits="System.Web.Mvc.ViewMasterPage" %>
<%@ Import Namespace="EPiServer.Framework.Web" %>
<%@ Import Namespace="EPiServer.Framework.Web.Mvc.Html" %>
<html>
<head runat="server">
    ...
    <%= Html.RequiredClientResources(RenderingTags.Header) %>
</head>
<body>
    ...

    <%= Html.RequiredClientResources(RenderingTags.Footer)%>
</body>
</html>
If EPiServer CMO is installed on ASP.NET Web Forms site, use the following WebControls:
<%@ Master Language="C#" AutoEventWireup="false" CodeBehind="Site.master.cs" Inherits="EPiServer.Templates.Alloy.Views.MasterPages.Site" %>
<html>
<head runat="server">
    ...
    <EPiServer:RequiredClientResources RenderingArea="Header" ID="RequiredResourcesHeader" runat="server" />
</head>
<body>
    ...

    <EPiServer:RequiredClientResources RenderingArea="Footer" ID="RequiredResourcesFooter" runat="server" />
</body>
</html>
See more details about client script handling in "Managing Client Resources" section in the Developer Guide of the EPiServer CMS SDK.
Deploying the CMS Website to the Production Environment
Change the website’s URL and the URLs to the Thumbnail Service and Statistics Handler will be immediately updated on the CMO Admin page.
Upgrading
For instructions on breaking changes and how to upgrade between versions, refer to the "Upgrading" section of the EPiServer CMS SDK.