
How to configure Alpine.js and Tailwind CSS with Optimizely
Why Tailwind CSS and Alpine.js
Let's start with a definition for those who haven't heard of these technologies yet:
- Tailwind CSS is a popular utility-first CSS framework that provides a set of predefined classes to quickly build responsive and customizable user interfaces.
- Alpine.js is a lightweight (14.1kB) JavaScript framework that focuses on providing a declarative syntax for building interactive web interfaces.
When we create an online store we usually don't need much logic for generic pages where we display the blocks themselves. In this case using frameworks like Vue.js or React is unnecessary because .net is a modern technology and we can do everything without using JavaScript just by using the styles in Razor pages. With that approach we have a great chance of passing Core Web Vitals without worrying about them, because of the much smaller amount of JavaScript loaded. For dynamic pages with a lot of logic, like the cart or checkout page, we already need a framework in which the frontend developer can communicate with the backend. Here we wanted to choose the lightest possible framework that would provide responsiveness and a global state.
At Hatimeria we have extensive experience implementing the Hyva theme for Magento-based stores, so we decided to use our knowledge in projects with Optimizely.
The combination of Alpine.js and Tailwind CSS works very well there, so we decided to check out these technologies with Optimizely, since on paper it seems to be a very good combination and, in addition, it works well for many stores that run on Magento.
In summary, we chose Alpine.js and Tailwind CSS because we use a small amount of JavaScript and only load the styles that are used in our application, resulting in faster loading times and better performance.
Pros and cons of Tailwind CSS
Here are some pros and cons of using Tailwind CSS:
Pros:
- Rapid Development: Tailwind CSS allows developers to quickly build user interfaces by utilizing pre-defined utility classes. This speeds up the development process as you don't have to write custom CSS styles from scratch.
- Highly Customizable: Tailwind CSS provides a vast number of utility classes that can be combined and customized to create unique designs. It offers extensive control over spacing, typography, colors and more, allowing you to easily match your design requirements.
- Performance: Tailwind CSS is designed to be highly optimized for production use. By utilizing utility classes, you can eliminate unused CSS and keep the final bundle size minimal, resulting in faster page load times.
- Easy Maintenance: the CSS file contains the styles that are used in the files and automatically removes unnecessary styles without having to worry that removing a particular line will break the layout somewhere.
Cons:
- Conflicts in Git: can occur when multiple developers make changes to the same class and all styles are written in a single line. These conflicts may become more frequent with larger teams. However, the good news is that resolving them is not difficult.
- Styles added from the admin panel may not work: Tailwind classes may not work if the added classes in the admin panel are not previously used in the code and added in the generated CSS file.
- Learning Curve: While the utility-first approach of Tailwind CSS offers great flexibility, it can have a steep learning curve, especially for developers who are accustomed to traditional CSS frameworks.
- Lack of Free Design Constraints: While Tailwind CSS provides flexibility, it doesn't impose any design constraints or opinionated free components out of the box (That option is a paid extra). This means you'll have to design and structure your UI components from scratch, which may require additional effort and expertise.
Pros and cons of Alpine js
Here are some pros and cons of using Alpine.js:
Pros:
- Lightweight: Alpine.js is designed to be lightweight (14.1kB) and has a small footprint. It adds only a minimal amount of JavaScript code to your project, resulting in faster load times and improved performance.
- Familiar Syntax: The syntax of Alpine.js is similar to popular frontend frameworks like Vue.js, making it easier for developers already familiar with these frameworks to quickly grasp Alpine.js and start building interactive components. So far I have written frontend in Vue.js version 2, writing js is virtually identical, the only difference is that we do not have key words like data, methods, mounted, etc everything is written on one level. It took me several hours to change from Vue.js to Alpine.j
- Stable: The repository on github looks very good as it has 23.8k stars and 0 issues at the moment. In comparison, the Vue.js repository has 37.7k stars and 615 issues.
- Progressive Enhancement: Alpine.js follows a progressive enhancement approach, which means you can progressively add interactivity to your project without requiring a complete rewrite. You can selectively apply Alpine.js to specific elements and enhance the user experience without disrupting the existing functionality.
Cons:
- Learning Curve: While Alpine.js has a relatively low learning curve compared to more complex frameworks, developers who are new to JavaScript frameworks may still need to invest some time in understanding its concepts and syntax.
- Community and Ecosystem: Alpine.js has a growing community, but it may not have the same level of community support or extensive ecosystem as larger frameworks. This means that finding pre-built components or libraries specifically tailored for Alpine.js might be more challenging.
- JavaScript Dependency: Alpine.js relies on JavaScript to function, which means that if a user has disabled JavaScript in their browser, the interactivity provided by Alpine.js will not be available. This can be a limitation for projects that require broad accessibility or compatibility with older browsers.
Tailwind CSS in a .NET Optimizely project
Configuration
We did the whole configuration based on an article and the Tailwind documentation, so to sum up here are the steps to follow:
Run the command npm init -y to quickly and automatically create a package.json file for the project. Flag -y means "yes", which means that all configuration questions will be automatically accepted with default values.
npm init -yNext, install Tailwind and its dependencies.
npm install -D tailwindcss@latest postcss@latest autoprefixer@latest
Run the Tailwind initialization command `npx tailwind init -p`
npx tailwind init -pAfter running the Tailwind initialization command, two files should be generated: postcss.config.js and tailwind.config.js
Here is the configuration used in our project for those files:
postcss.config.js
module.exports = {
  plugins: {
    tailwindcss: { config: './tailwindcss-config.js' },
    'postcss-import': {},
    'tailwindcss/nesting': {},
    autoprefixer: {},
    ...(process.env.NODE_ENV === 'production' ? { cssnano: {} } : {}),
  },
};
tailwind.config.js
/** @type {import('tailwindcss').Config} */


module.exports = {
  content: [
    './Views/**/*.cshtml',
    './Features/**/*.cshtml',
    './Features/CMS/ContentAreaRenderer/ContentAreaItemRenderer.cs',
  ],
  theme: {
    extend: {},
  },
  variants: {
    extend: {},
  },
  plugins: [],
};
Tailwind CSS works by scanning all of your HTML files, JavaScript components and any other templates for class names, generating the corresponding styles and then writing them to a static CSS file. So it is even possible to generate CSS from a .cs file, when you add the paths in the content. In our project, in the ContentAreaItemRenderer.cs file, we added support for Display Options and the corresponding classes for the selected option.
  private static string GetCssClassForTag(string tagName)
{
    if (string.IsNullOrEmpty(tagName))
    {
        return string.Empty;
    }


    return tagName.ToLowerInvariant() switch
    {
        ContentAreaTags.FullWidth => "w-full",
        ContentAreaTags.WideWidth => "w-full lg:w-8/12",
        ContentAreaTags.HalfWidth => "w-full md:w-6/12",
        ContentAreaTags.NarrowWidth => "w-full md:w-6/12 lg:w-4/12",
        _ => string.Empty,
    };
}
Add the @tailwind directives for each of Tailwind’s layers to your main CSS file.
site.css
/*! @import */
@import "tailwindcss/base";
@import "tailwindcss/components";
@import "tailwindcss/utilities";
Add build scripts for Tailwind in package.json
"scripts": {
    "css:build": "npx tailwindcss -i ./wwwroot/css/site.css -o ./wwwroot/css/output.css --minify",
    "css:watch": "npx tailwindcss -i ./wwwroot/css/site.css -o ./wwwroot/css/output.css --watch"
},
css:build is a script for production with minify output
css:watch is a script for development
Then in your project .csproj add the configured npm commands to run automatically every time you build a project
  <Target Name="Tailwind" BeforeTargets="Build" Condition="'$(Configuration)' == 'Debug'">
    <Exec Command="npm run css:watch" />
  </Target>


  <Target Name="Tailwind" BeforeTargets="Build" Condition="'$(Configuration)' == 'Release'">
    <Exec Command="npm run css:build" />
  </Target>
Add import for the generated CSS file in View Layout
<head>
    <meta charset="utf-8">
    <meta http-equiv="X-UA-Compatible" content="IE=edge">
    <meta name="viewport" content="width=device-width, initial-scale=1, maximum-scale=1">

    @Html.CanonicalLink()
    @Html.AlternateLinks()
    @Html.RequiredClientResources("Header")

    <link rel="stylesheet" href="~/css/output.css" />
</head>
Cache
In a development environment, the provided code will function correctly if the "disabled cache" checkbox is selected in the network tab of the DevTools. However, in a production project, it's important to handle versioning of the CSS file to ensure that users are not using an outdated version.
Here's an improved version of the code that addresses this issue by generating an ID based on the latest modification of the CSS file:
namespace Web.Infrastructure
{
    public static class CssHelper
    {
        private static string? _cssFileVersion;

        public static string GetCssFileVersion()
        {
            if (_cssFileVersion == null)
            {
                var cssFilePath = "wwwroot/css/output.css";
                var cssFileLastModified = File.GetLastWriteTime(cssFilePath);
                _cssFileVersion = cssFileLastModified.ToString("yyyyMMddHHmmss");
            }

            return _cssFileVersion;
        }
    }
}
Updated import:
@using Web.Infrastructure;

<link rel="stylesheet" href="~/css/output.css?v=@CssHelper.GetCssFileVersion()" />
In this code, you can adjust the cssFilePath variable to the appropriate path of your CSS file. The File.GetLastWriteTime() method retrieves the last modification time of the CSS file.
By calling the CssHelper.GetCssFileVersion() method in your CSHTML file as @CssHelper.GetCssFileVersion(), you will get a unique ID based on the last edit of the CSS file. This ensures the effective handling of caching and guarantees that users receive the latest version of the CSS file in a production environment.
Start using Tailwind in your CSHTML

Hot Reload
There is a package on NuGet called Tailwind.Extensions.AspNetCore that allows hot reload to work with CSHTML and makes life easier for frontend developers. It is worth noting that it is in beta version, but during development we didn't encounter major problems with its use except for the problems described in Limitation.
Configuration
In order to configure hot reloading you need to follow the steps below:
Instal package
dotnet add package Tailwind.Extensions.AspNetCore --version 1.0.0-beta3Add configuration in Startup.cs
Add the npm command you configured in package.json to run Tailwind in development mode. In our application it is “css:watch”.
using Tailwind;

namespace Web;

public class Startup
{
    public void Configure(IApplicationBuilder app, IWebHostEnvironment env)
    {
        if (env.IsDevelopment())
        {
            app.RunTailwind("css:watch");
        }
    }
}
The RunTailwind method gets two parameters:
- string npmScript,
- string workingDir = "./"
The default value for workingDir is “./” so we omitted it in Startup.cs
Limitation
There is a known issue with using Visual Studio 2022 because hot reloading does not always work. We also experienced this when building our application.
So a much better solution is to use the command
dotnet watch runand make changes in Visual Studio Code.
Alpine js in a .net Optimizely project
Configuration
Adding Alpine.js to a project is very simple. We chose the from a script tag way to add in the head tag. In Views we added it once in the Layout:
<head>
    <meta charset="utf-8">
    <meta http-equiv="X-UA-Compatible" content="IE=edge">
    <meta name="viewport" content="width=device-width, initial-scale=1, maximum-scale=1">

    @Html.CanonicalLink()
    @Html.AlternateLinks()
    @Html.RequiredClientResources("Header")

    <link rel="stylesheet" href="~/css/output.css" />

    //alpine import
     <script defer src="https://cdn.jsdelivr.net/npm/alpinejs@3.12.1/dist/cdn.min.js"></script>
    // import api helper
    <script src="~/js/store/api.js"></script>
</head>
After that we have full access to all the features offered by Alpine.js.
Writing code
In the case of Alpine.js, we have two options for writing code in CSHTML files or creating new js files and adding them in a script tag. In our project we decided to add simple functionality like opening, closing the mobile menu in CSHTML, and all logic for checkout or the cart in JavaScript files. Since it had more than 300 lines of code we wanted to separate the code in CSHTML to make it more readable. In these files we add the whole logic to the Alpine store and in CSHTML we added the appropriate import in the script tag.
CSHTML example
<div
    class="z-20 order-2 sm:order-1 lg:order-2 navigation lg:hidden"
    x-data="initMenuMobile()">
    <div
        class="bg-container-lighter"
        x-bind:class="{'h-screen overflow-x-hidden overflow-y-auto fixed top-0 left-0 w-full' : open}"
        x-on:keydown.window.escape="open=false"
        x-on:toggle-mobile-menu.window="open = !open">
         //mobile menu
    </div>
</div>

<script>
    'use strict';
    function initMenuMobile() {
        return {
            open: false,
        }
    }
</script>
JavaScript files
checkout.js
document.addEventListener('alpine:init', () => {
  Alpine.store('checkout', {
    isLoading: false,
    //...
  });
});
checkout.cshtml
@model CheckoutPage;

<script defer src="~/js/store/checkout.js"></script>

<section x-data class="py-12 relative flex flex-col lg:flex-row lg:gap-10" x-bind:class="{'blur pointer-events-none' : $store.checkout.isLoading }">
</section>
$store.checkout.isLoading is a boolean responsible for loading a state on action like adding a shipping address, choosing a shipping method etc…
The Alpine Store can be used for Vue.js mixins. For example in our application we use fetch and every time we would have to repeat the logic for it by attaching anti-forgery token in headers. Instead we created an API helper file for fetch.
api.js
document.addEventListener('alpine:init', () => {
  Alpine.store('apiHelper', {
    REQUEST_VERIFICATION_TOKEN: document.querySelector('[name=__RequestVerificationToken]')
      ? document.querySelector('[name=__RequestVerificationToken]').getAttribute('value')
      : '',
    async fetch(options) {
      const requestOptions = {
        url: options.url || '',
        method: options.method || 'GET',
        body: options.body || null,
        headers: options.headers || {},
        prefix: options.prefix || `/api/${window.GLOBAL_LOCALE}/`
      };

      try {
        const response = await fetch(`${window.location.origin}${requestOptions.prefix}${requestOptions.url}`, {
          method: requestOptions.method,
          headers: {
            'Content-Type': 'application/json',
            ...requestOptions.headers,
            RequestVerificationToken: this.REQUEST_VERIFICATION_TOKEN,
          },
          body: requestOptions.body,
        });
        return response;
      } catch (error) {
        // handle exception
      }
    },
  });
});
checkout.js
 async loadShippingMethods() {
  try {
    this.startLoading();
    const options = {
      url: 'checkout/shipping/methods',
    };
    const response = await Alpine.store('apiHelper').fetch(options);
    if (response.status !== 200) {
      this.initErrorMessages();
    }
    const data = await response.json();

    this.shippingMethods = data || [];
    this.stopLoading();
  } catch (error) {
    this.initErrorMessages();
  }
},
With this approach when we want to change something in fetch like adding default headers, we can do it in one place.
Cache
<script defer src="~/js/store/checkout.js"></script>The code provided may lead to production issues due to the lack of versioning for the JavaScript file. This can cause caching problems for end users. To address this, we have a couple of potential solutions:
Option 1: Implement versioning based on the last edit of each file, similar to how we handle styles. This way, each file will have a unique version, allowing for effective cache management.
Option 2: Alternatively, we can opt for a uniform versioning approach where all files receive the same version number. In this case, we would need to increment the version number with each deployment. One possible approach is to base the version on the Assembly of Startup.cs or Program.cs.
By implementing one of these solutions, we can ensure proper cache handling and mitigate potential issues in production caused by outdated JavaScript files.
Let me know your thoughts on which option would work best for your project.
Limitations of Alpine.js in .net
In CSHTML files, symbols like "@" and ":" have special meanings in Razor's syntax. Therefore, using shorthand syntax for x-bind (using ":") and x-on (using "@") in CSHTML files will not work as expected. These symbols are reserved for Razor's syntax and cannot be used as shorthand syntax for Alpine.js directives in CSHTML files.
To ensure proper usage, developers should remember not to use shorthand syntax for x-bind and x-on in CSHTML files and instead use the full syntax provided by Alpine.js for these directives. This will prevent conflicts with Razor's syntax and ensure the correct interpretation of the code.
Nevertheless, there is also the option to use the shorthand syntax for x-on via “@@”, but this can lead to confusion and in our case we chose not to use shorthand syntax.
Results - performance
We expected good results on Lighthouse but didn't think they would be that good without thinking too much about performance when developing the application. Every page on mobile and desktop achieves a score of 100.
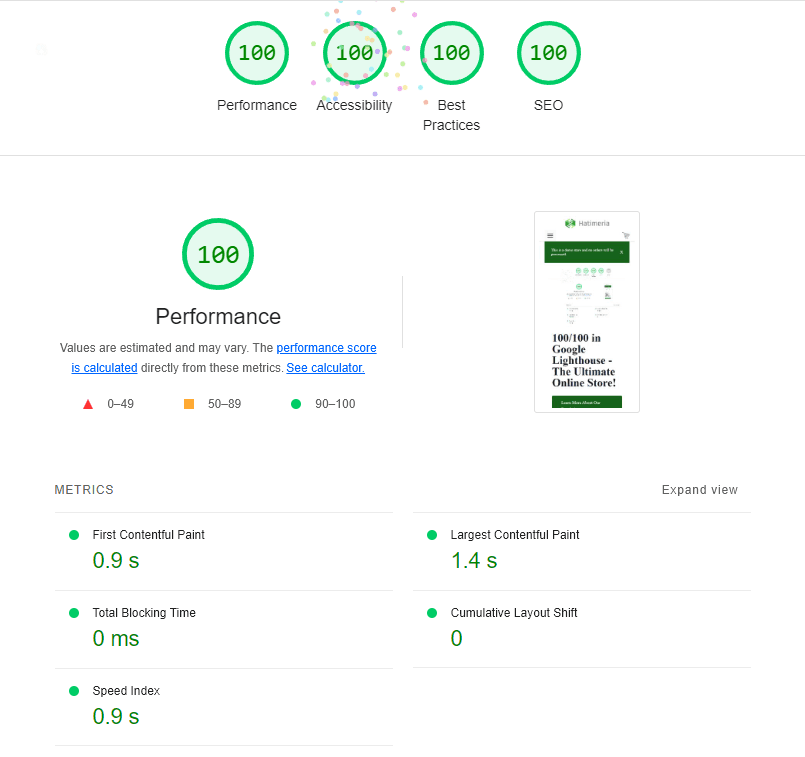
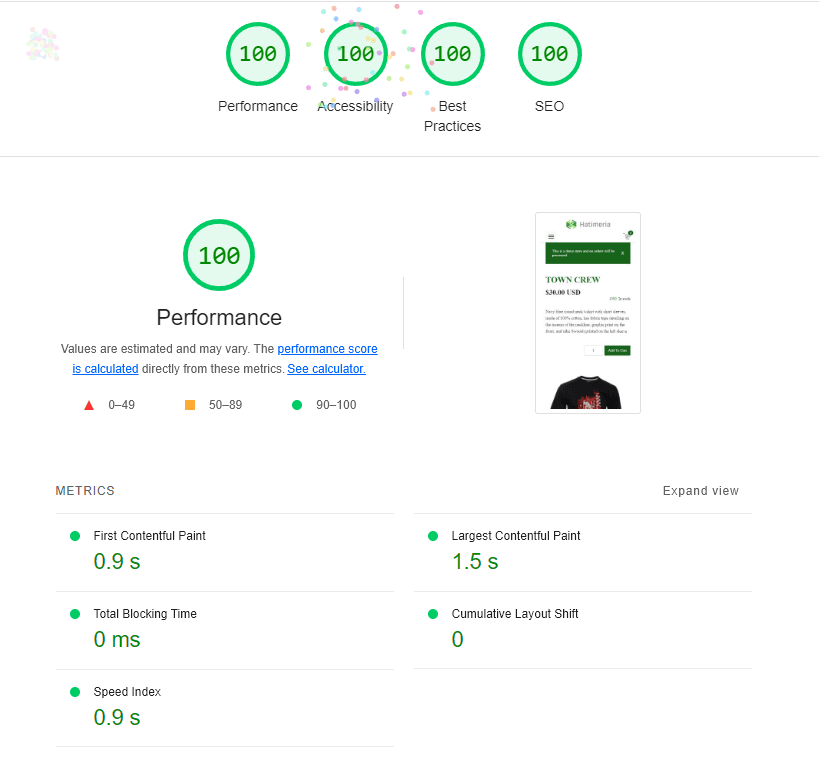
In summary, my transition from Vue.js to Alpine.js was very smooth and the performance results are much better.
Conclusion
If you have encountered any problems while trying to set up your project I will be more than happy to help you resolve them.
Nice to see more people getting into Tailwind CSS!
For the link and script elements in head I find it nice to just use the built-in asp-append-version="true".
Absolutely, Tailwind CSS is a fantastic solution, and I try to use it wherever I can! 😃 Especially with the recent addition of the UI element library for Alpine.js and Tailwind CSS, complete with ready-made components at https://devdojo.com/pines.
Regarding "asp-append-version='true,'" it's definitely the easiest way to manage versioning for links and scripts. Thanks a lot for this tip!